SageMaker ML Integration
Fiddler offers seamless integration with Amazon SageMaker. This guide will walk you through how you can easily upload a model trained with SageMaker into Fiddler.
Before proceeding with this walkthrough, make sure you have already
- Uploaded a baseline dataset
- Trained a model using SageMaker
Getting your model from S3
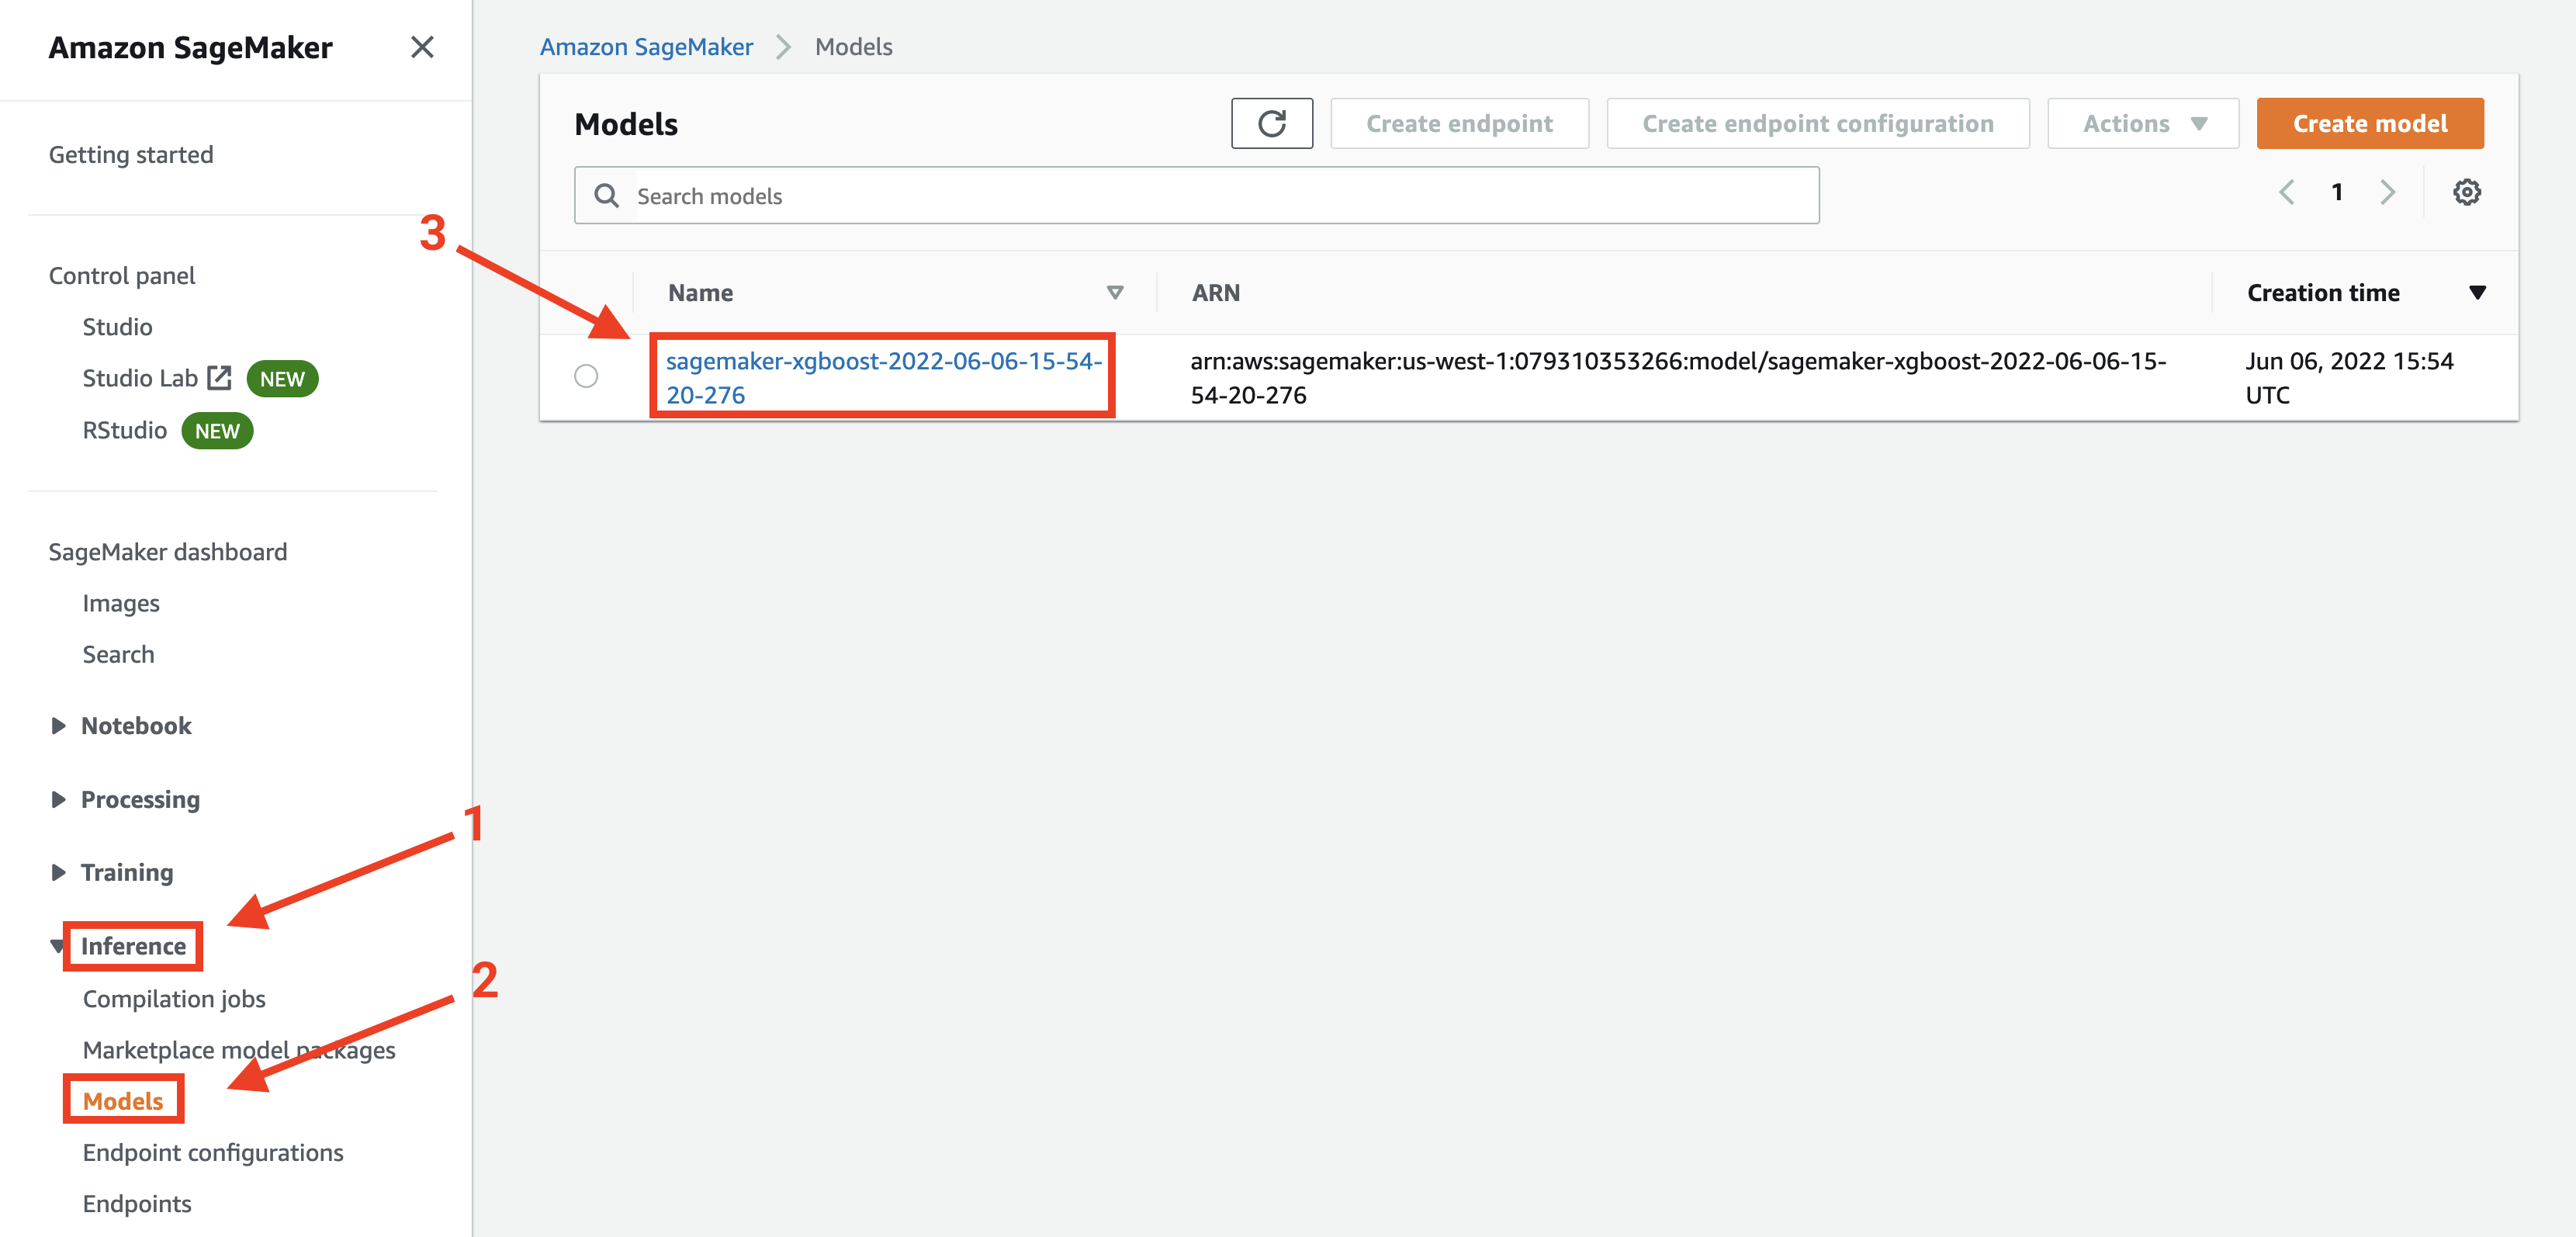
In order to download your model, navigate to the AWS console and go to SageMaker. On the left, click "Inference" and go to "Models". Then select the model you want to upload to Fiddler.

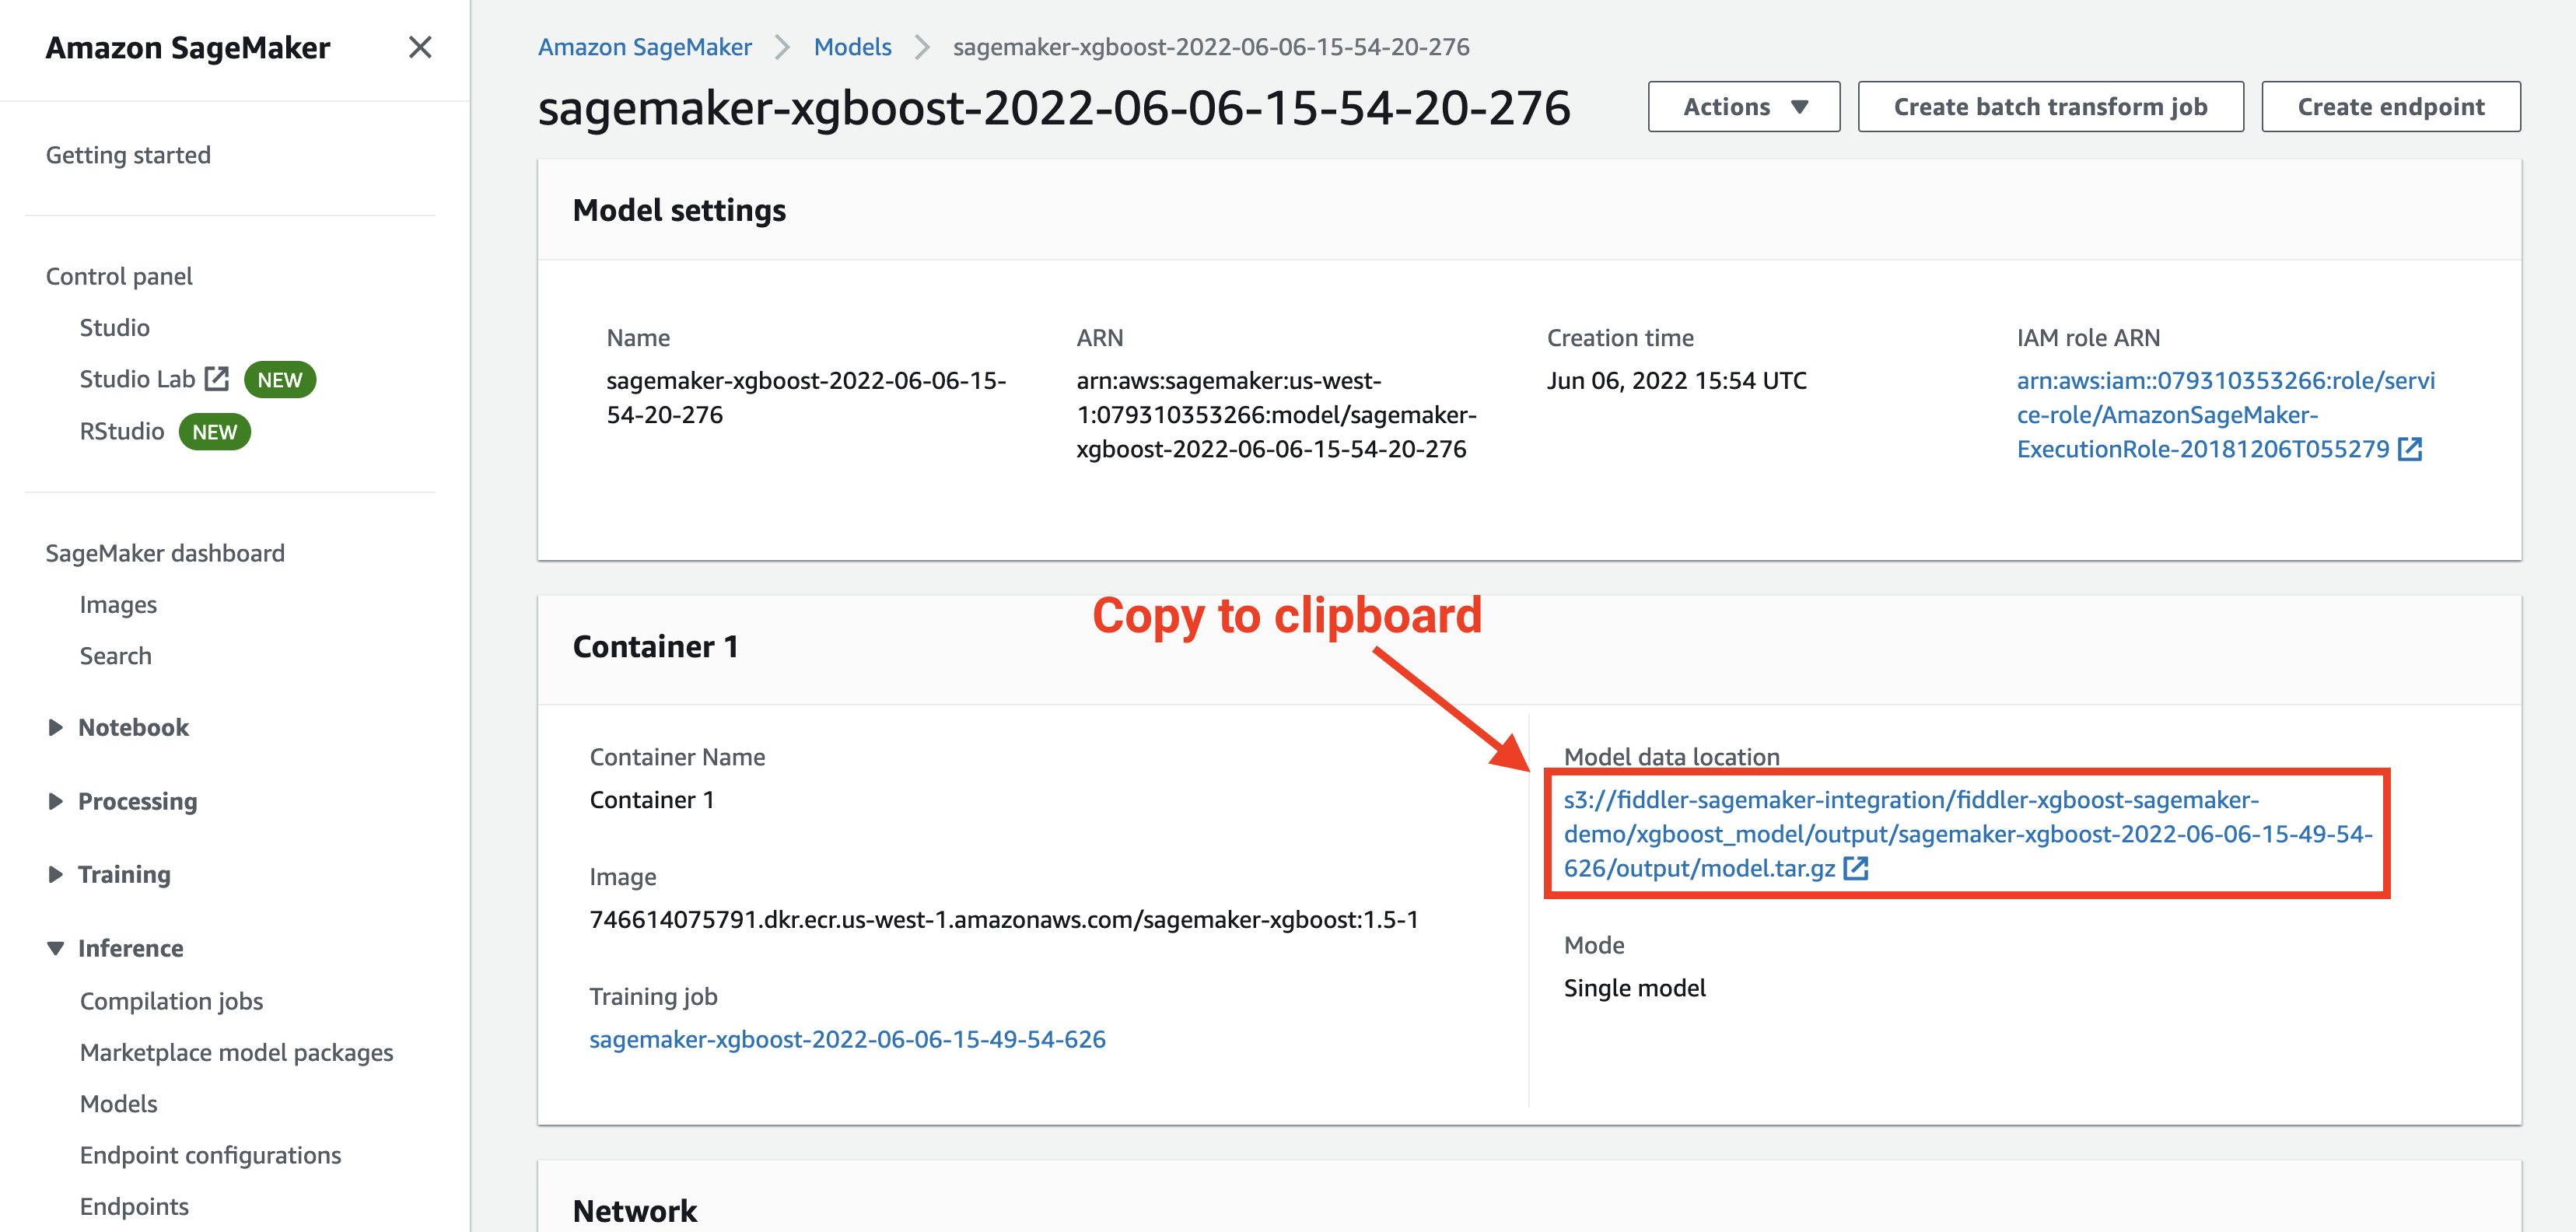
Copy the Model data location to your clipboard.

Downloading your model with Python
Now, from a Python environment (Jupyter notebook or standard Python script), paste the Model data location you copied into a new variable.
MODEL_S3_LOCATION = 's3://fiddler-sagemaker-integration/fiddler-xgboost-sagemaker-demo/xgboost_model/output/sagemaker-xgboost-2022-06-06-15-49-54-626/output/model.tar.gz'
Then extract the bucket name and file key into their own variables.
MODEL_S3_BUCKET = 'fiddler-sagemaker-integration'
MODEL_S3_KEY = 'fiddler-xgboost-sagemaker-demo/xgboost_model/output/sagemaker-xgboost-2022-06-06-15-49-54-626/output/model.tar.gz'
Let's also import a few packages we will be using.
import numpy as np
import pandas as pd
import boto3
import tarfile
import yaml
import xgboost as xgb
import fiddler as fdl
After that, initialize an S3 client with AWS using boto3.
AWS_PROFILE = 'my_profile'
AWS_REGION = 'us-west-1'

session = boto3.session.Session(
    profile_name=AWS_PROFILE,
    region_name=AWS_REGION
)

s3_client = session.client('s3')
We're ready to download! Just run the following code block.
s3_client.download_file(
    Bucket=MODEL_S3_BUCKET,
    Key=MODEL_S3_KEY,
    Filename='model.tar.gz'
)

tarfile.open('model.tar.gz').extractall('model')
This will save the model into a directory called model.
!!! note
It's important to keep track of the name of your saved model file. Check the model directory in your local filesystem to see its name.
Upload your model to Fiddler
Now it's time to connect to Fiddler. For more information on how this is done, see Authorizing the Client.
URL = 'https://app.fiddler.ai'
ORG_ID = 'my_org'
AUTH_TOKEN = 'xtu4g_lReHyEisNg23xJ8IEex0YZEZeeEbTwAsupT0U'

fiddler_client = fdl.FiddlerApi(
    url=URL,
    org_id=ORG_ID,
    auth_token=AUTH_TOKEN
)
Then, get the dataset info from your baseline dataset by using client.get_dataset_info.
After that, construct a model info object and save it as a .yaml file into the model directory.
PROJECT_ID = 'example_project'
DATASET_ID = 'example_data'

dataset_info = fiddler_client.get_dataset_info(
    project_id=PROJECT_ID,
    dataset_id=DATASET_ID
)

model_info = fdl.ModelInfo.from_dataset_info(
    dataset_info=dataset_info,
    dataset_id=DATASET_ID,
    target='target_column',
    outputs=['output_column']
)

with open('model/model.yaml', 'w') as yaml_file:
    yaml.dump({'model': model_info.to_dict()}, yaml_file)
The last step is to write our package.py.
%%writefile model/package.py

import numpy as np
import pandas as pd
from pathlib import Path
import xgboost as xgb

import fiddler as fdl

PACKAGE_PATH = Path(__file__).parent

class ModelPackage:

    def __init__(self):

        self.model_path = str(PACKAGE_PATH / 'xgboost-model') # This is the name of your model file within the model directory
        self.model = xgb.Booster()
        self.model.load_model(self.model_path)

        self.output_columns = ['output_column']

    def transform_input(self, input_df):
        return xgb.DMatrix(input_df)

    def predict(self, input_df):
        transformed_input = self.transform_input(input_df)
        pred = self.model.predict(transformed_input)
        return pd.DataFrame(pred, columns=self.output_columns)

def get_model():
    return ModelPackage()
Now, go ahead and upload!
MODEL_ID = 'sagemaker_model'

fiddler_client.upload_model_package(
    artifact_path='model',
    project_id=PROJECT_ID,
    model_id=MODEL_ID
)
Updated 4 months ago
