Overview
Single Sign-On (SSO) authentication allows users to access Fiddler using their existing organizational credentials from identity providers like Okta, Microsoft Entra ID, Google, and PingOne. SSO streamlines user access and reduces password management overhead.When to Use SSO Authentication
SSO authentication is ideal for:- Organizations with existing identity providers
- Environments requiring centralized user management
- Compliance requirements mandating enterprise authentication
- Large user bases where manual user provisioning is impractical
How SSO Works with Fiddler
User Provisioning
Automatic User Creation: When users successfully authenticate through your SSO provider for the first time, Fiddler automatically creates their user account with basic profile information. No Manual Creation Required: Unlike email authentication, SSO users don’t need to be manually created in the AuthN console—they gain access automatically upon successful SSO authentication.Note that auto-provisioned users will be created with the Fiddler Org Member role by default. Edit a user’s Organization role in the Access tab of the Settings page.
Authentication Flow
- User Access: User navigates to Fiddler login page
- SSO Redirect: User clicks “Sign in with SSO” and is redirected to your identity provider
- Identity Provider Authentication: User authenticates with their organizational credentials
- Automatic Provisioning: If first login, Fiddler creates the user account automatically
- Access Granted: User gains access to Fiddler as an Org Member and potentially additional privileges if Group Syncing is implemented
Supported Identity Providers
Fiddler supports major enterprise identity providers through industry-standard protocols:SSO Configuration Process
Prerequisites
Before configuring SSO, ensure you have:- Administrative access to your identity provider
- Access to the Fiddler AuthN management console
- Access to the AuthN user account having the “Org Owner” role
- Required information from your identity provider (client IDs, metadata URLs, certificates)
General Configuration Steps
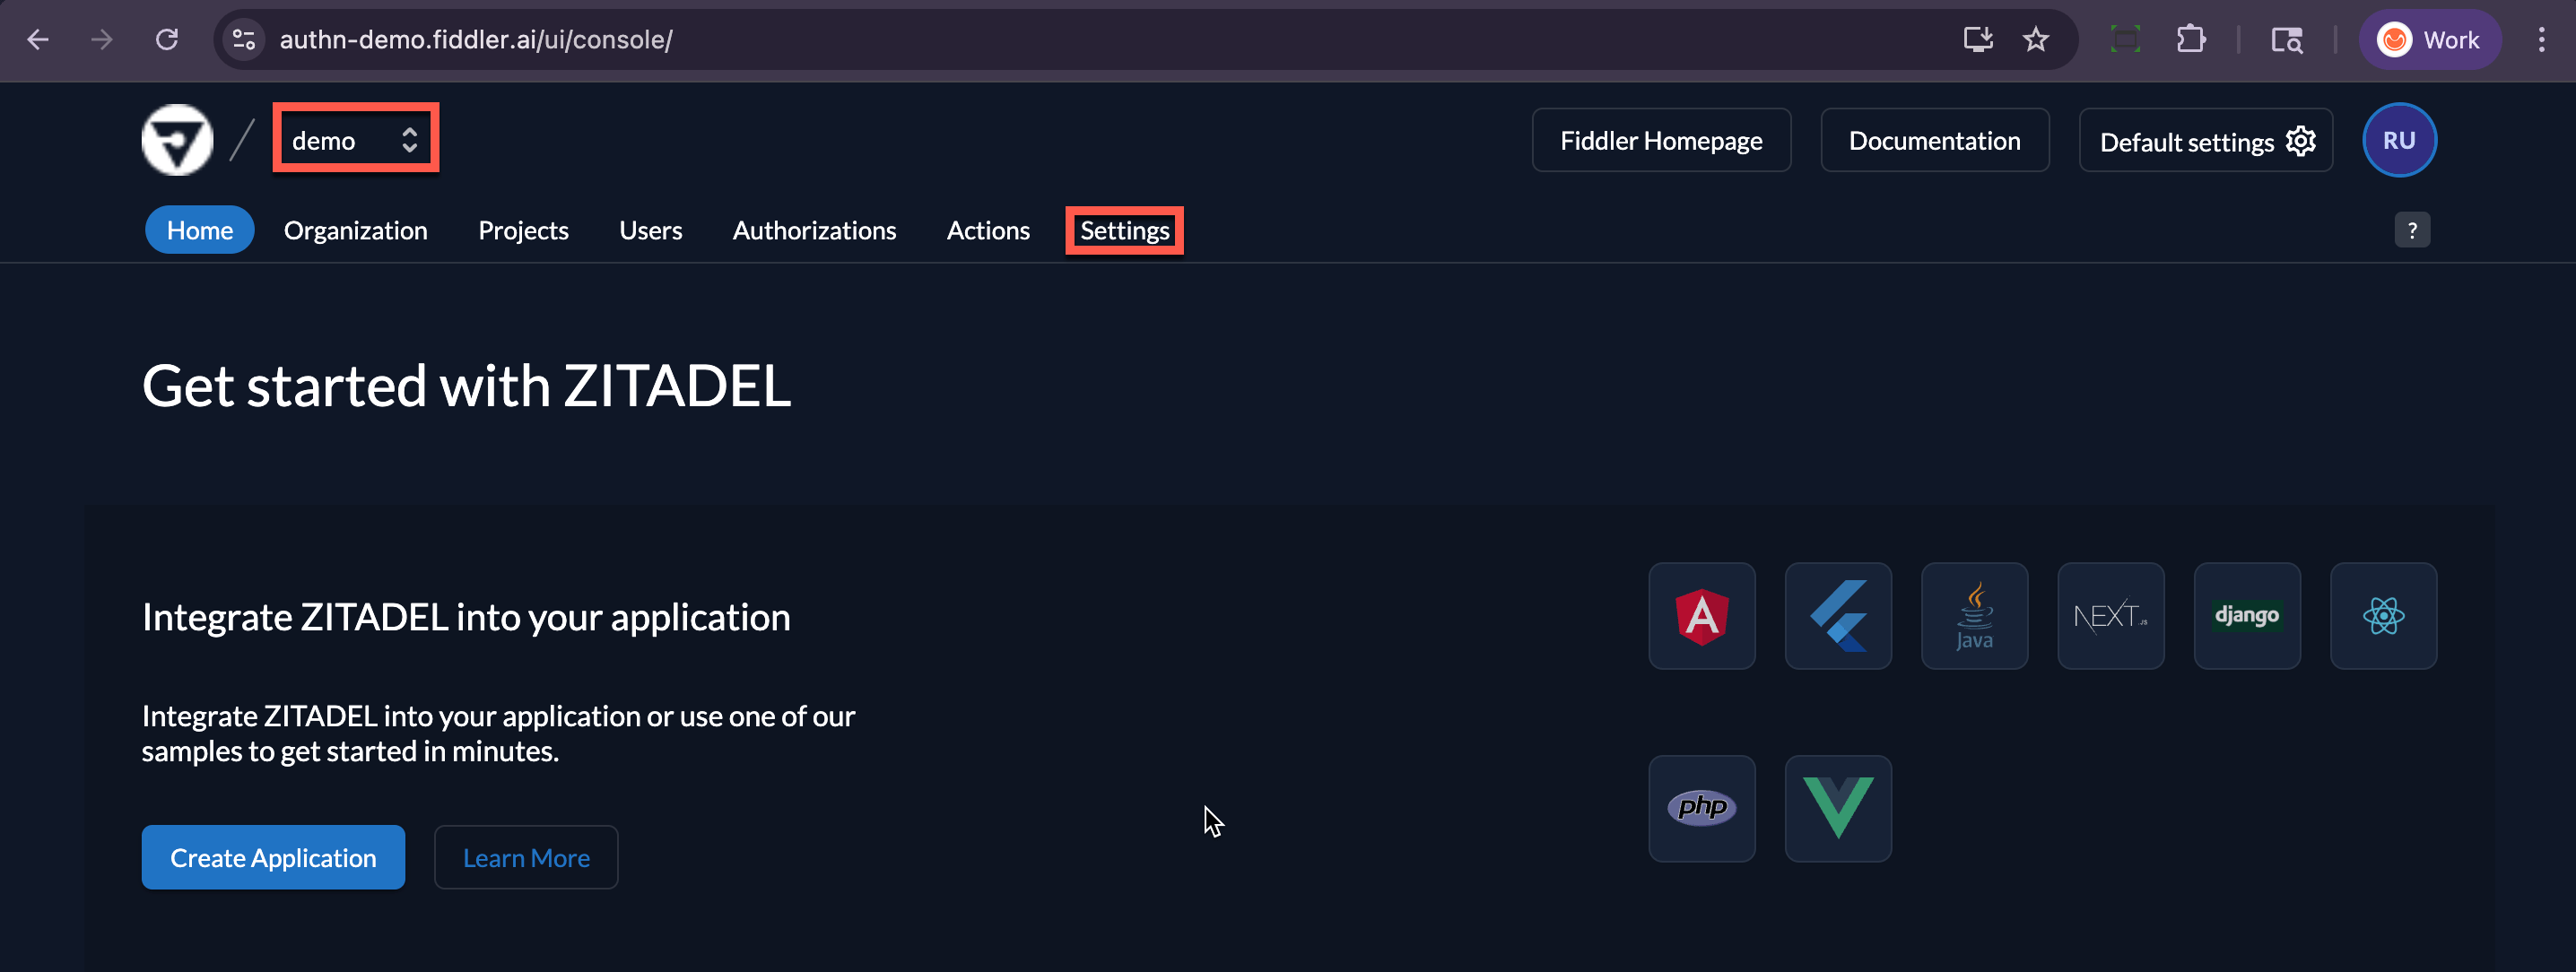
These are the basic steps to follow for most IdPs. Follow the specific guide for your required IdP and protocol. Step 1: Access Authentication Management Console-
Log into the AuthN authentication management console

-
Select your customer organization from the dropdown
-
Navigate to Settings > Login and Access > Identity Providers
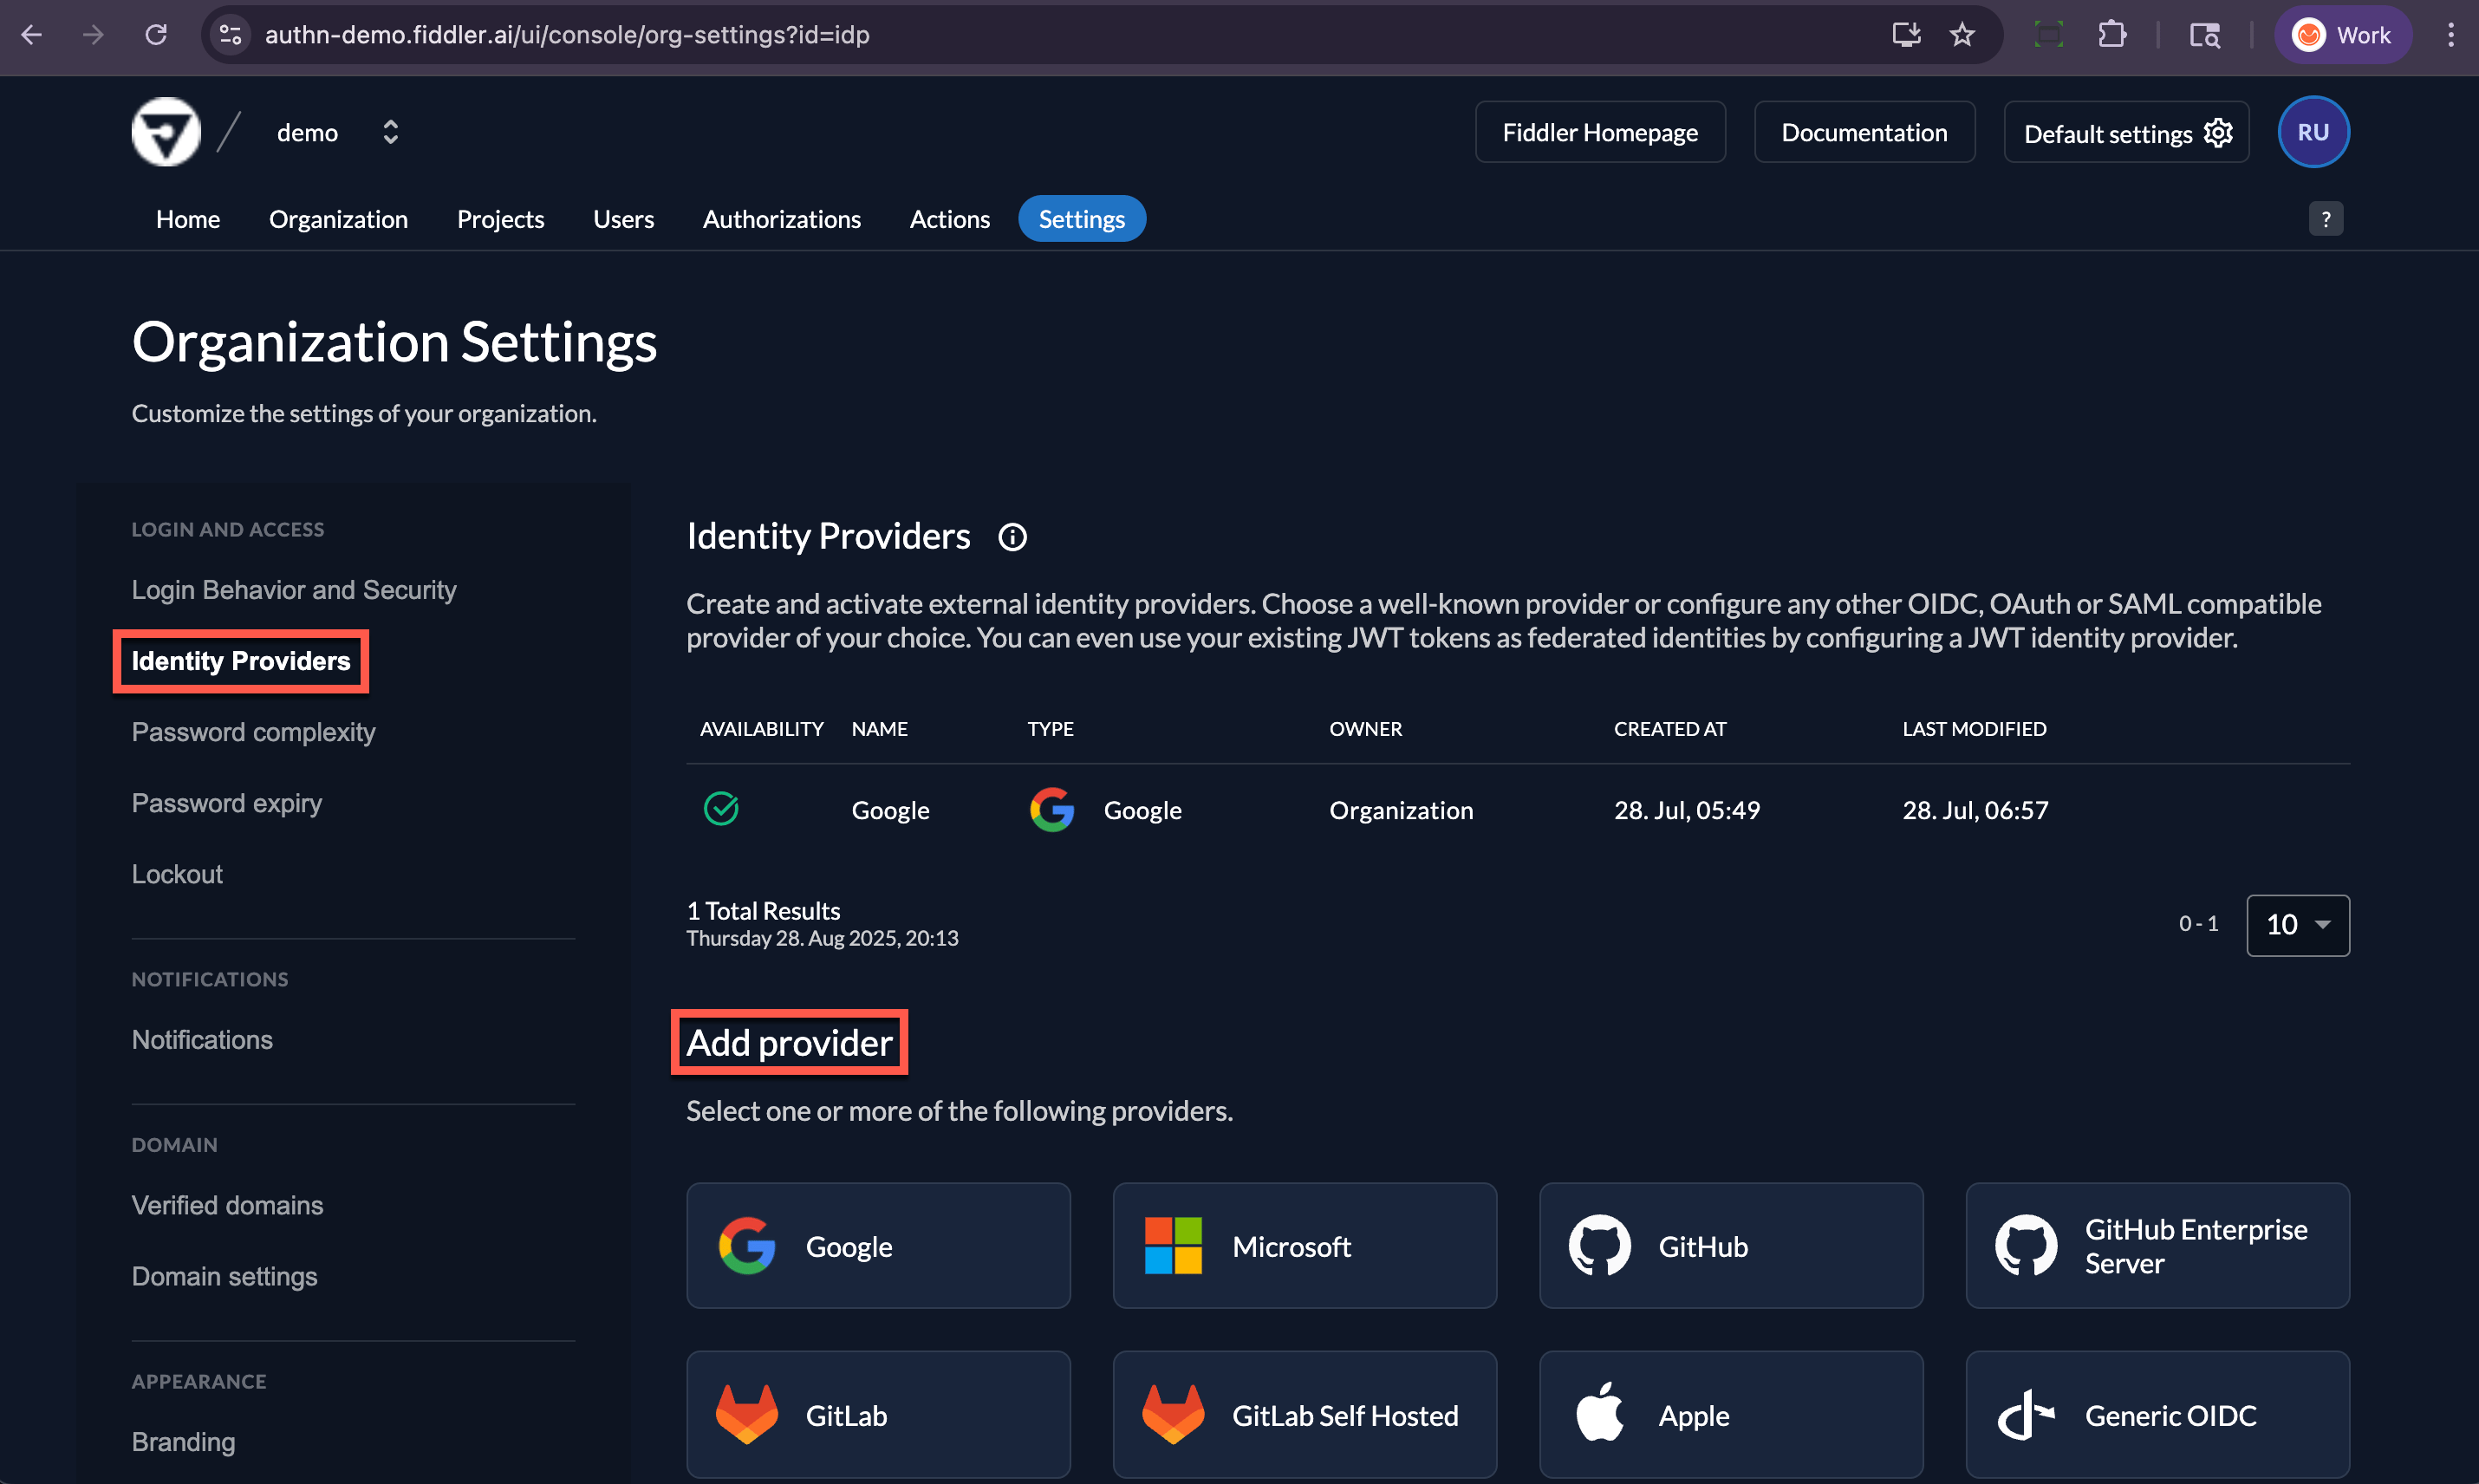
- Select your desired provider by selecting its icon in the Add Provider section
- Provider Name: Enter a descriptive name for your SSO integration
- Copy AuthN Settings: If required, copy AuthN settings to use in creating the application in your IdP
- IdP Required Fields: Populate your IdP’s required fields
- Connection Details: Copy required settings from your IdP:
- Client ID or Application ID
- Metadata URL or Issuer URL
- Client Secret (if required)
- Certificate information (for SAML)
- ✅ Enable “Automatic creation” - Creates new users on first successful login
- ✅ Enable “Automatic update” - Updates user information from identity provider
- ✅ Select “Check for existing username” - Links identities to existing accounts when appropriate
- First Name (
firstName,given_name) - Last Name (
lastName,family_name) - Email Address (
email)
- Groups (
groups) - For automated group-based access control see Mapping LDAP Groups guide
- Paste the Fiddler-provided script into the text area
- Paste the script name into the Name text box
- Set the Trigger Type option per the guide
- Set the Actions dropdown option per the guide
- Save your SSO configuration
- Test authentication with a sample user account
- Verify user information is properly mapped
- Confirm automatic provisioning works as expected
Group Synchronization
Supported Providers
Group synchronization is available for these identity providers:- Okta (OIDC and SAML)
- Microsoft Entra ID (OIDC and SAML, with proper configuration)
- PingOne (SAML)
User Management with SSO
Automatic User Provisioning
First Login Process:- User authenticates successfully through SSO
- Fiddler automatically creates user account with information from the IdP
- User receives default organization member role (the very first user to login will be assigned the Org Admin role)
- Additional permissions can be assigned through Fiddler teams or individual roles
- User information automatically updates from the IdP on each login
- Group memberships sync automatically (if configured)
- User status changes (deactivation/reactivation) can be managed through the IdP (note that Fiddler deactivates user accounts rather than deletes)
Mixed Authentication Environments
Combining SSO and Email Authentication
Organizations can use both SSO and email authentication simultaneously:- SSO Users: Automatically provisioned from identity provider
- Email Users: Manually added through the AuthN management console
- Separate Login Paths: Users choose appropriate authentication method at login if more than one path has been enabled
User Account Constraints
- Single Authentication Method: Each user account uses either SSO or email authentication, not both
- Account Linking: Existing email-authenticated users can be linked to SSO identities under specific conditions
Troubleshooting Common Issues
External User Not Found
If you see the “External User Not Found” screen after SSO login, follow these steps in order: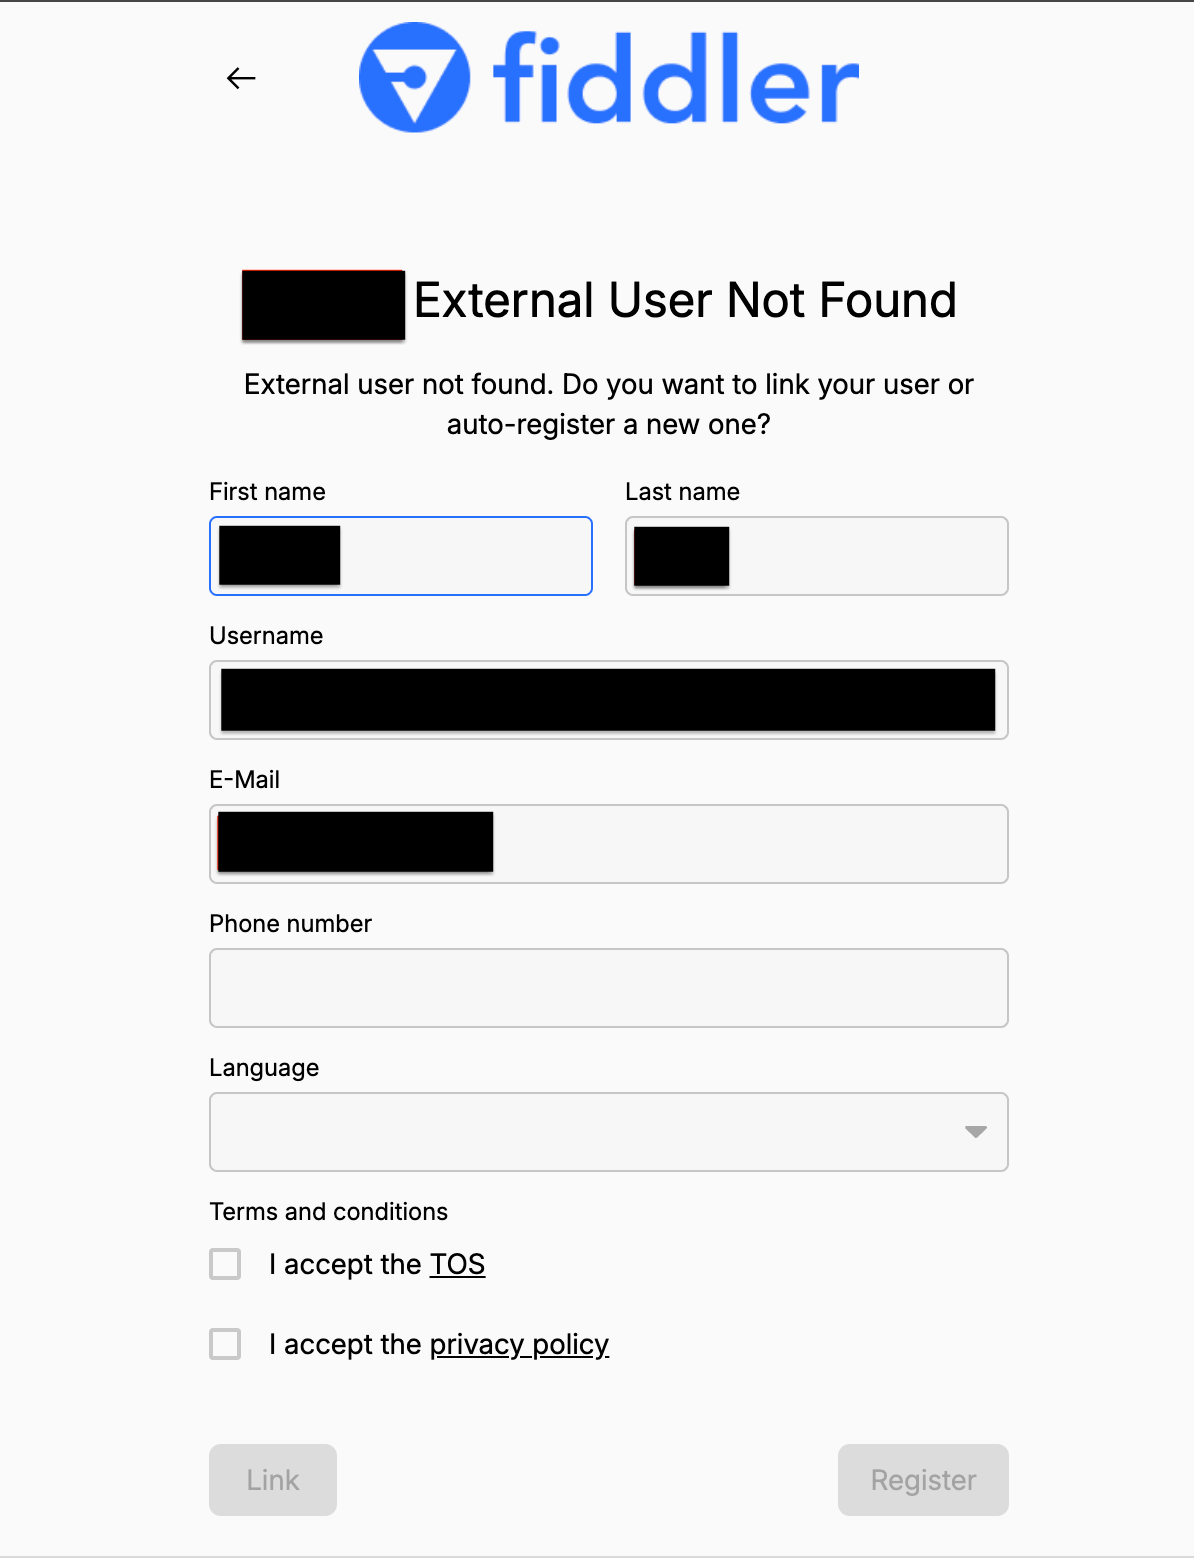
- Enable the Automatic creation toggle — creates a Fiddler user on first sign-in
- Enable the Automatic update toggle — syncs profile fields (name, email) on subsequent sign-ins
- Set the Determines whether an identity will be prompted to be linked to an existing account dropdown to Check for existing username — matches the incoming identity to an existing user before creating a duplicate
- Your identity provider is not configured to pass the attributes that the Fiddler action script expects (e.g., for SAML:
firstName,lastName,email,groups; for OIDC:given_name,family_name,email,groups) - The attribute names in your identity provider do not match the attribute names in the action script
- The action script was not copy-pasted correctly and has a syntax error — verify the script has no broken string literals or missing quotes
Debugging Identity Provider Attribute Responses
To confirm exactly what attributes your identity provider is returning, you can temporarily enable logging in the action script. Add the following lines after the variable declarations in your existing action script:Verifying SAML Assertion Attributes
For SAML identity providers, you can inspect the raw SAML assertion to verify that the expected attributes are present in the response from your identity provider:- Open Chrome DevTools (F12 or Ctrl+Shift+I) and navigate to the Network tab
- Enable Preserve log to retain network entries across redirects
- Attempt an SSO sign-in through your SAML identity provider
-
In the Network tab, locate the
POSTrequest tohttps://authn-{base_url}/ui/login/login/externalidp/saml/acs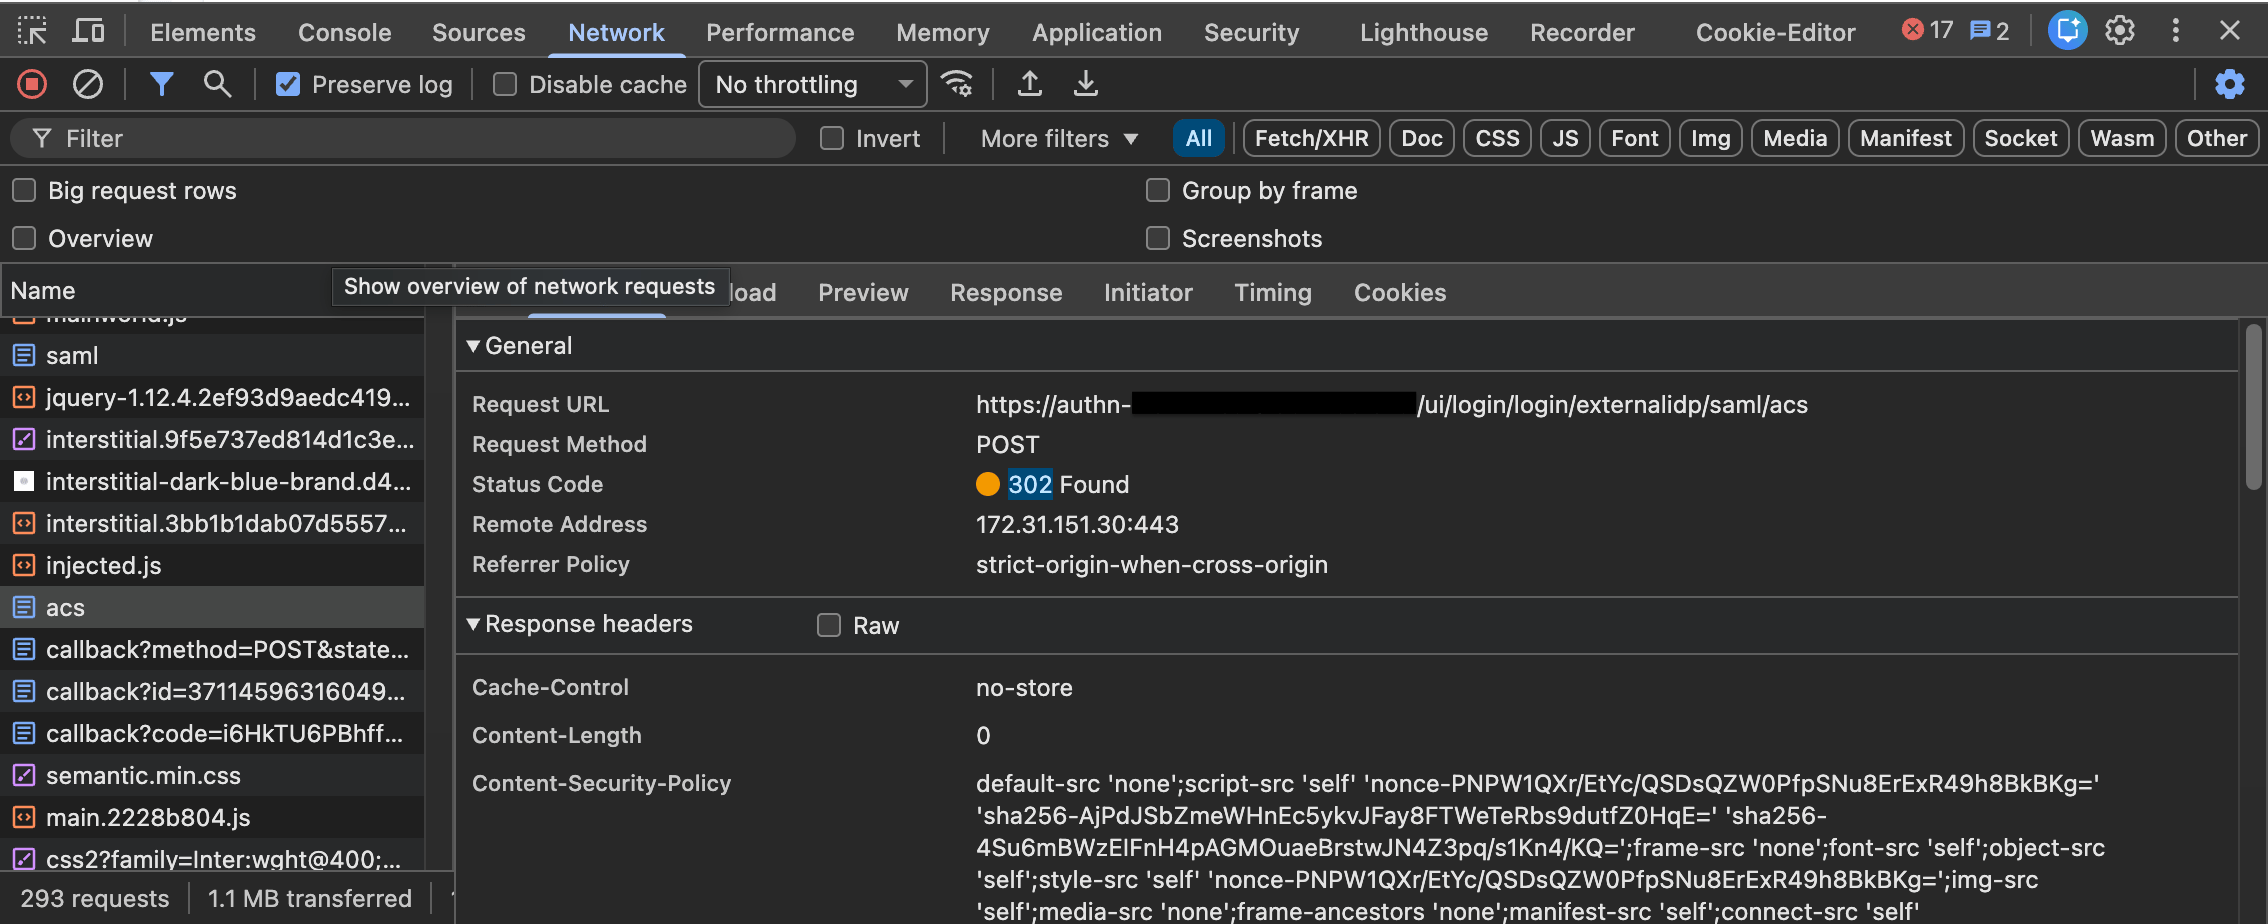
-
Open the Payload tab for that request and copy the
SAMLResponsevalue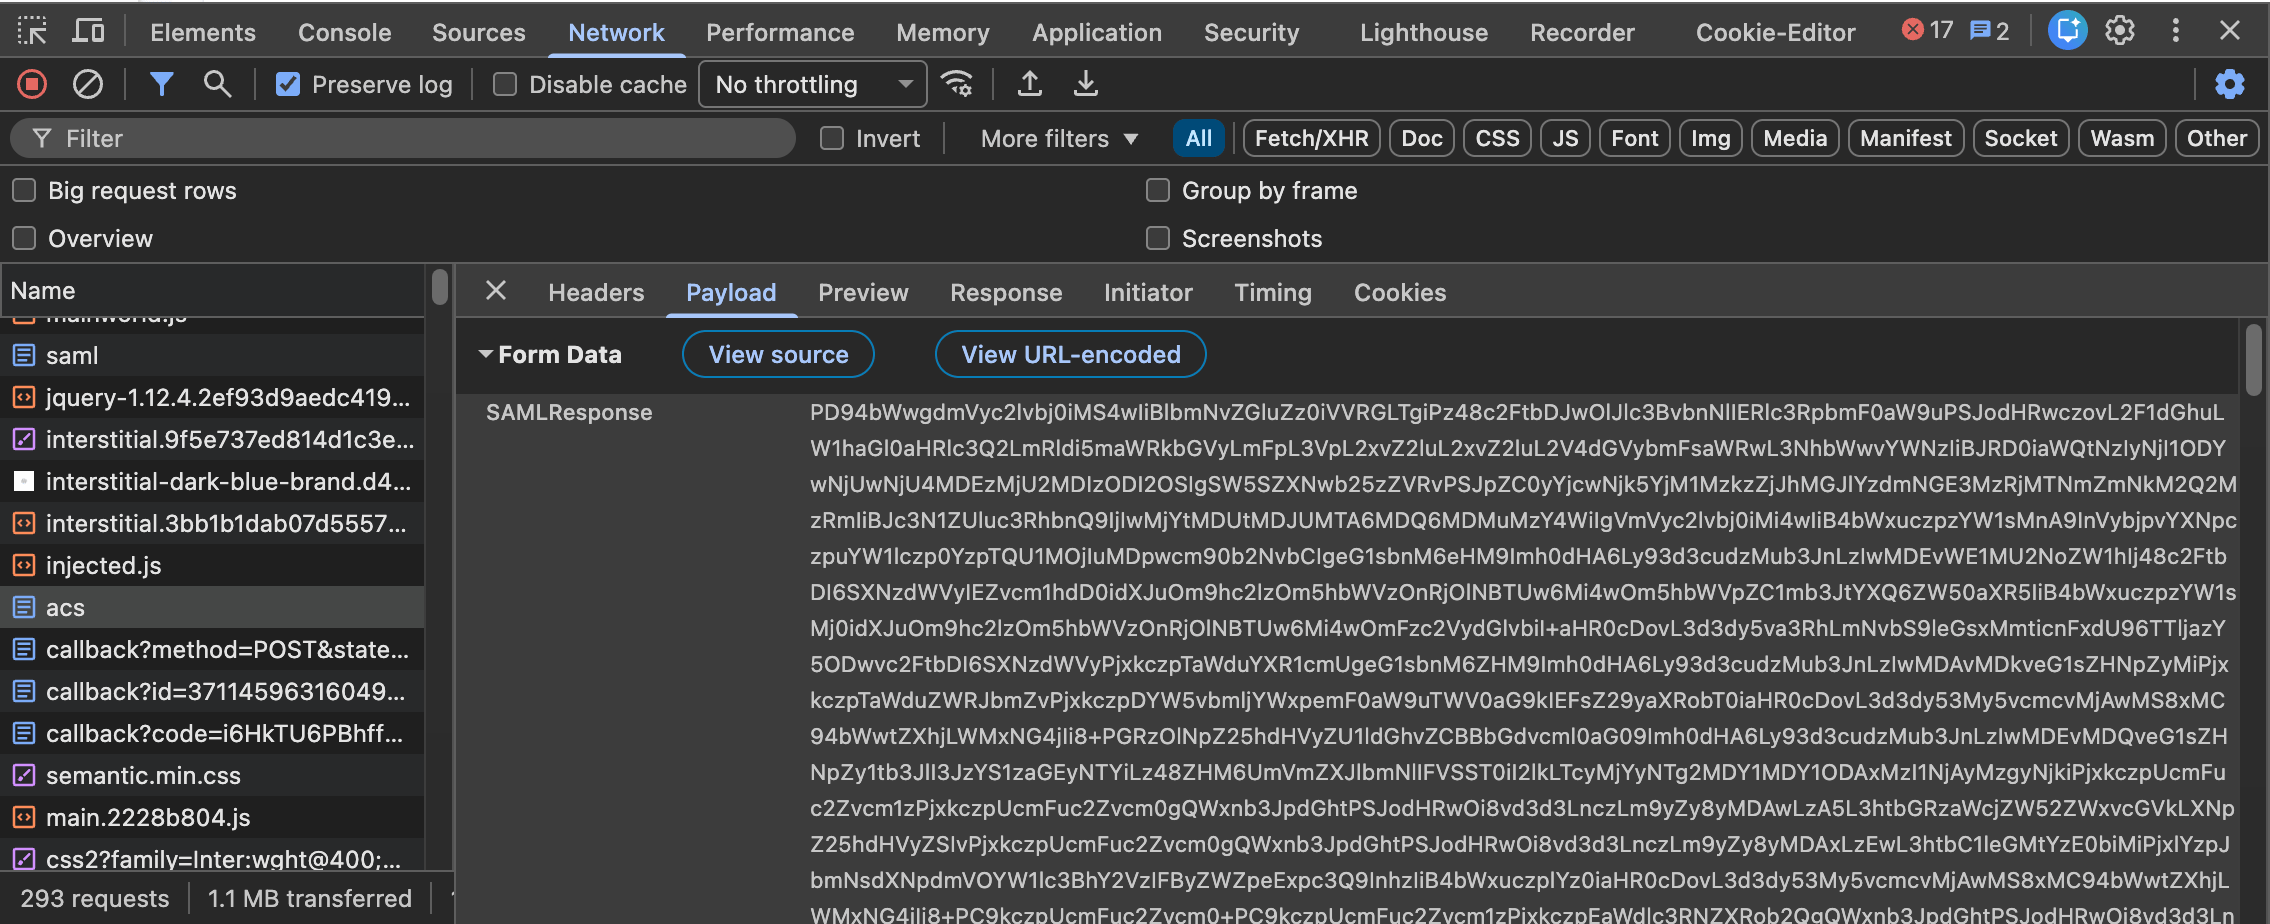
-
Decode the
SAMLResponselocally using your terminal — this returns an XML document.- macOS:
pbpaste | base64 -d - Linux:
xclip -selection clipboard -o | base64 -d(orxsel -b | base64 -d) - Cross-platform:
echo "<value>" | base64 -d - Windows PowerShell:
[System.Text.Encoding]::UTF8.GetString([System.Convert]::FromBase64String("<value>"))
- macOS:
-
In the decoded XML, verify that the attributes your action script expects (e.g., for SAML:
firstName,lastName,email,groups; for OIDC:given_name,family_name,email,groups) are present and contain the correct values
Authentication Failures
Redirect URI Mismatch:- Verify redirect URI in identity provider matches:
{fiddler_url}/api/sso/{provider}/callback - Check for HTTP vs. HTTPS mismatches
- Monitor client secret expiration dates (typically 6-24 months)
- Update expired certificates or secrets in both identity provider and Fiddler configuration
- For OIDC providers, see Rotating an OIDC Client Secret for step-by-step instructions
- Verify required attributes (
firstName,lastName,email) are included in authentication response - Check attribute name consistency between identity provider and Fiddler configuration
Rotating an OIDC Client Secret
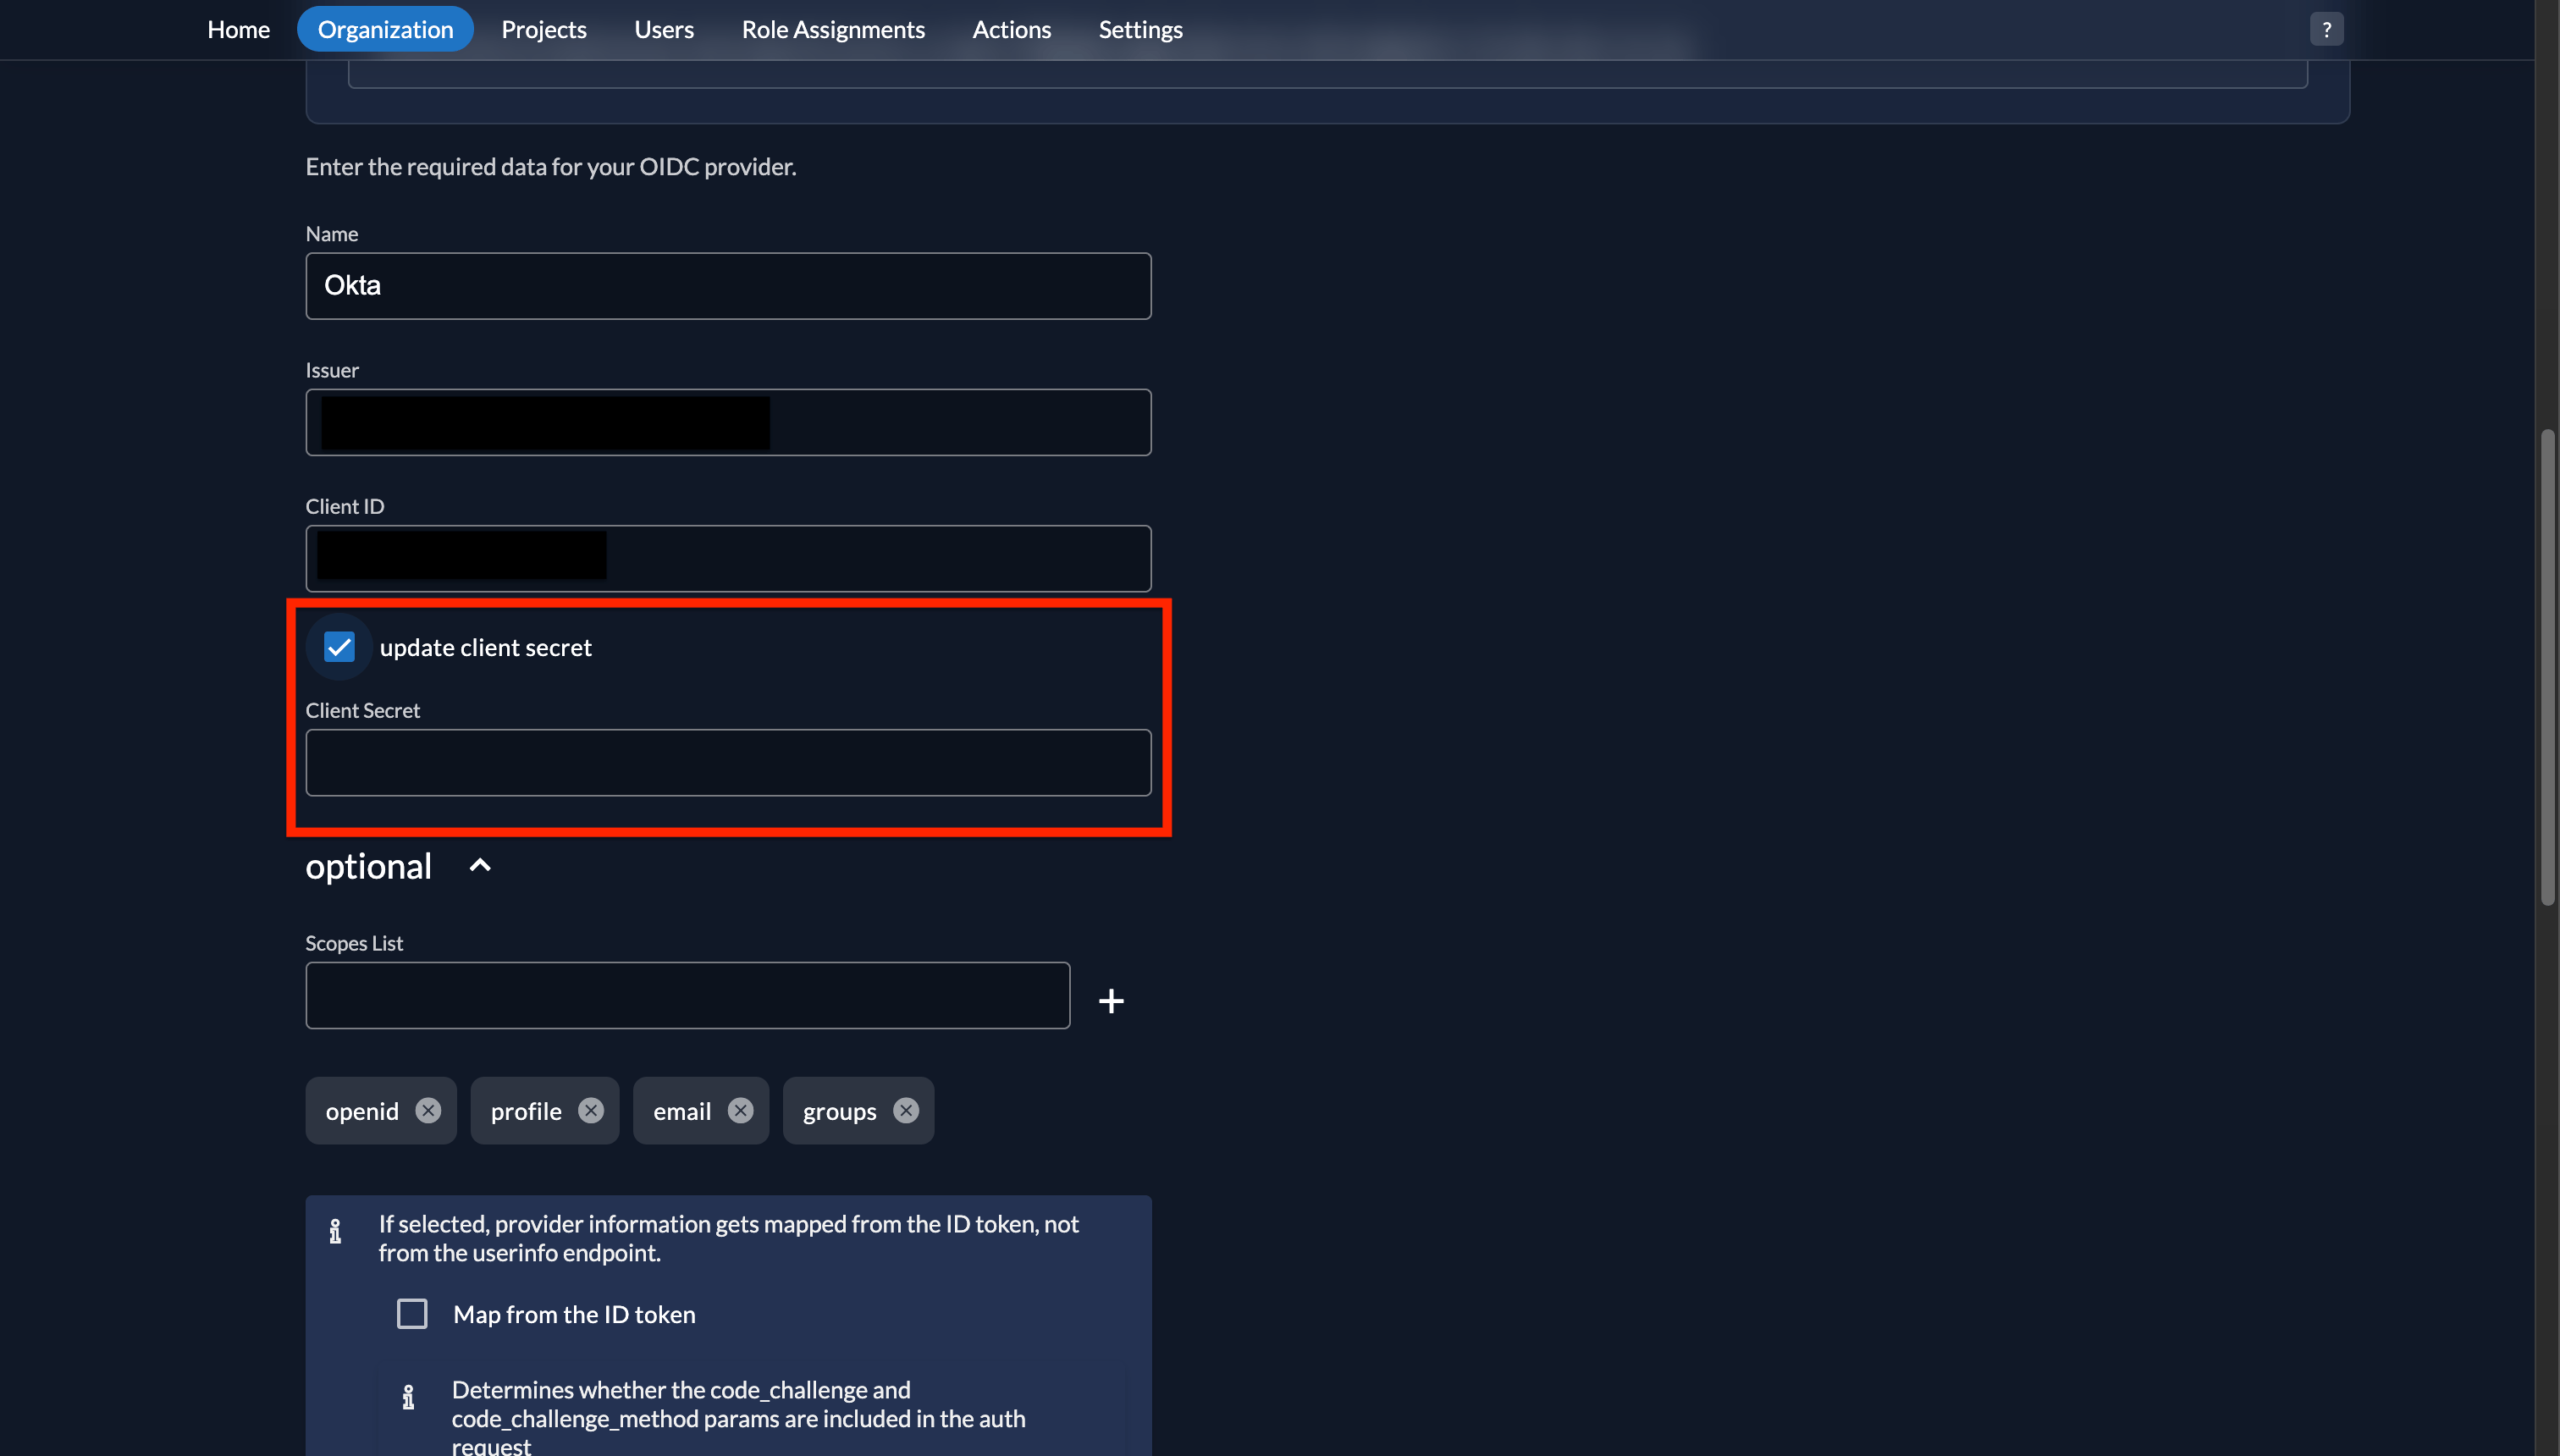
OIDC client secrets sometimes need to be replaced. Microsoft Entra ID requires secrets to expire (typically up to 24 months); Google and Okta do not expire secrets by default, but you may still rotate one if it is compromised or your security policy requires it. Sign-in is disrupted only if the old secret expires or is invalidated before the new one is saved in the Fiddler AuthN console — so create the new secret in your identity provider first, then update Fiddler. The AuthN console steps below are identical for all OIDC providers. For where to generate the new secret in your specific provider, see that provider’s guide: Microsoft Entra ID, Google, Okta. Step 1: Create a new client secret in your identity provider Follow your provider-specific guide (linked above) to generate a new client secret and copy its value. The secret value is usually shown only once at creation, so copy it before leaving the page. Step 2: Update the secret in the Fiddler AuthN console- Log into the Fiddler AuthN management console — editing identity provider settings requires the Org Owner role
- Select your organization from the dropdown
- Navigate to Settings > Login and Access > Identity Providers
- Open your existing OIDC provider for editing
- Select the update client secret checkbox, then enter the new secret value from Step 1 in the Client Secret field
- Select Save
- Navigate to your Fiddler login page and select Sign in with SSO
- Confirm you are redirected to your identity provider and back into Fiddler successfully
User Provisioning Issues
Users Not Auto-Provisioned:- Confirm “Automatic creation” setting is enabled
- Verify user has appropriate permissions in identity provider
- Check authentication logs for error messages
- Validate attribute mappings in identity provider configuration
- Ensure identity provider includes required claims in authentication tokens
- Verify
groupsattribute is included in identity provider claims - Check that corresponding teams exist in Fiddler
- Confirm group names match between identity provider and Fiddler teams
Next Steps
After reading this overview:- Choose Your Provider: Review the provider-specific integration guides
- Plan Implementation: Coordinate with your identity provider administrator
- Test Configuration: Set up a test environment before production deployment
- Train Users: Provide documentation on the new authentication process
Note: SSO configuration requires coordination between Fiddler administrators and identity provider administrators. Plan accordingly for configuration, testing, and rollout phases.