> ## Documentation Index
> Fetch the complete documentation index at: https://docs.fiddler.ai/llms.txt
> Use this file to discover all available pages before exploring further.
# Google SAML
> Learn how to configure Fiddler with Google Workspace for Single Sign-On (SSO) using the Security Assertion Markup Language (SAML) protocol.
## Overview
This integration allows your users to sign in to Fiddler using their existing Google Workspace account, without needing a separate Fiddler password. Users are automatically provisioned on their first successful login — no manual invitations required. Google Workspace group memberships can be synchronized to Fiddler teams.
Use SAML rather than [Google OIDC](/reference/access-control/google-integration) if you need group synchronization. Google's OIDC ID tokens contain no group claim, so the SAML integration is the only way to map Google groups to Fiddler teams.
## Prerequisites
Before starting, ensure you have:
* **Google Workspace Super Administrator Access**: Google requires super administrator access to create and configure custom SAML apps in your tenant.
* **Fiddler AuthN Administrator Access**: Org Owner role in Fiddler's AuthN management console.
* **Deployment Information**: The hostname of your Fiddler deployment, e.g. `idpexample.dev.fiddler.ai`.
## Configuring Google Workspace and Fiddler for Integration
Fiddler's AuthN service has two versions of its hosted login experience: **Login V1**, which most deployments run today, and **Login V2**, which Fiddler is migrating to. Each uses a different Assertion Consumer Service (ACS) URL — the address your identity provider posts the SAML response to. Your Fiddler representative can confirm which version your deployment runs.
A Google custom SAML app accepts only **one** ACS URL, and Fiddler's two login versions use different ones. Covering both therefore takes two separate integrations — each a Google app paired with its own identity provider in the AuthN console. The steps below set up the Login V1 integration; [Add a Second Integration for Login V2](#add-a-second-integration-for-login-v2) sets up the other. Only one identity provider is active at a time, so users see a single SSO button, and nothing needs to change in Google Workspace when your deployment moves to Login V2.
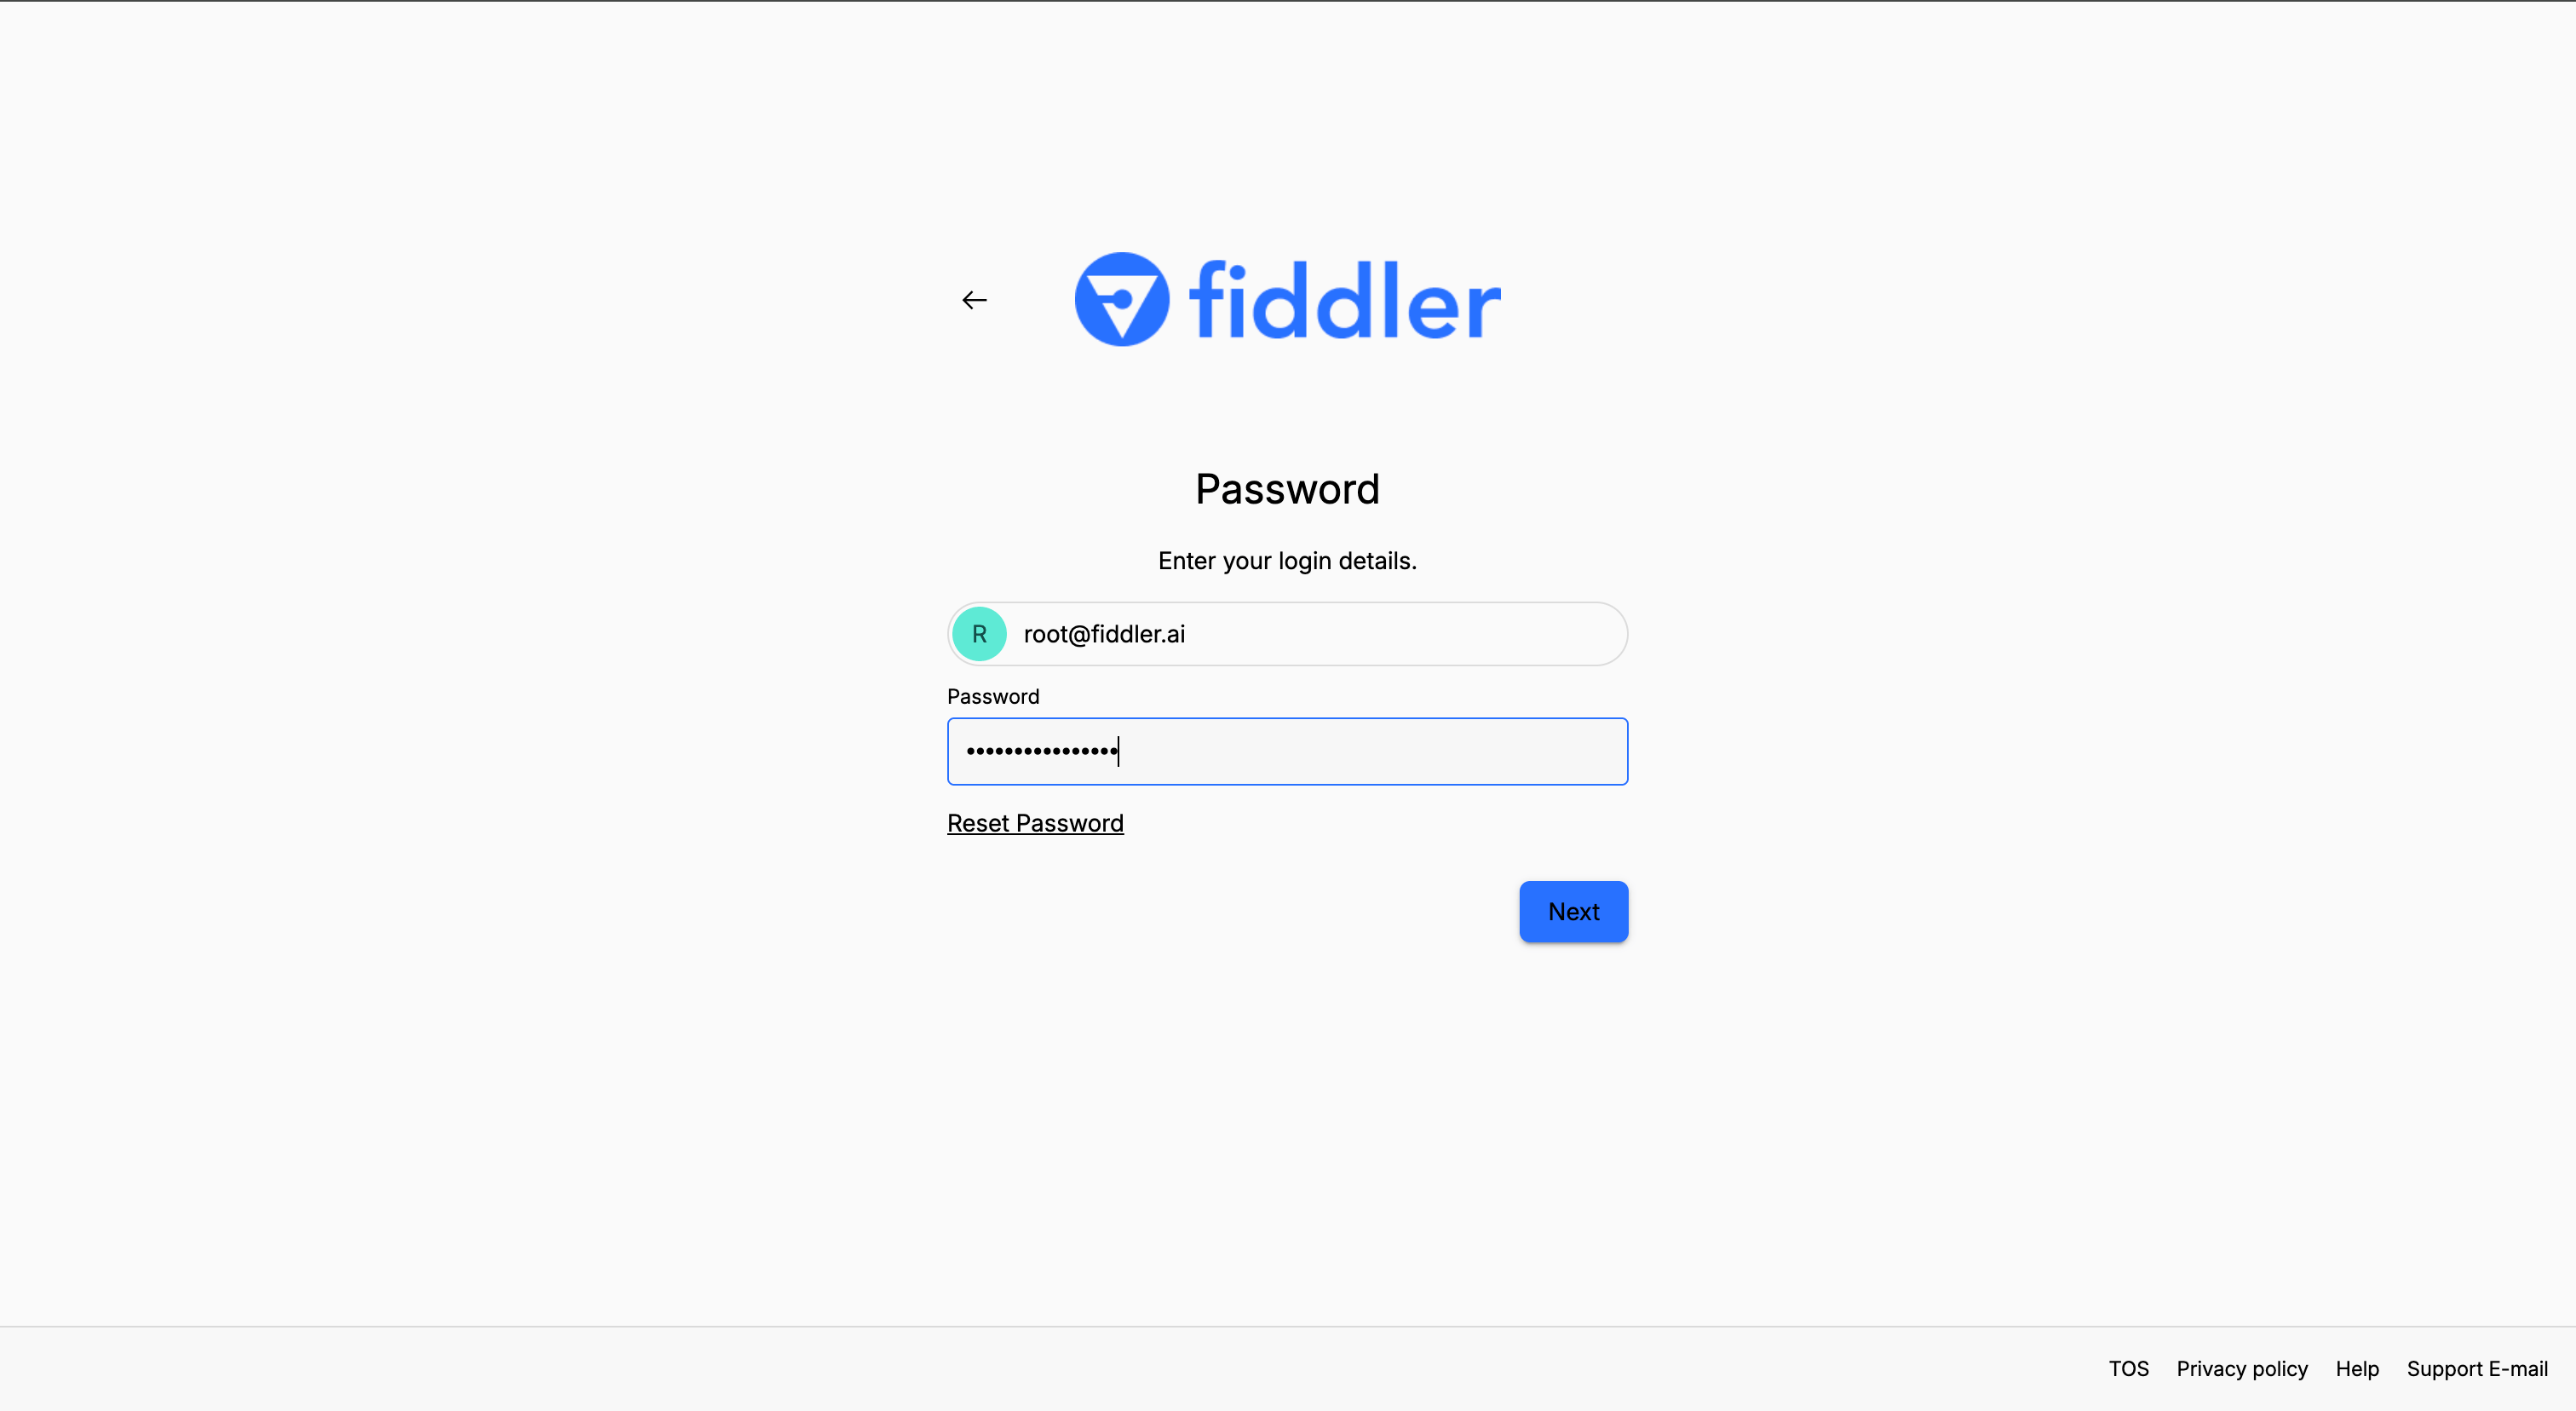
The URL to the Fiddler AuthN management console is your Fiddler instance base URL prepended with `authn-`. For example, if your Fiddler base URL is `https://idpexample.dev.fiddler.ai` then you will access the AuthN management console at `https://authn-idpexample.dev.fiddler.ai`.
Sign in using the AuthN console Org Owner user account credentials provided by your Fiddler representative.
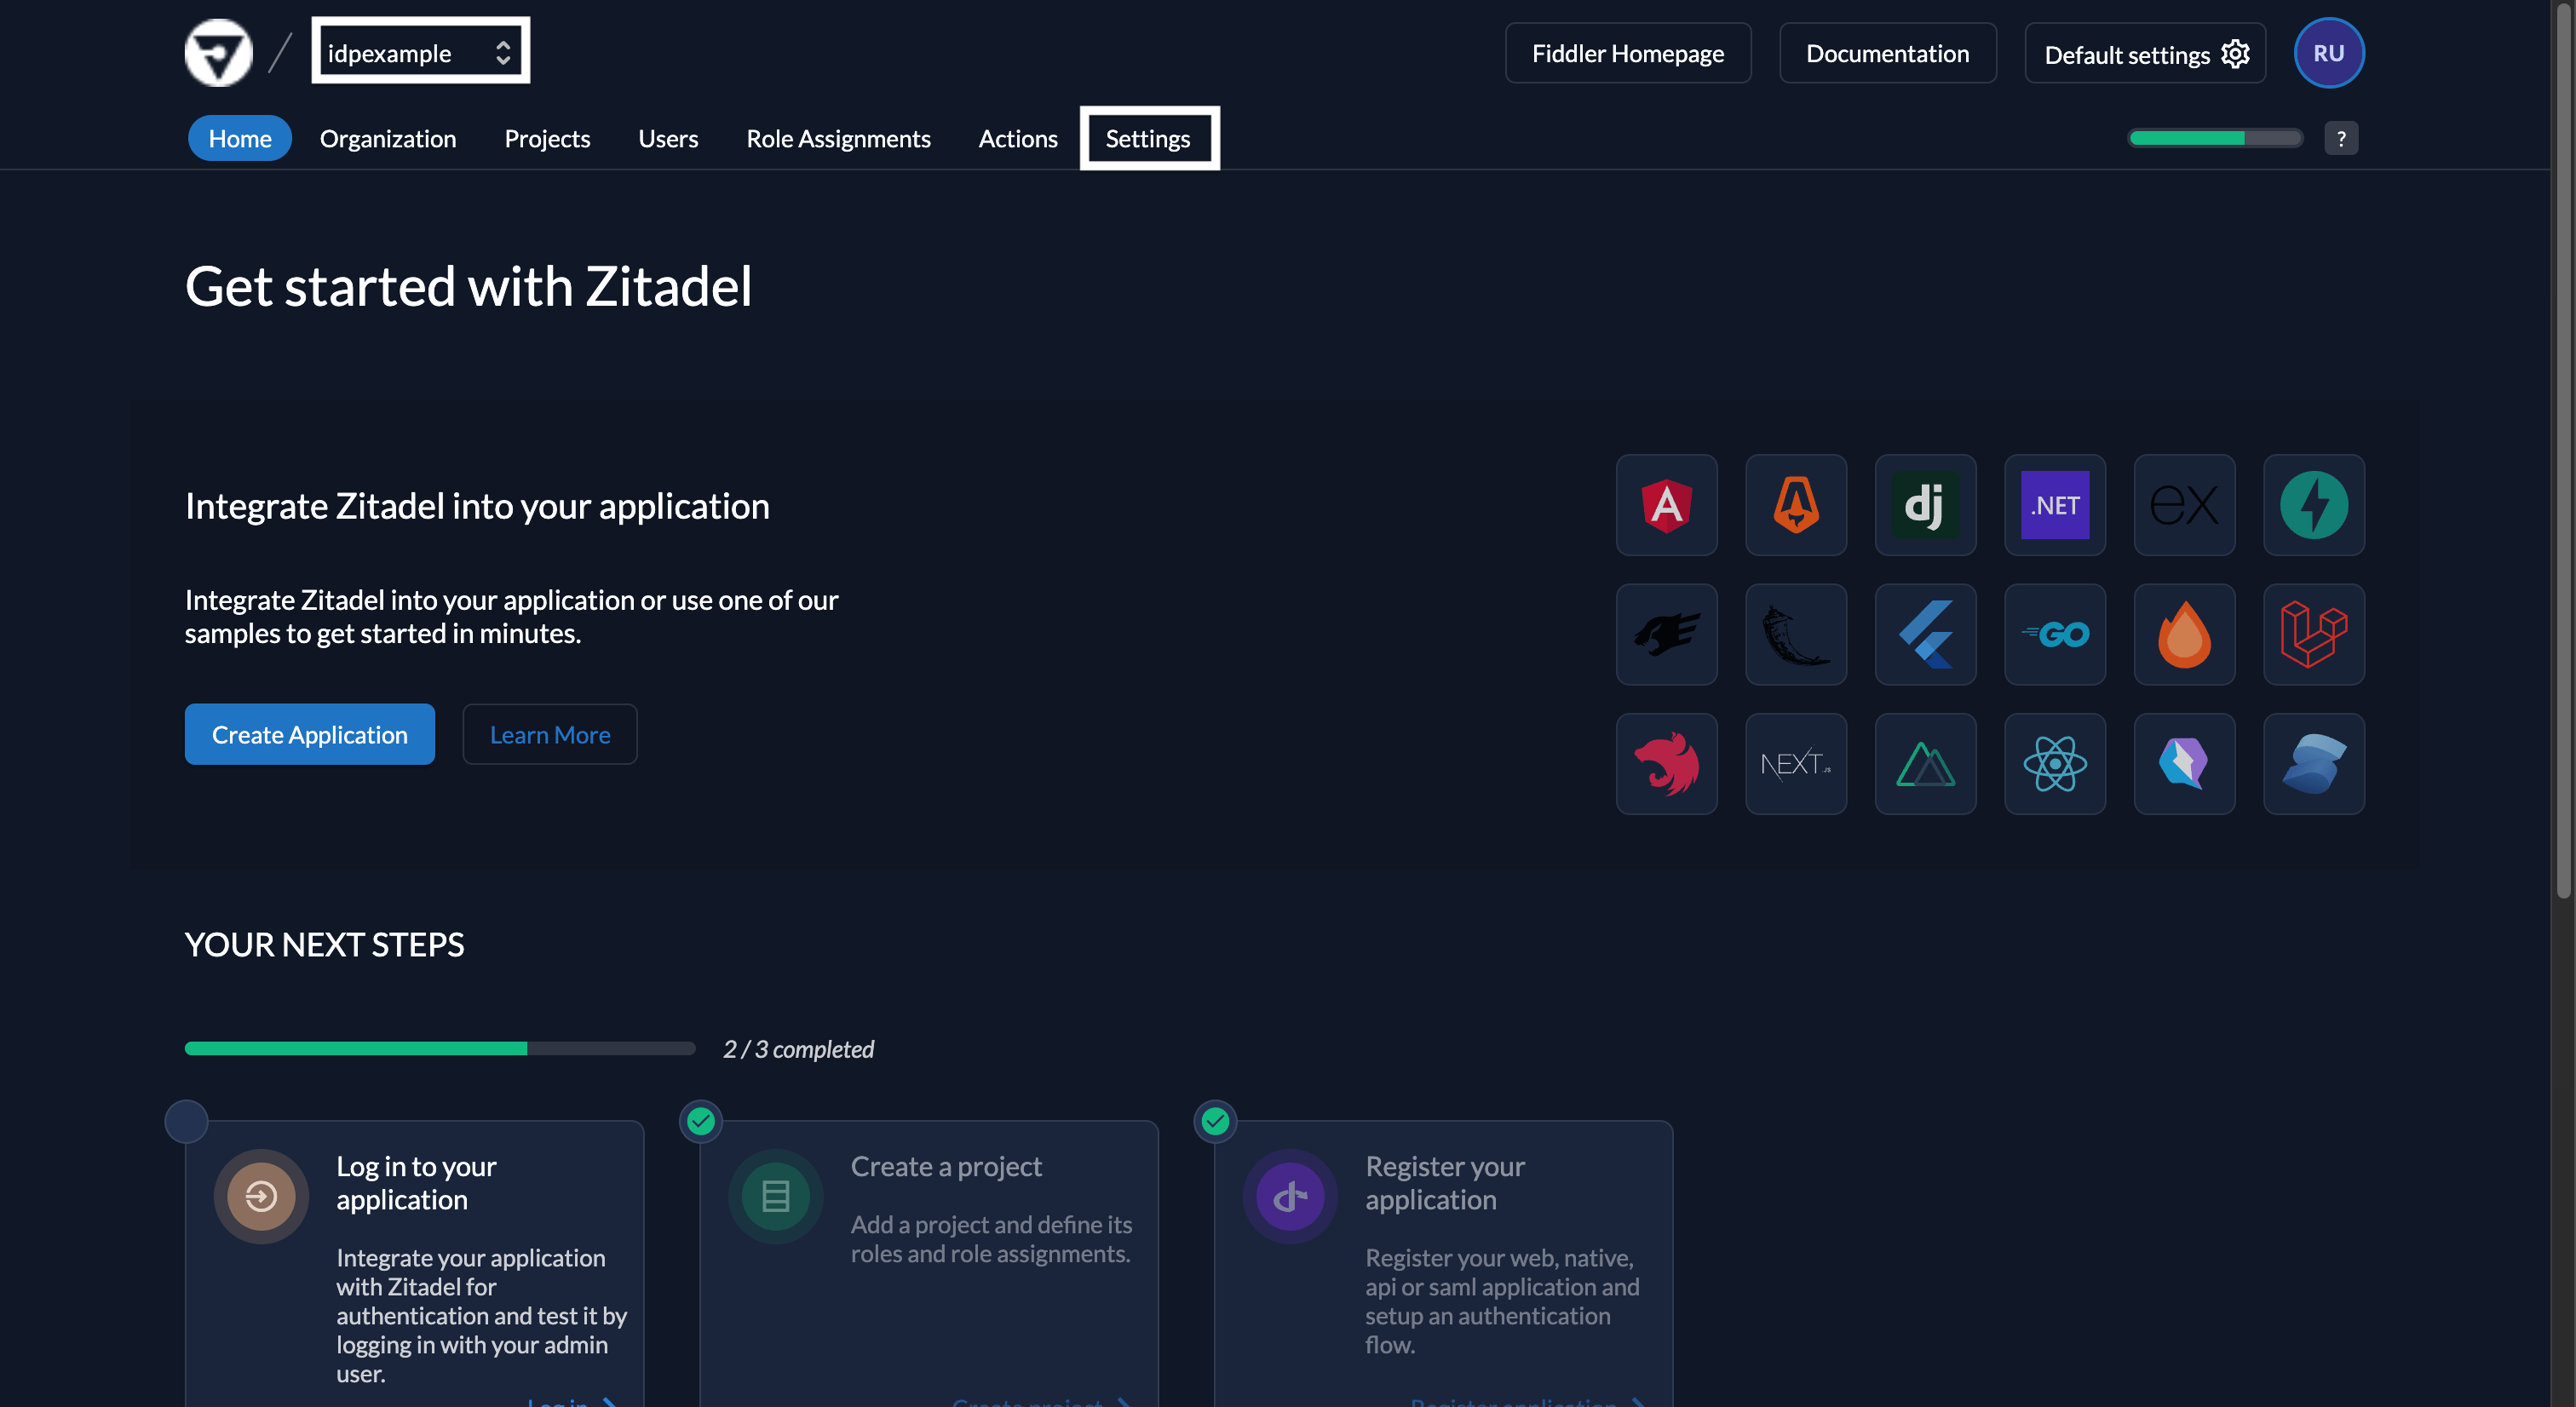
 Ensure your organization is selected in the dropdown. You may see the *fiddler* organization, but this is reserved for system use and should not be edited. Here we are using the *idpexample* organization.
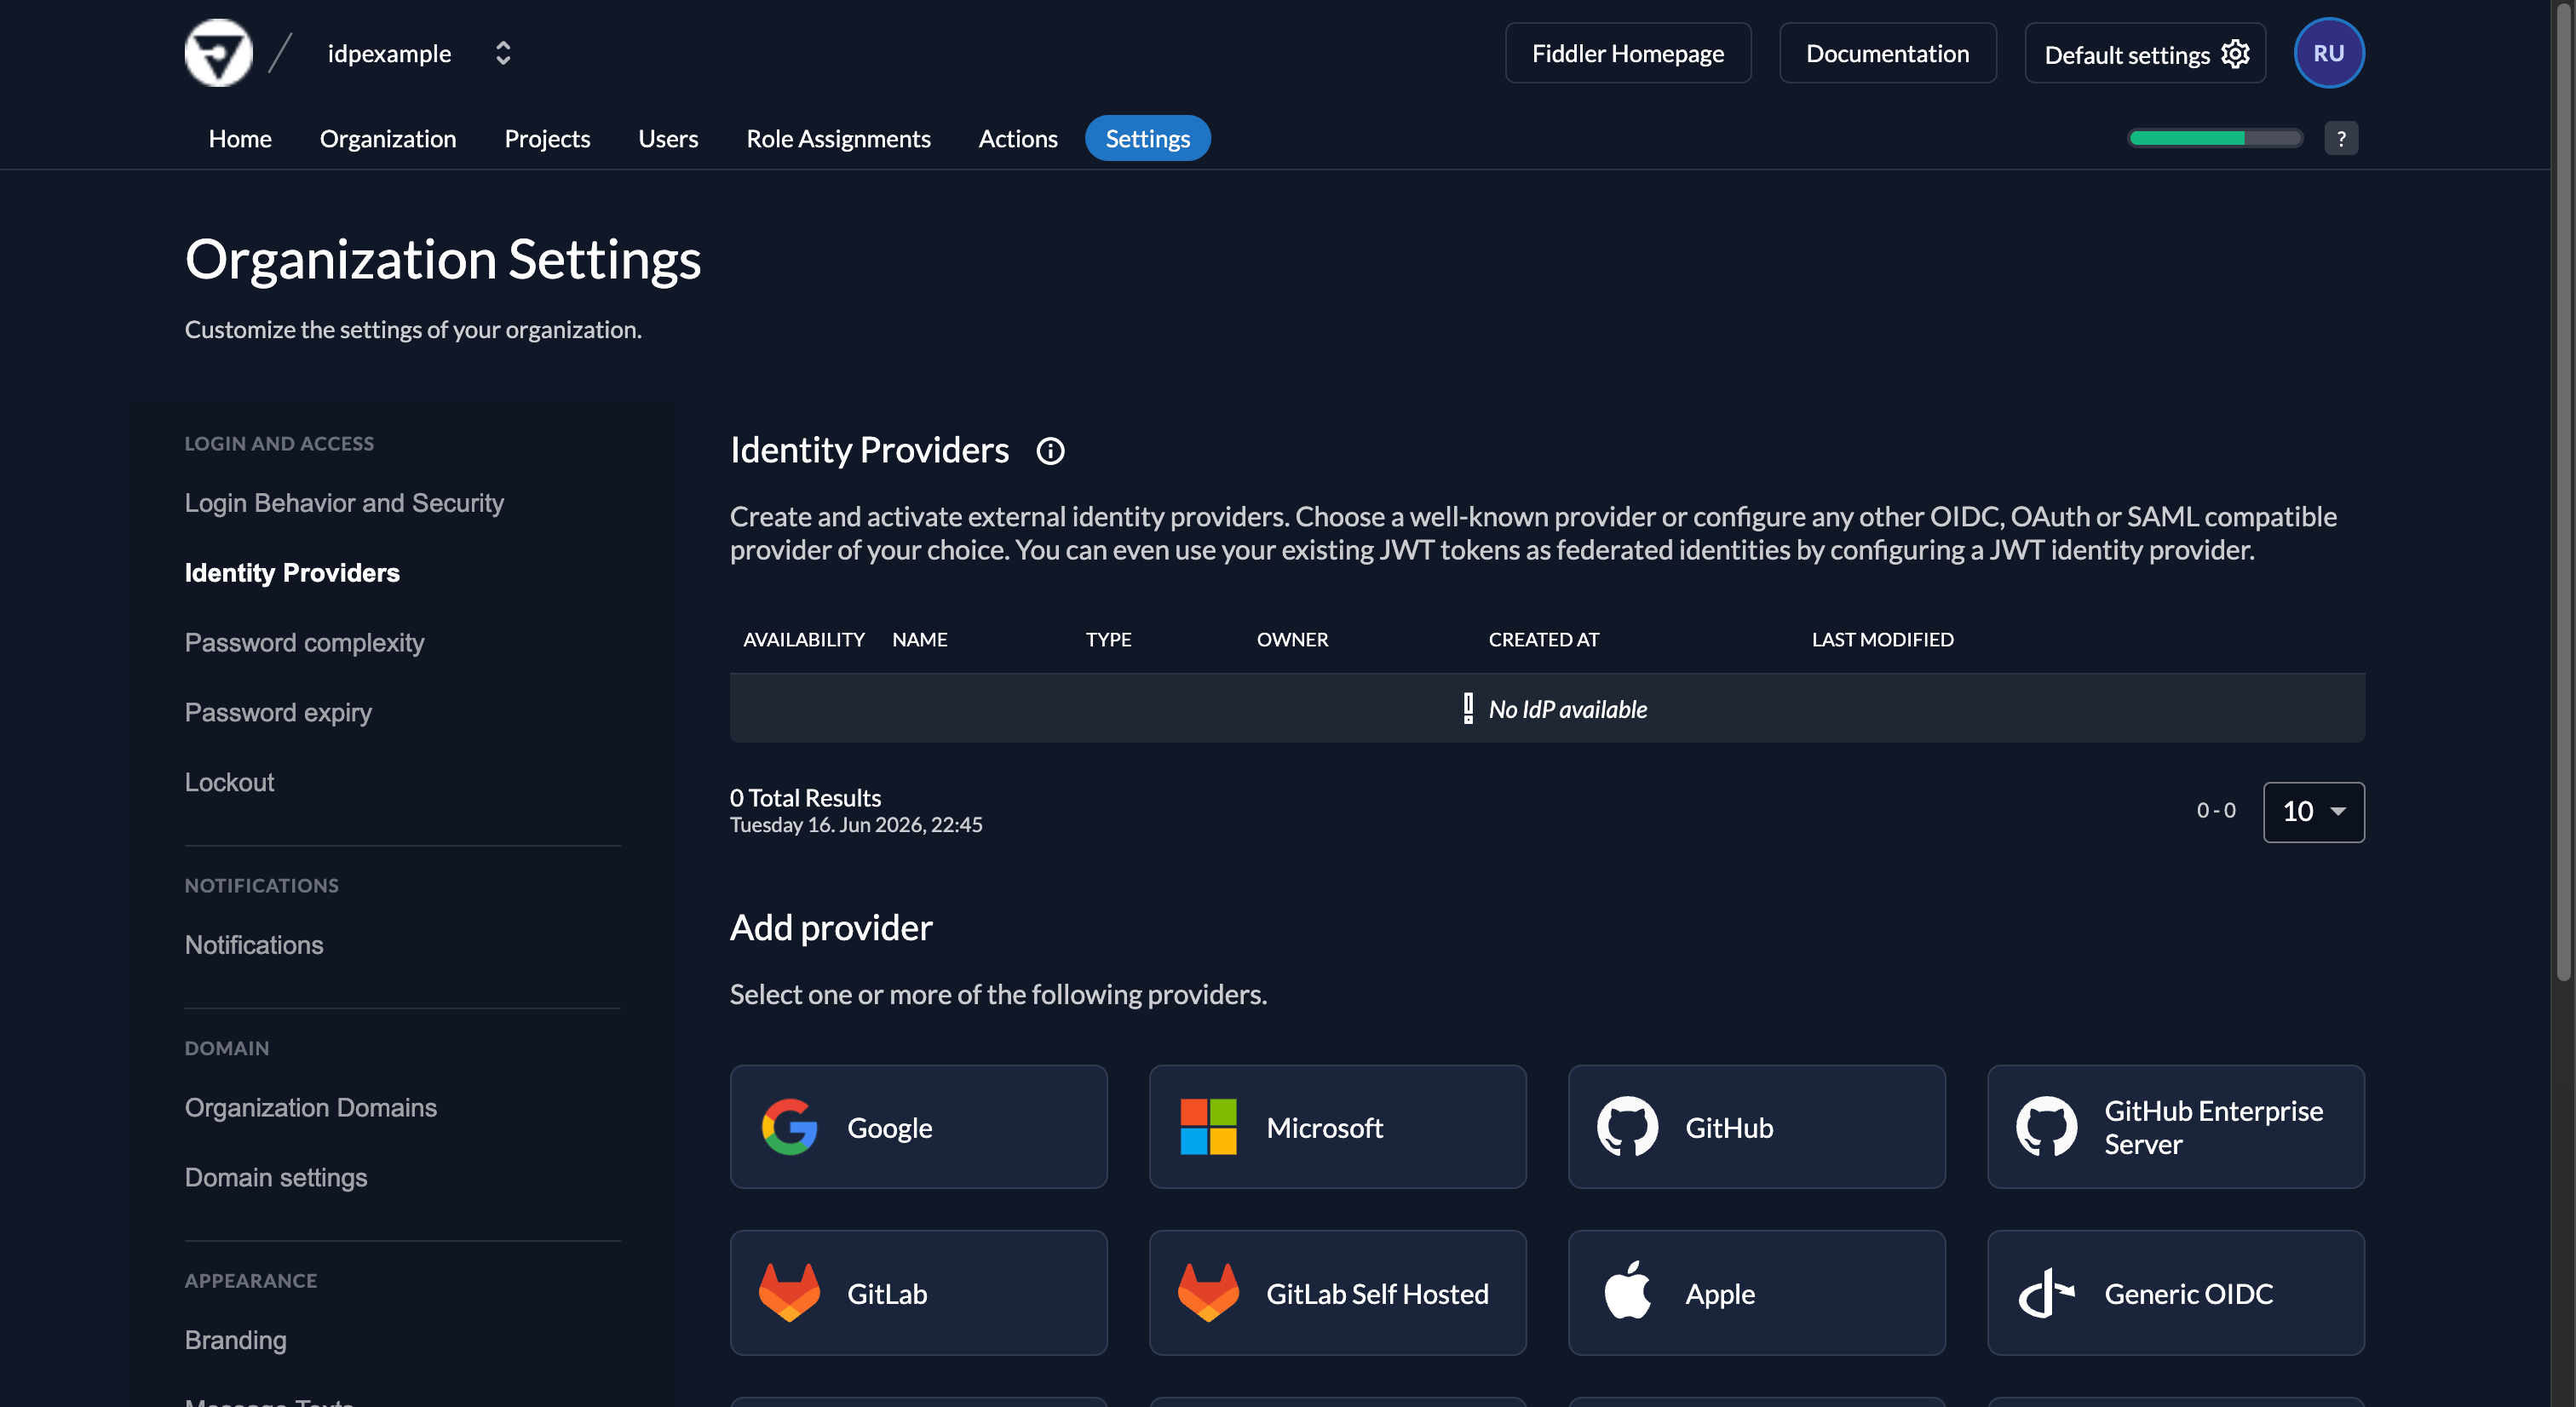
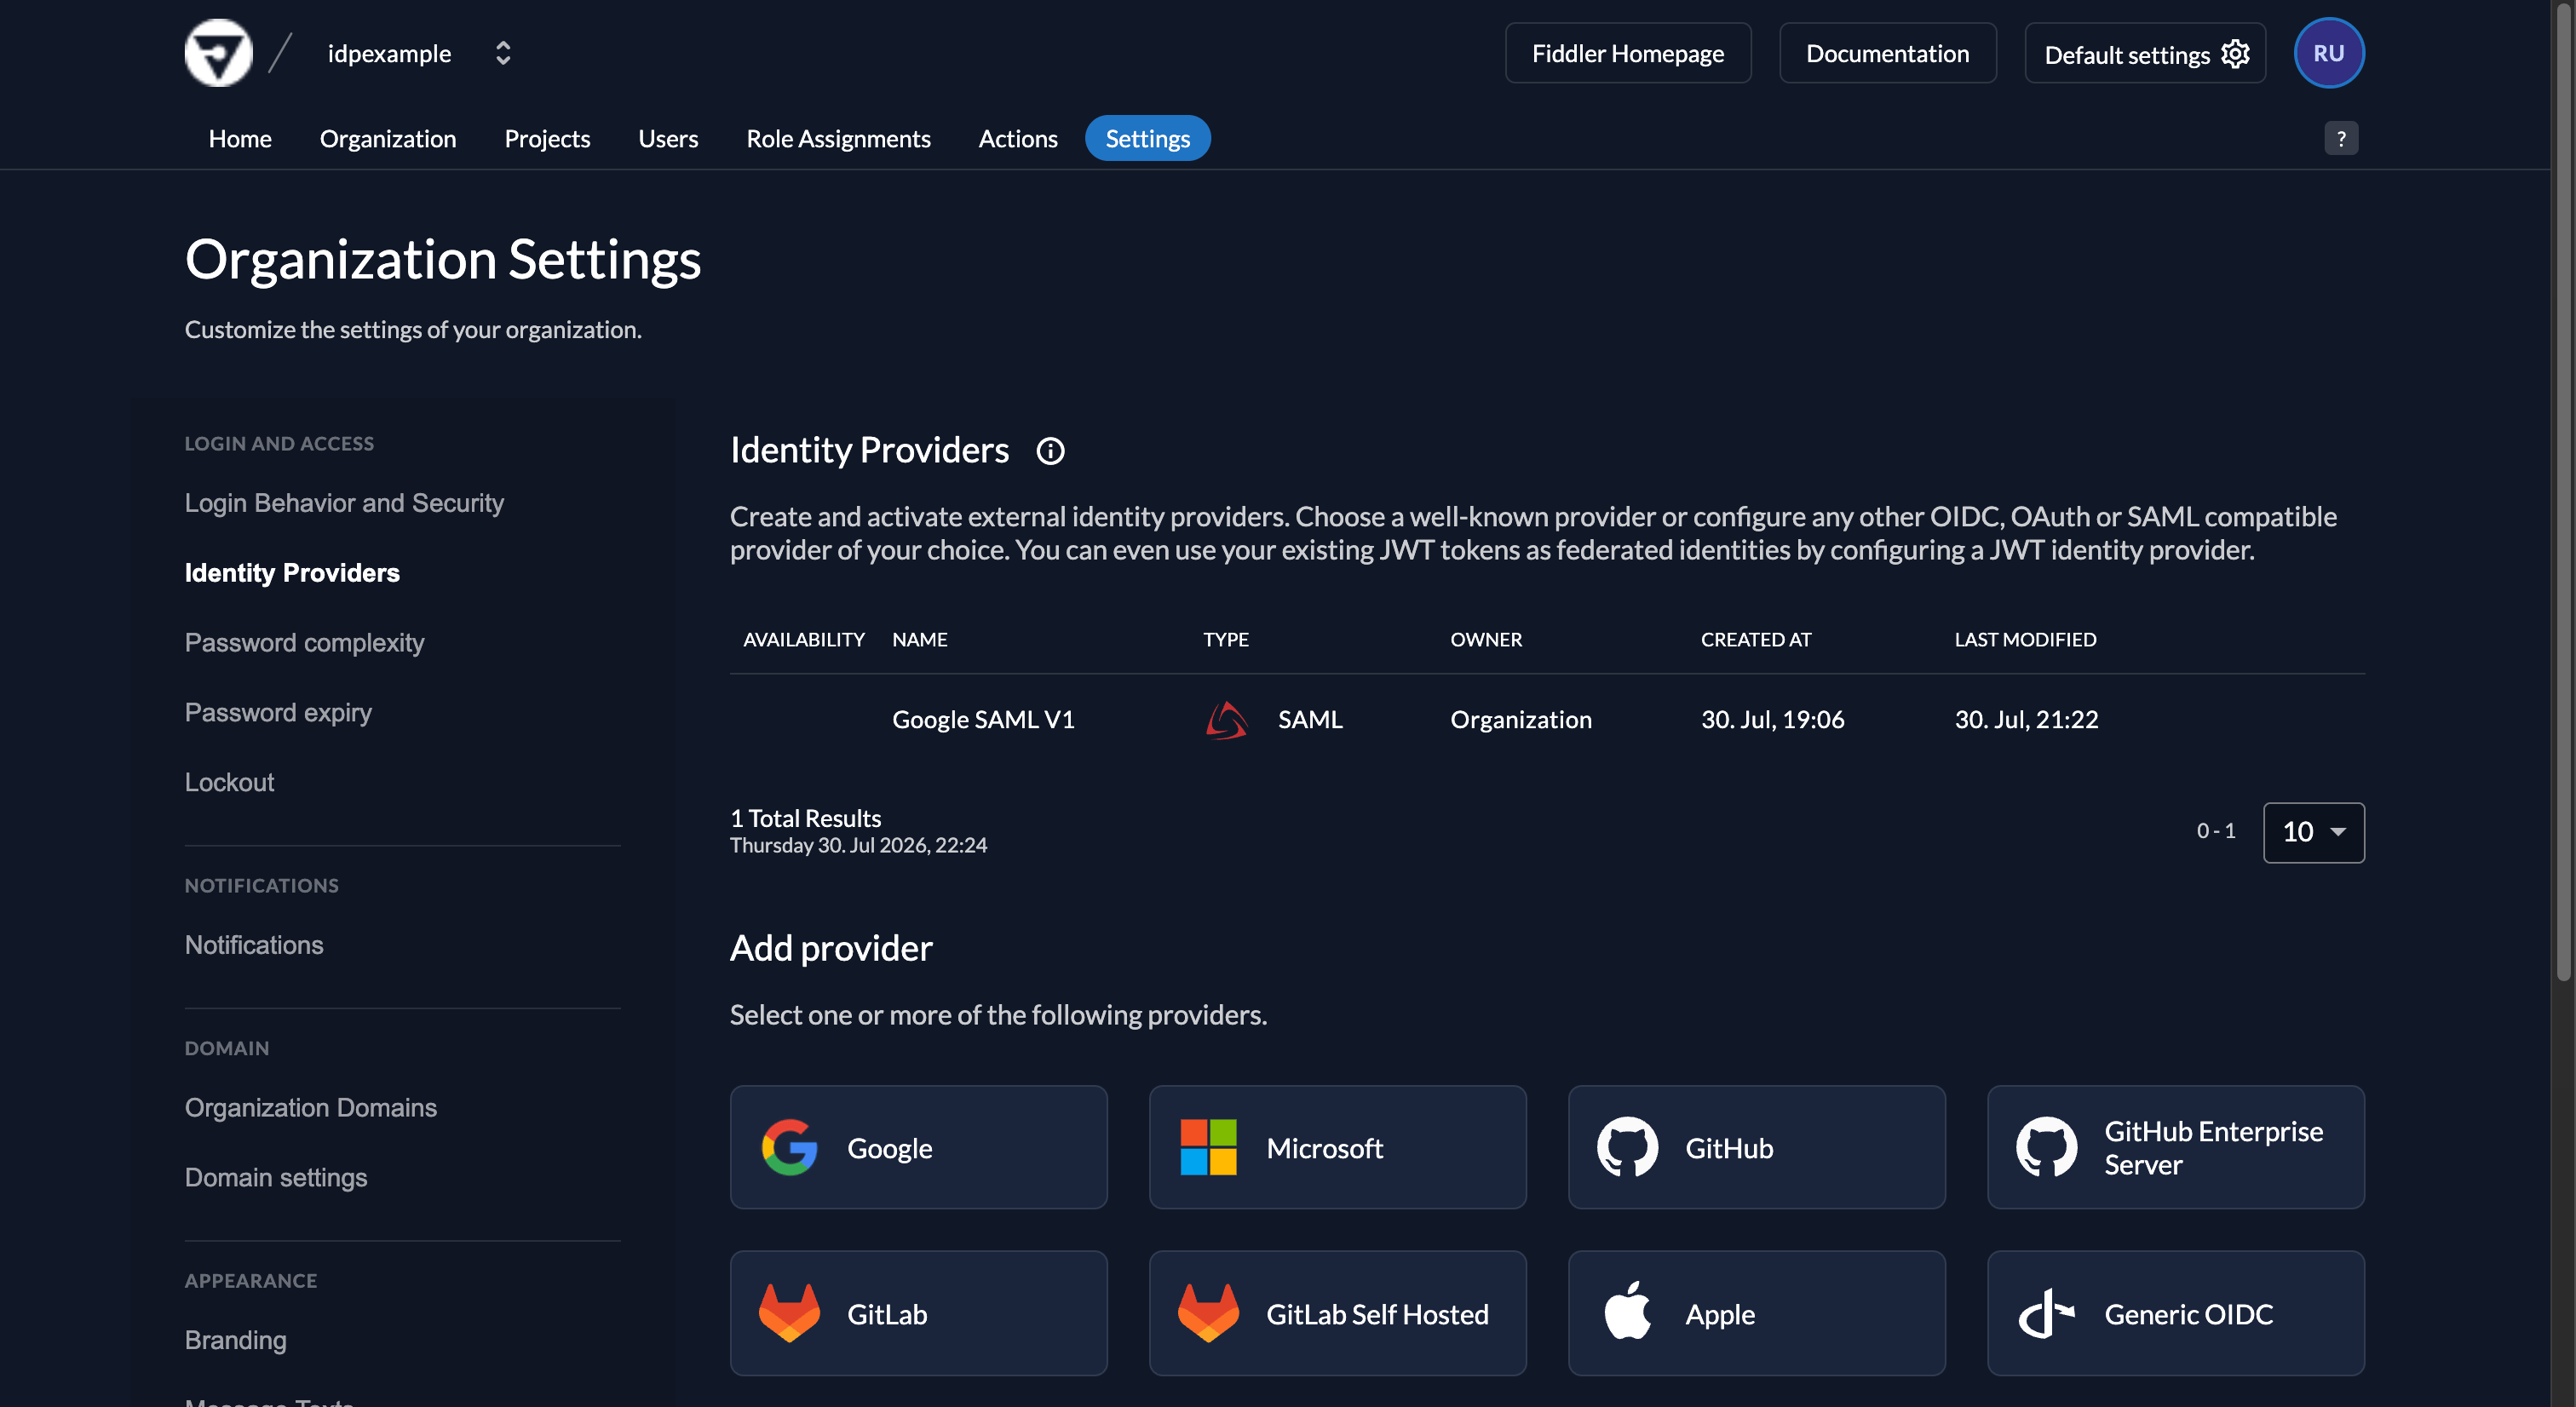
 Select *Settings* tab from the top menu and then select *Identity Providers* from the left navigation menu.
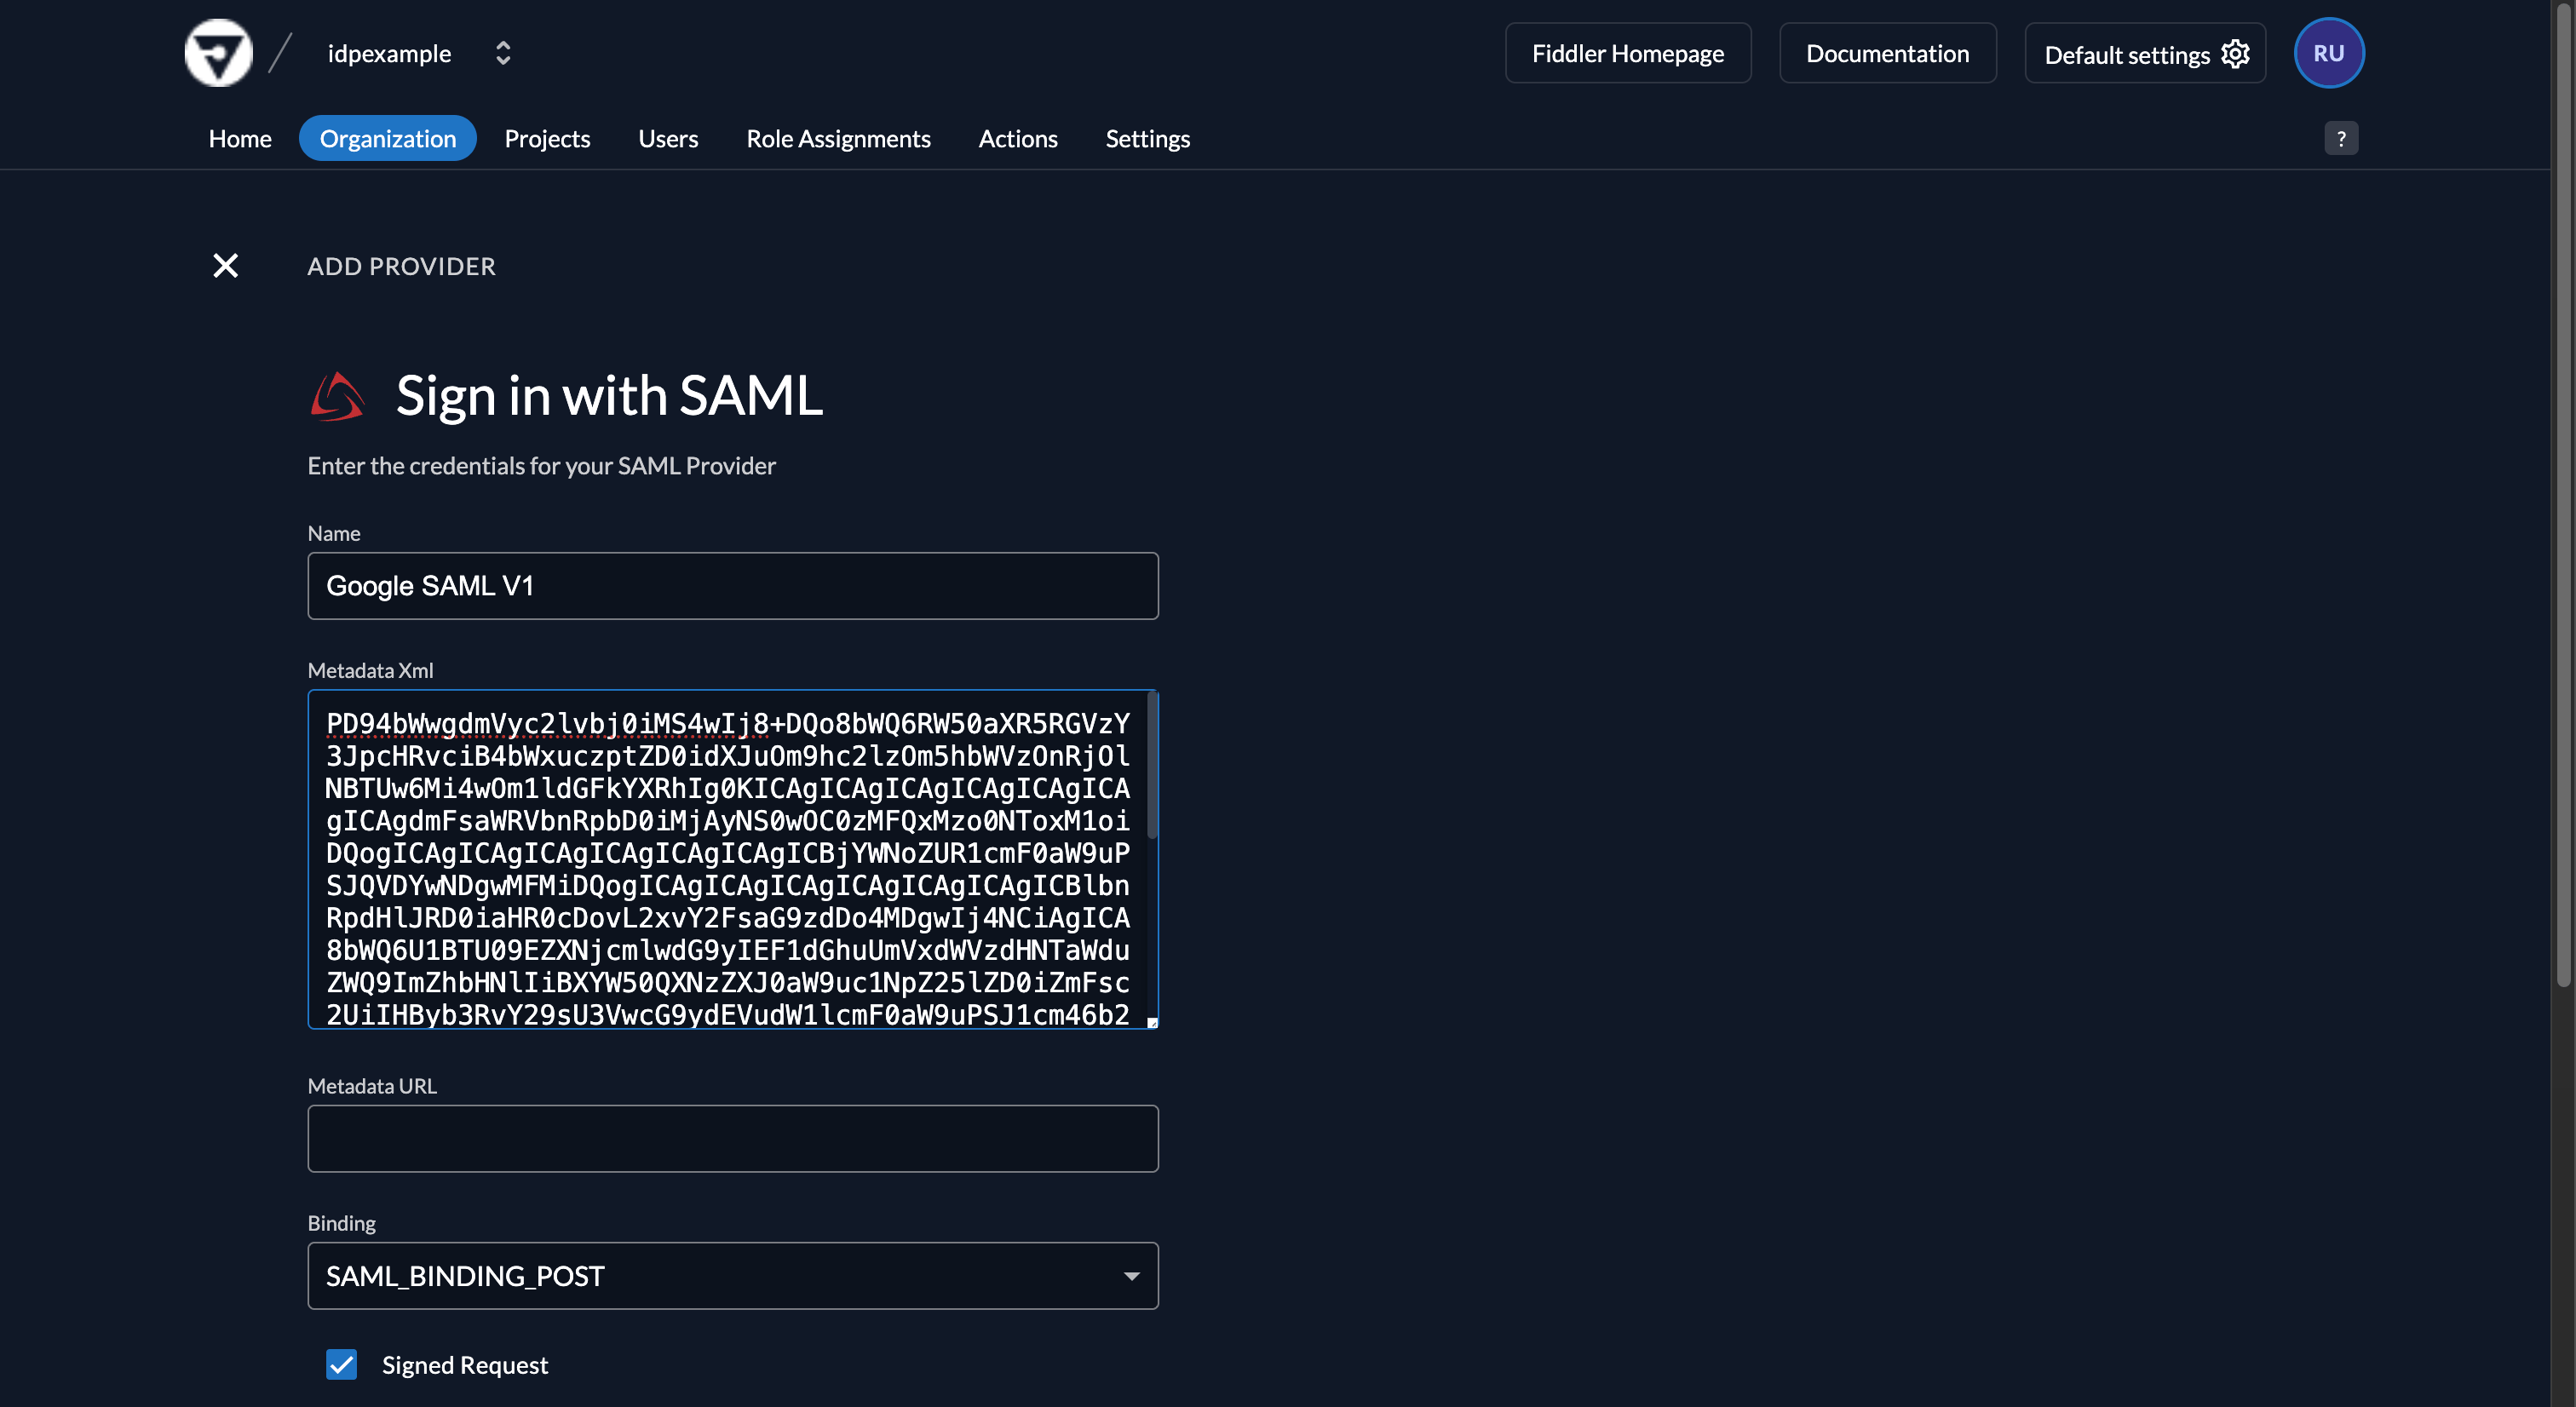
 1. Select the *SAML* option in the *Add provider* section, which brings up the Sign in with SAML form.
2. Enter a name for the integration, e.g. `Google SAML V1`. This name is displayed on the SSO login button on the Fiddler sign-in page.
3. Paste the following placeholder value into the *Metadata XML* text area. AuthN needs it to generate the URLs used when you create the Google custom SAML app; you will replace it in a later step.
**File:** `Placeholder Metadata XML value`
```text theme={null}
PD94bWwgdmVyc2lvbj0iMS4wIj8+DQo8bWQ6RW50aXR5RGVzY3JpcHRvciB4bWxuczptZD0idXJuOm9hc2lzOm5hbWVzOnRjOlNBTUw6Mi4wOm1ldGFkYXRhIg0KICAgICAgICAgICAgICAgICAgICAgdmFsaWRVbnRpbD0iMjAyNS0wOC0zMFQxMzo0NToxM1oiDQogICAgICAgICAgICAgICAgICAgICBjYWNoZUR1cmF0aW9uPSJQVDYwNDgwMFMiDQogICAgICAgICAgICAgICAgICAgICBlbnRpdHlJRD0iaHR0cDovL2xvY2FsaG9zdDo4MDgwIj4NCiAgICA8bWQ6U1BTU09EZXNjcmlwdG9yIEF1dGhuUmVxdWVzdHNTaWduZWQ9ImZhbHNlIiBXYW50QXNzZXJ0aW9uc1NpZ25lZD0iZmFsc2UiIHByb3RvY29sU3VwcG9ydEVudW1lcmF0aW9uPSJ1cm46b2FzaXM6bmFtZXM6dGM6U0FNTDoyLjA6cHJvdG9jb2wiPg0KICAgICAgICA8bWQ6TmFtZUlERm9ybWF0PnVybjpvYXNpczpuYW1lczp0YzpTQU1MOjEuMTpuYW1laWQtZm9ybWF0OnVuc3BlY2lmaWVkPC9tZDpOYW1lSURGb3JtYXQ+DQogICAgICAgIDxtZDpBc3NlcnRpb25Db25zdW1lclNlcnZpY2UgQmluZGluZz0idXJuOm9hc2lzOm5hbWVzOnRjOlNBTUw6Mi4wOmJpbmRpbmdzOkhUVFAtUE9TVCINCiAgICAgICAgICAgICAgICAgICAgICAgICAgICAgICAgICAgICBMb2NhdGlvbj0iaHR0cDovL2xvY2FsaG9zdDo4MDgwL2NvbnN1bWUvZGF0YSINCiAgICAgICAgICAgICAgICAgICAgICAgICAgICAgICAgICAgICBpbmRleD0iMSIgLz4NCiAgICAgICAgDQogICAgPC9tZDpTUFNTT0Rlc2NyaXB0b3I+DQo8L21kOkVudGl0eURlc2NyaXB0b3I+
```
1. Select the *SAML* option in the *Add provider* section, which brings up the Sign in with SAML form.
2. Enter a name for the integration, e.g. `Google SAML V1`. This name is displayed on the SSO login button on the Fiddler sign-in page.
3. Paste the following placeholder value into the *Metadata XML* text area. AuthN needs it to generate the URLs used when you create the Google custom SAML app; you will replace it in a later step.
**File:** `Placeholder Metadata XML value`
```text theme={null}
PD94bWwgdmVyc2lvbj0iMS4wIj8+DQo8bWQ6RW50aXR5RGVzY3JpcHRvciB4bWxuczptZD0idXJuOm9hc2lzOm5hbWVzOnRjOlNBTUw6Mi4wOm1ldGFkYXRhIg0KICAgICAgICAgICAgICAgICAgICAgdmFsaWRVbnRpbD0iMjAyNS0wOC0zMFQxMzo0NToxM1oiDQogICAgICAgICAgICAgICAgICAgICBjYWNoZUR1cmF0aW9uPSJQVDYwNDgwMFMiDQogICAgICAgICAgICAgICAgICAgICBlbnRpdHlJRD0iaHR0cDovL2xvY2FsaG9zdDo4MDgwIj4NCiAgICA8bWQ6U1BTU09EZXNjcmlwdG9yIEF1dGhuUmVxdWVzdHNTaWduZWQ9ImZhbHNlIiBXYW50QXNzZXJ0aW9uc1NpZ25lZD0iZmFsc2UiIHByb3RvY29sU3VwcG9ydEVudW1lcmF0aW9uPSJ1cm46b2FzaXM6bmFtZXM6dGM6U0FNTDoyLjA6cHJvdG9jb2wiPg0KICAgICAgICA8bWQ6TmFtZUlERm9ybWF0PnVybjpvYXNpczpuYW1lczp0YzpTQU1MOjEuMTpuYW1laWQtZm9ybWF0OnVuc3BlY2lmaWVkPC9tZDpOYW1lSURGb3JtYXQ+DQogICAgICAgIDxtZDpBc3NlcnRpb25Db25zdW1lclNlcnZpY2UgQmluZGluZz0idXJuOm9hc2lzOm5hbWVzOnRjOlNBTUw6Mi4wOmJpbmRpbmdzOkhUVFAtUE9TVCINCiAgICAgICAgICAgICAgICAgICAgICAgICAgICAgICAgICAgICBMb2NhdGlvbj0iaHR0cDovL2xvY2FsaG9zdDo4MDgwL2NvbnN1bWUvZGF0YSINCiAgICAgICAgICAgICAgICAgICAgICAgICAgICAgICAgICAgICBpbmRleD0iMSIgLz4NCiAgICAgICAgDQogICAgPC9tZDpTUFNTT0Rlc2NyaXB0b3I+DQo8L21kOkVudGl0eURlc2NyaXB0b3I+
```
 Select the *Create* button and then select the *Save* button. You will be returned to the Organization Settings page.
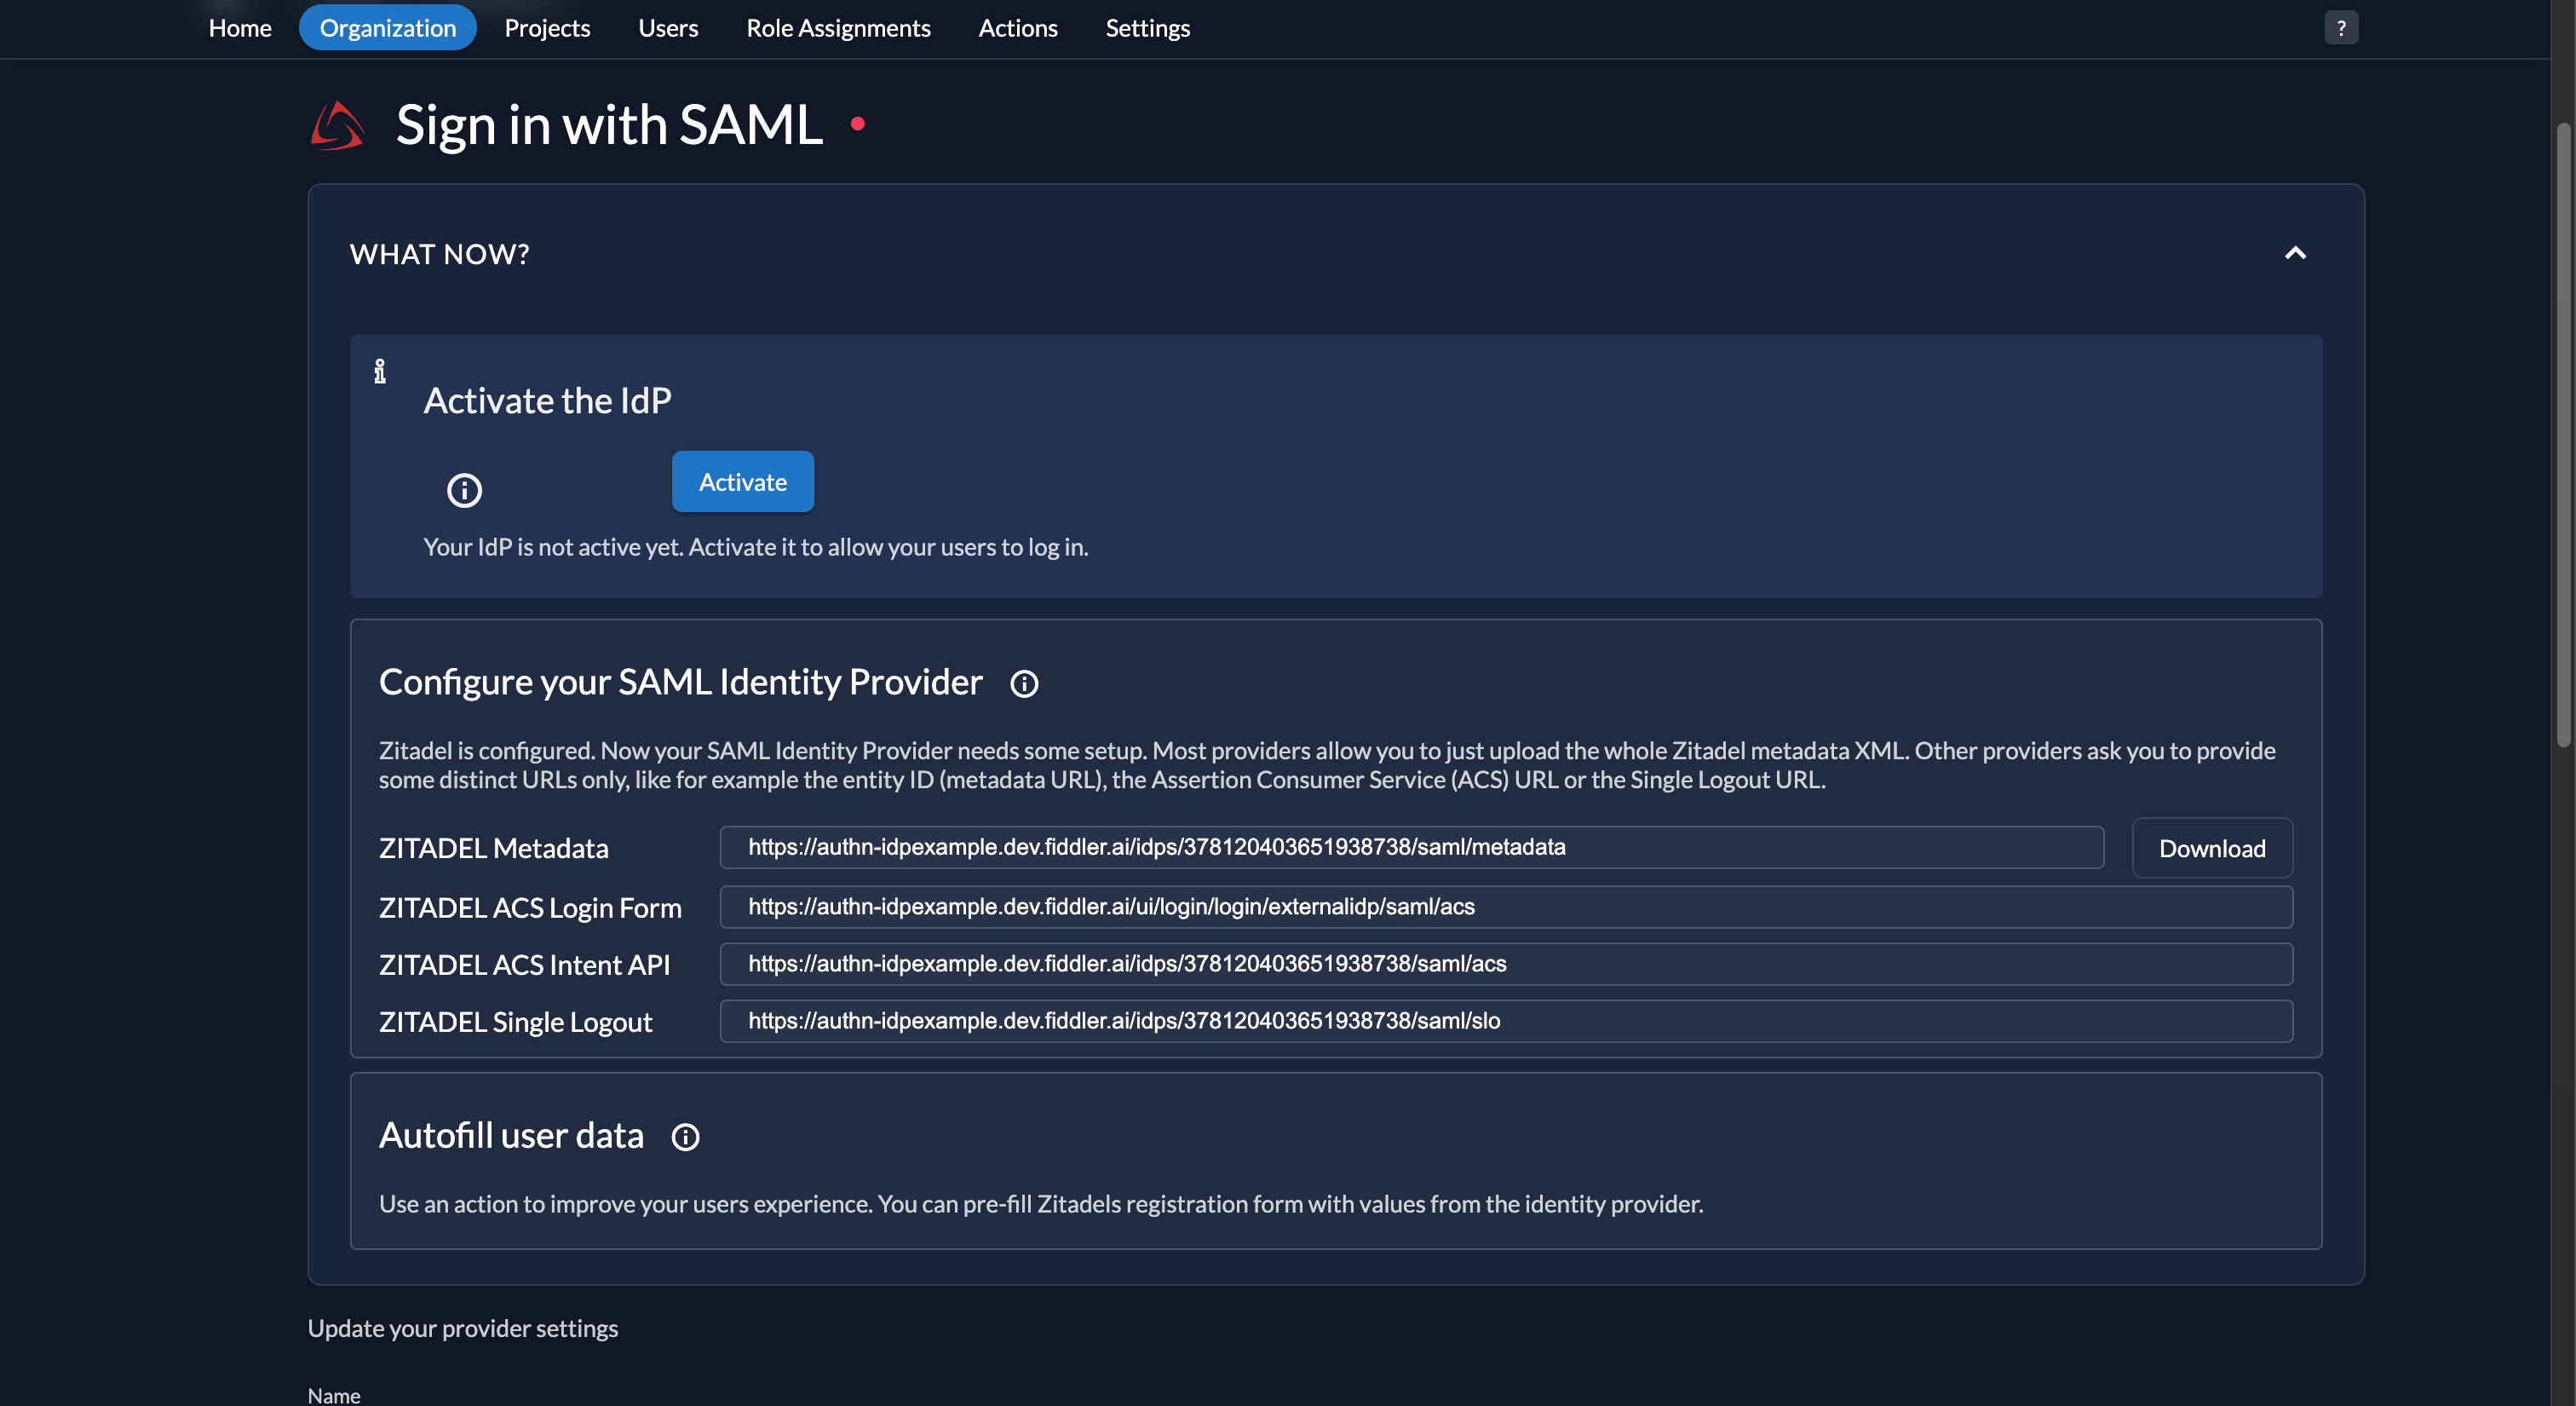
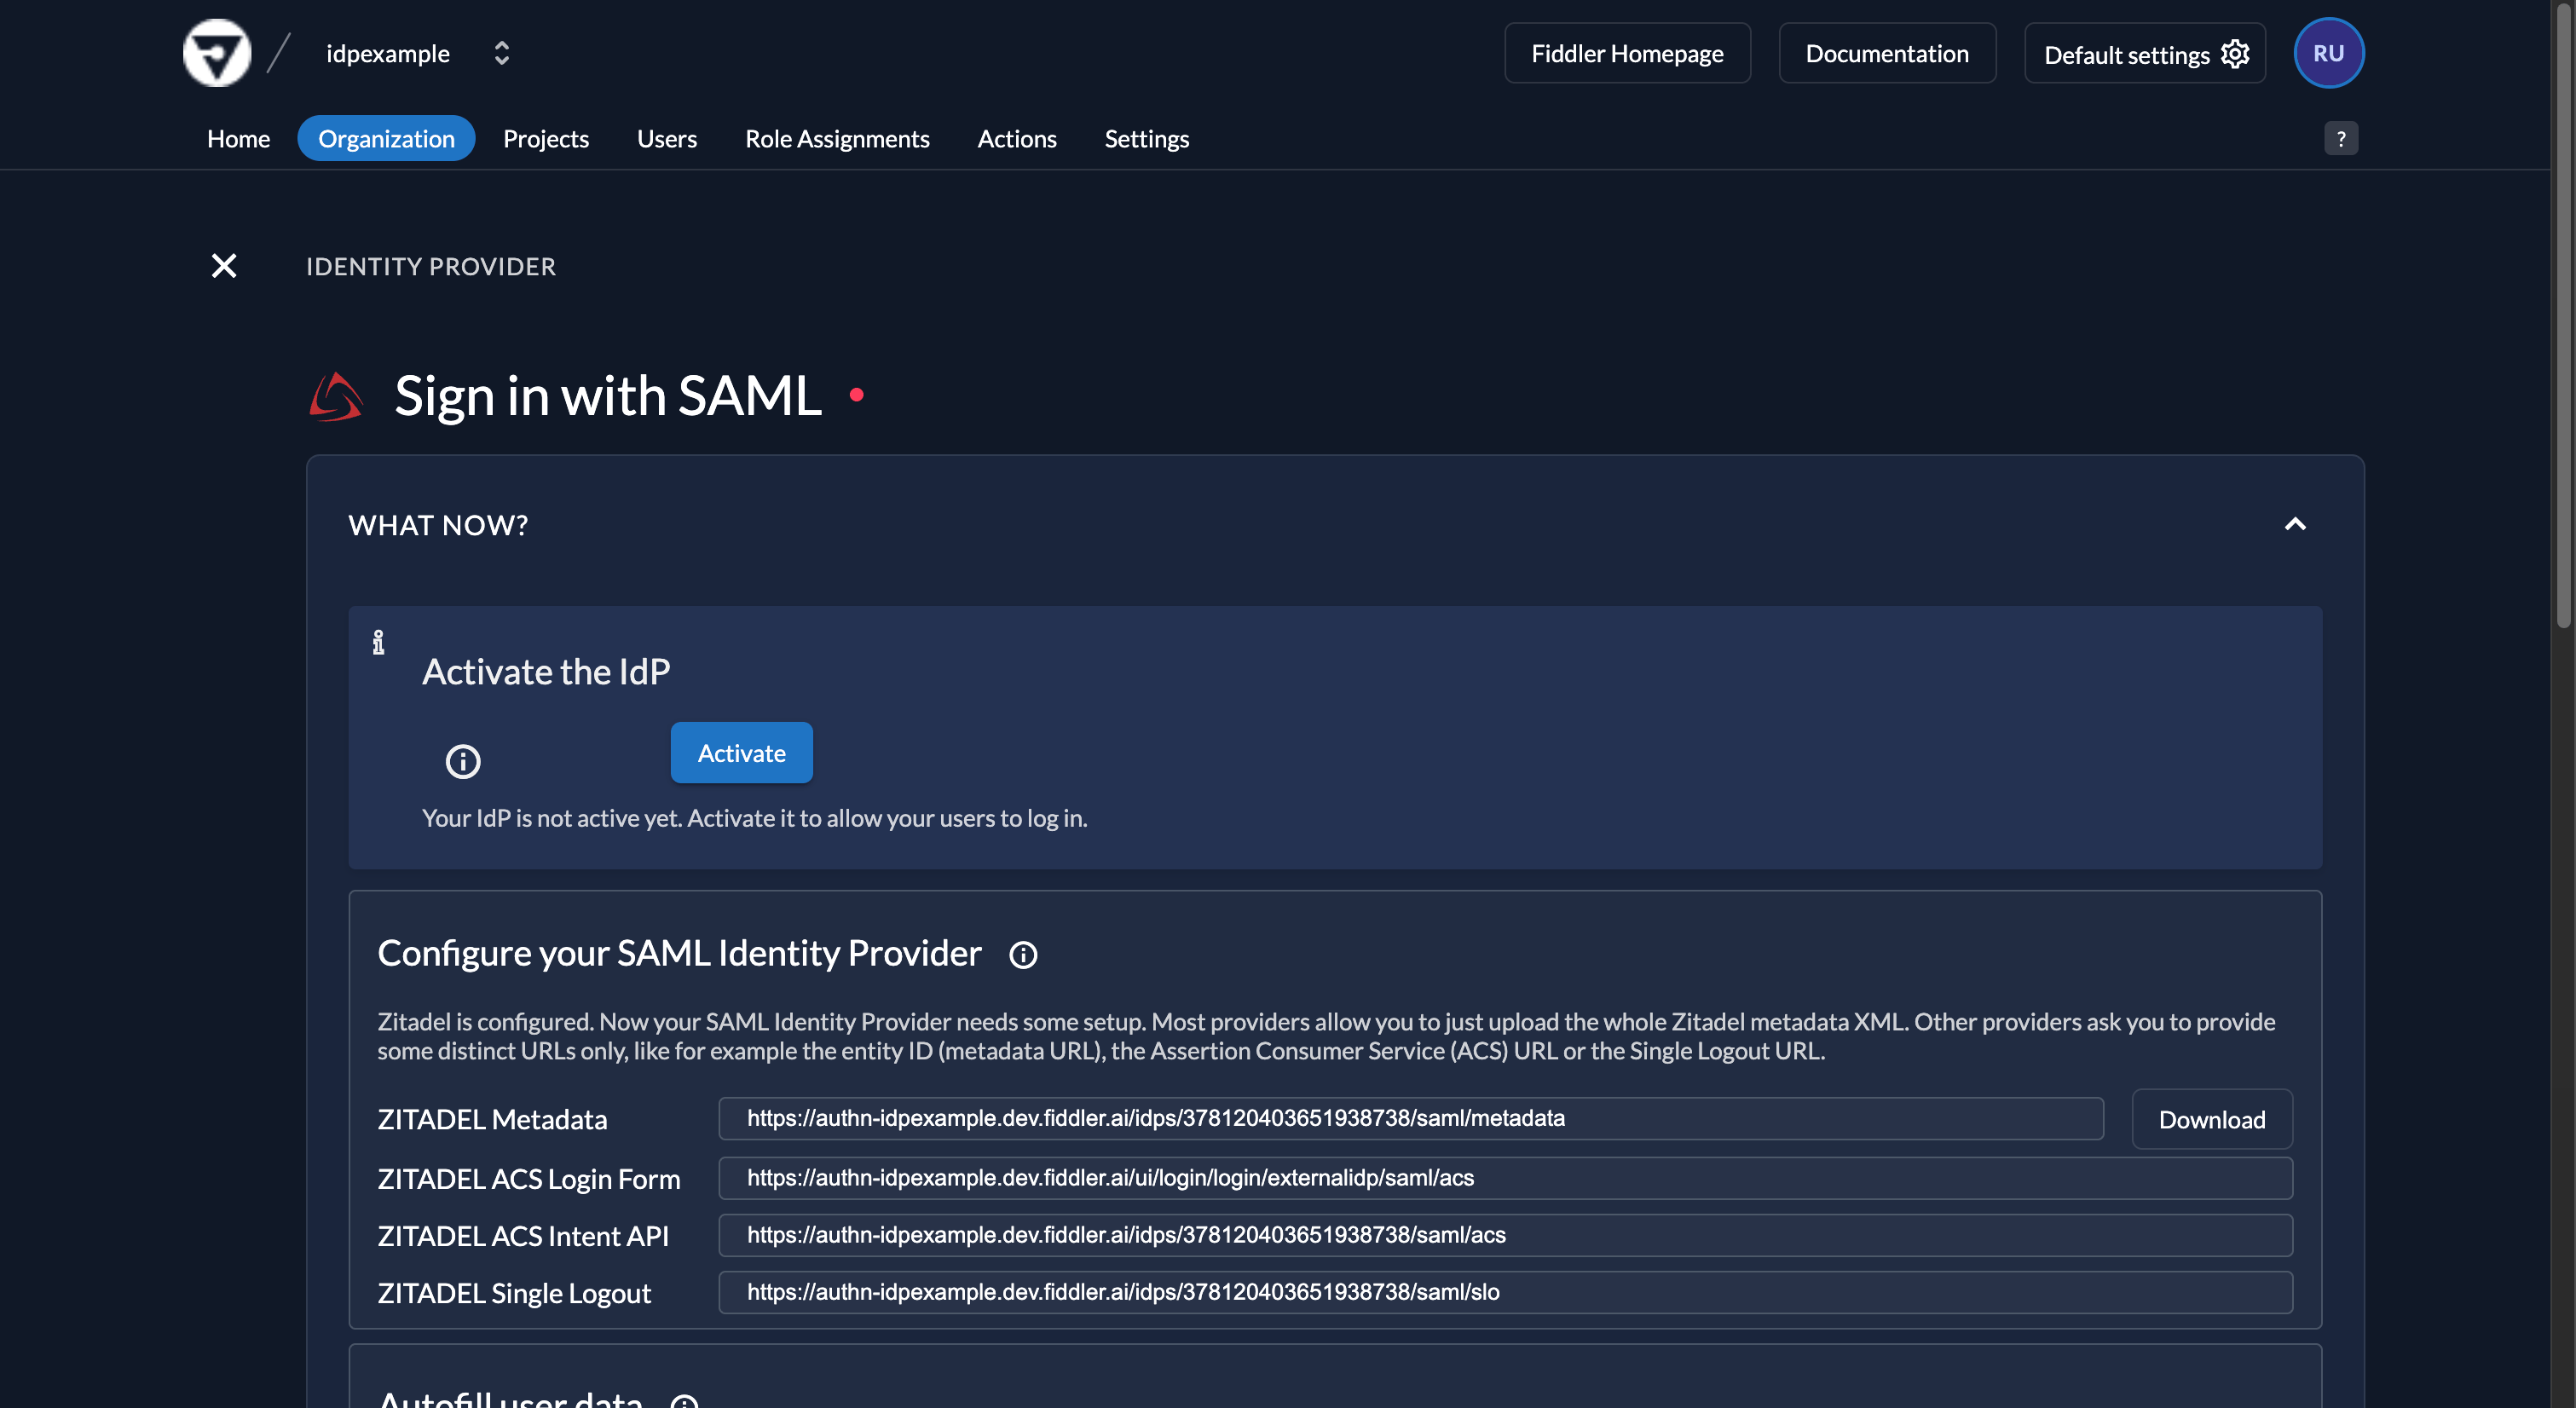
 Select your IdP from the list. Four URLs are displayed — copy the following two for the Google Workspace configuration steps:
* ZITADEL Metadata URL
* ZITADEL ACS Login Form URL
Select your IdP from the list. Four URLs are displayed — copy the following two for the Google Workspace configuration steps:
* ZITADEL Metadata URL
* ZITADEL ACS Login Form URL
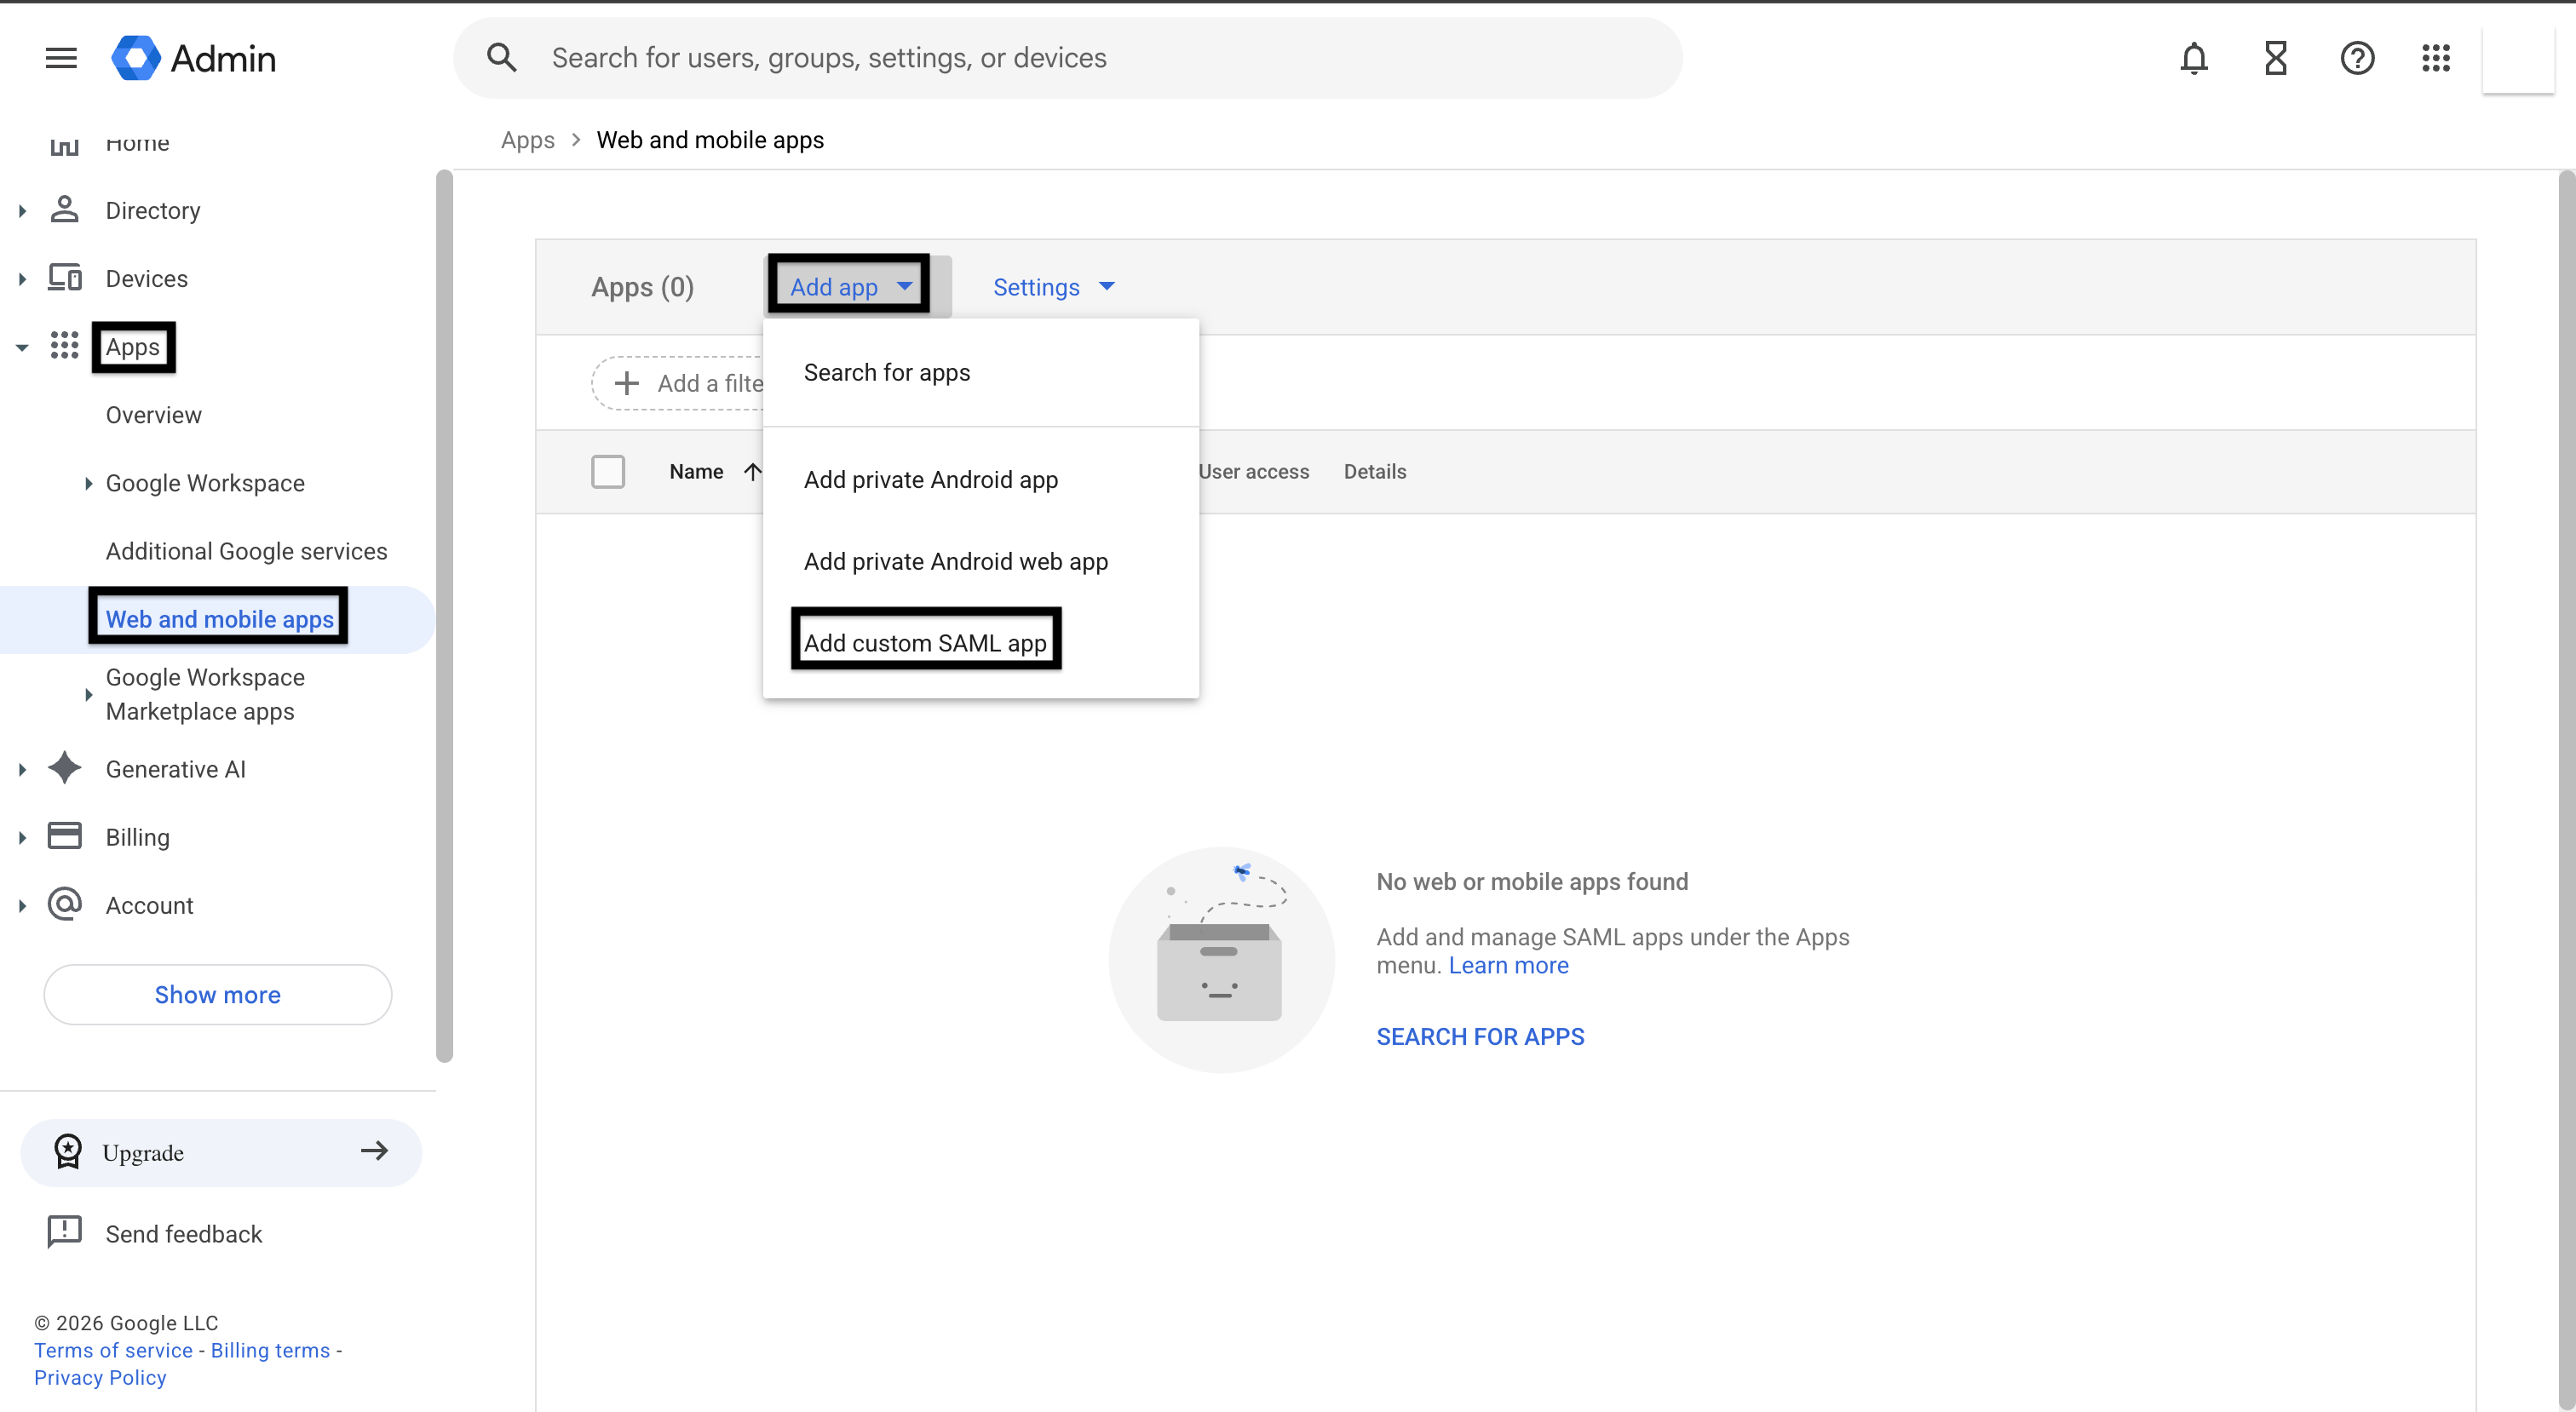
 1. In the [Google Admin console](https://admin.google.com/), go to *Apps → Web and mobile apps* and select *Add App → Add custom SAML app*.
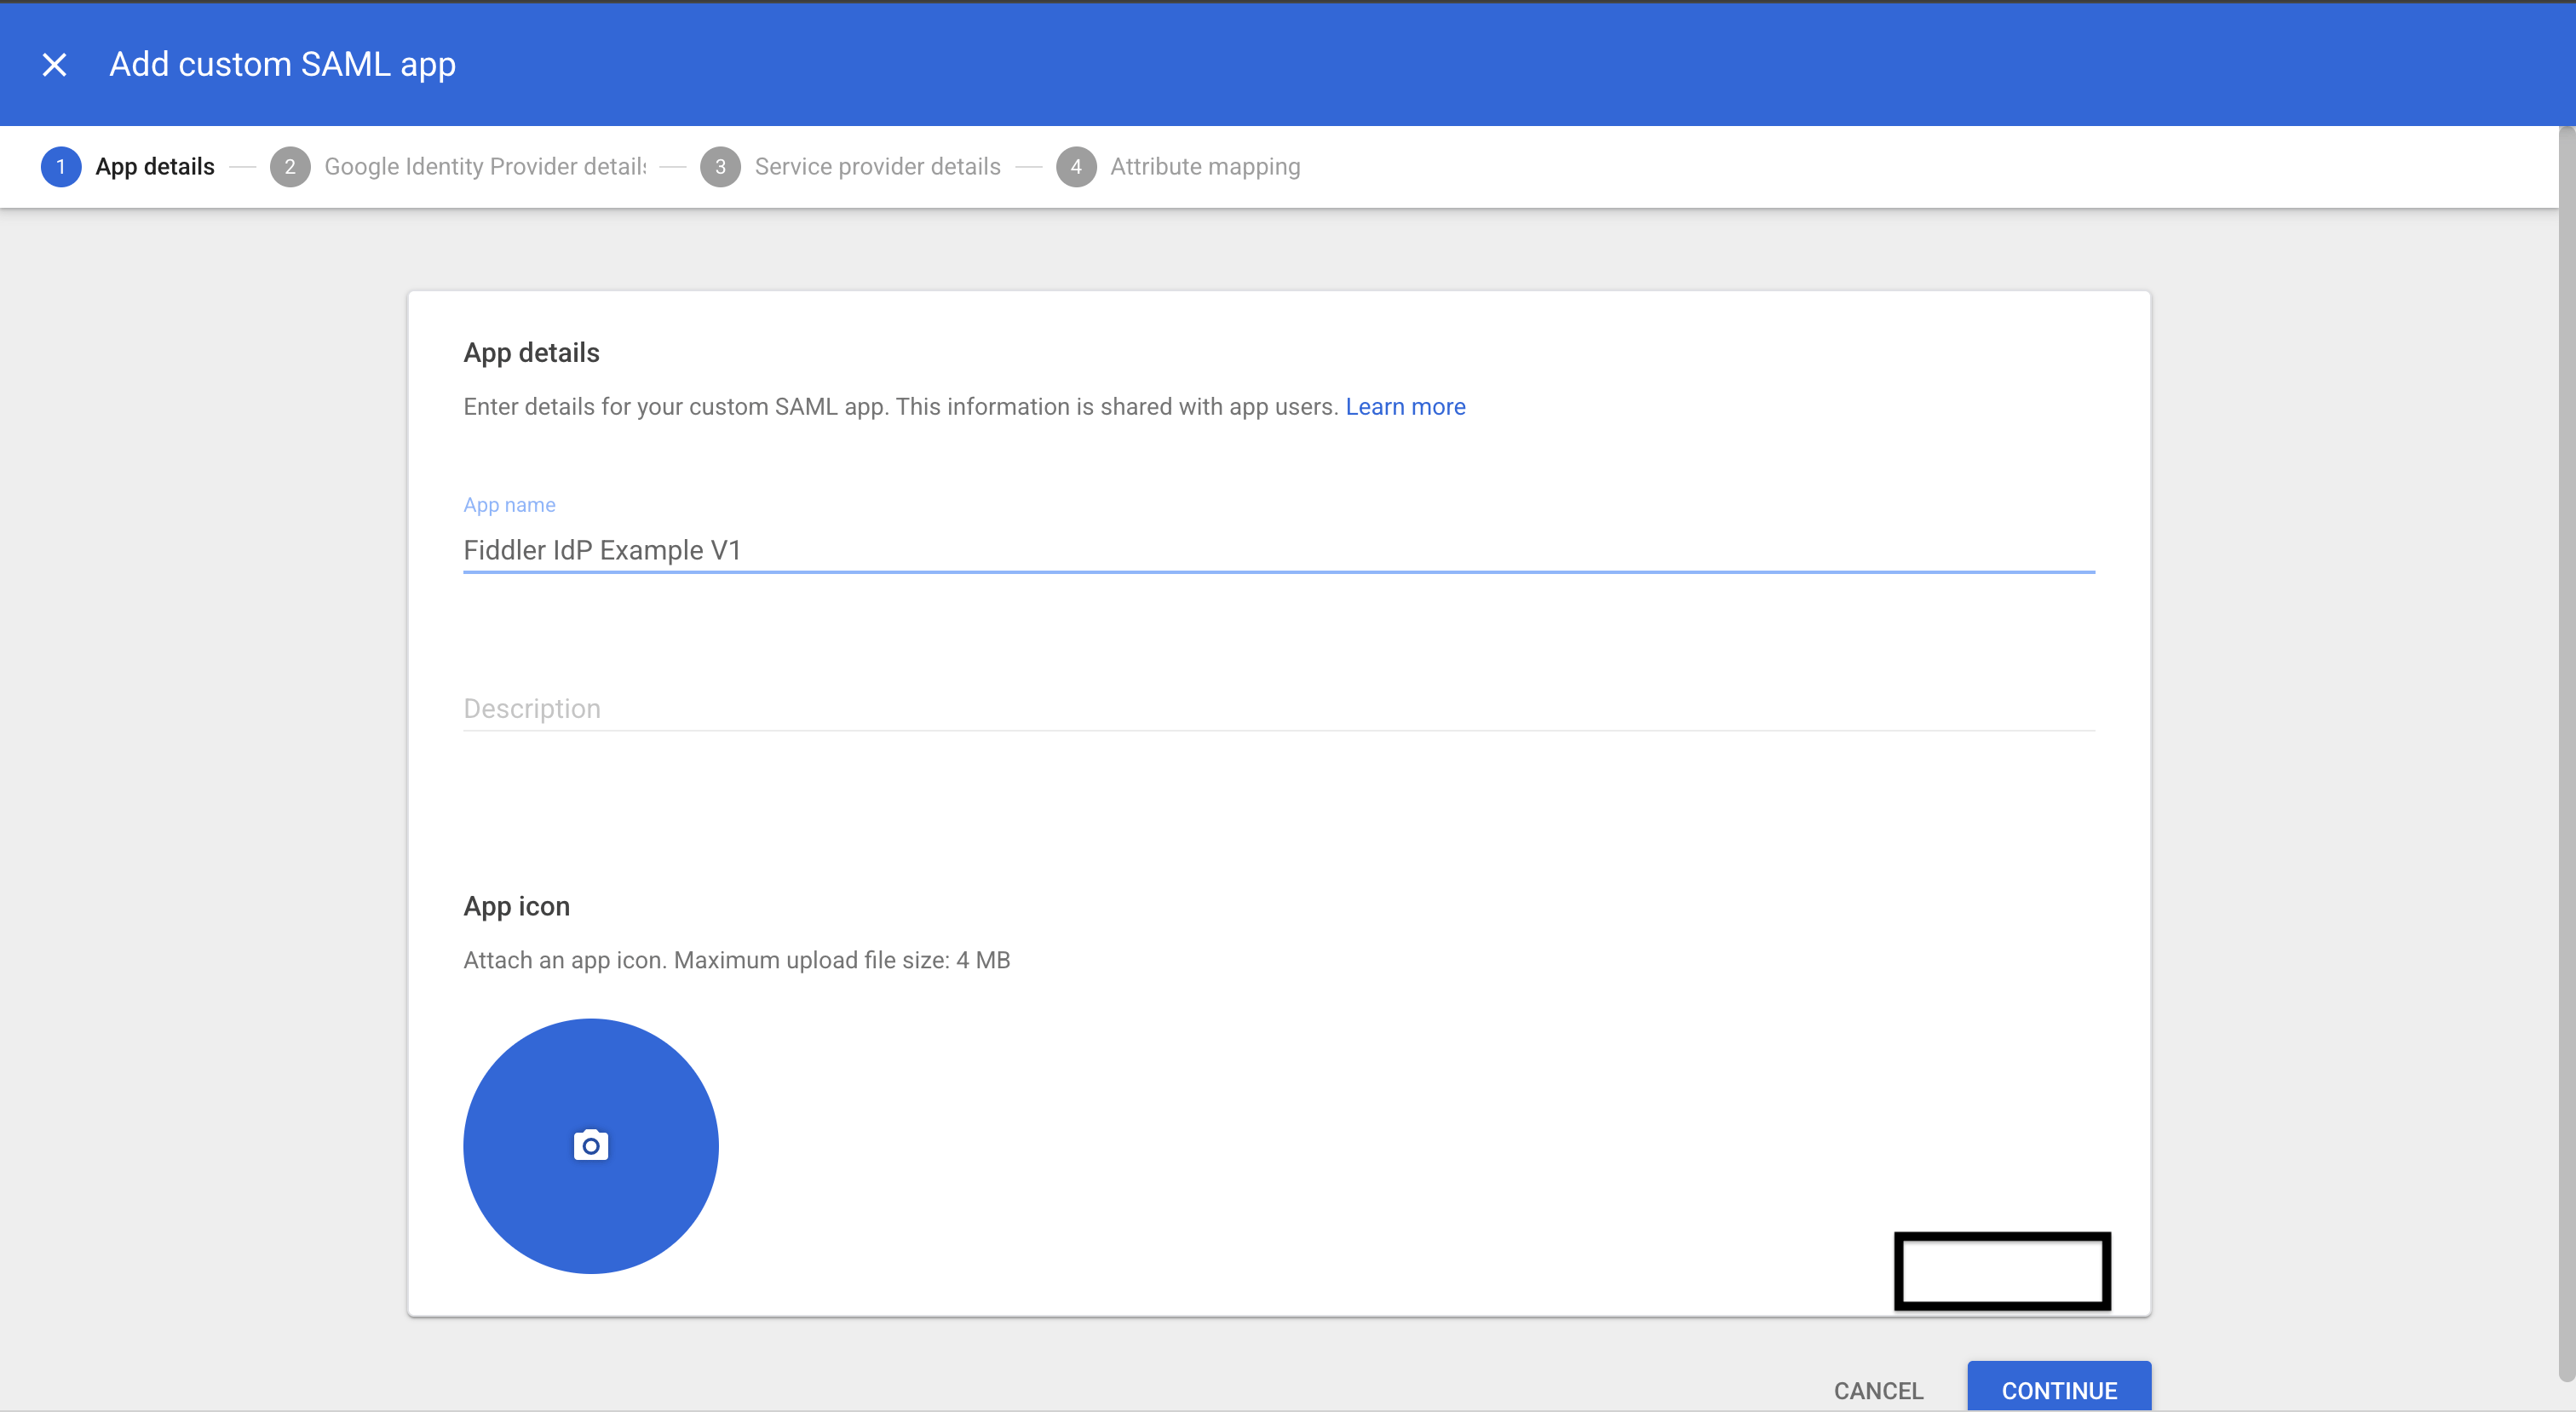
 2. Enter an app name, e.g. `Fiddler IdP Example - Login V1`, then select *Continue*.
 3. On the *Google Identity Provider details* page, select *Download Metadata*. This saves a `GoogleIDPMetadata.xml` file that you will use to replace the placeholder in a later step. Select *Continue*.
 Google does not publish a fetchable metadata URL, so pasting this XML is the only way to give Fiddler Google's metadata.
4. On the *Service provider details* page, enter the values copied from the AuthN console:
1. *ACS URL*: the *ZITADEL ACS Login Form URL*, which Login V1 uses.
2. *Entity ID*: the *ZITADEL Metadata URL*.
3. Leave *Signed response* unchecked and *Name ID* set to *Basic Information > Primary email*.
Google does not publish a fetchable metadata URL, so pasting this XML is the only way to give Fiddler Google's metadata.
4. On the *Service provider details* page, enter the values copied from the AuthN console:
1. *ACS URL*: the *ZITADEL ACS Login Form URL*, which Login V1 uses.
2. *Entity ID*: the *ZITADEL Metadata URL*.
3. Leave *Signed response* unchecked and *Name ID* set to *Basic Information > Primary email*.
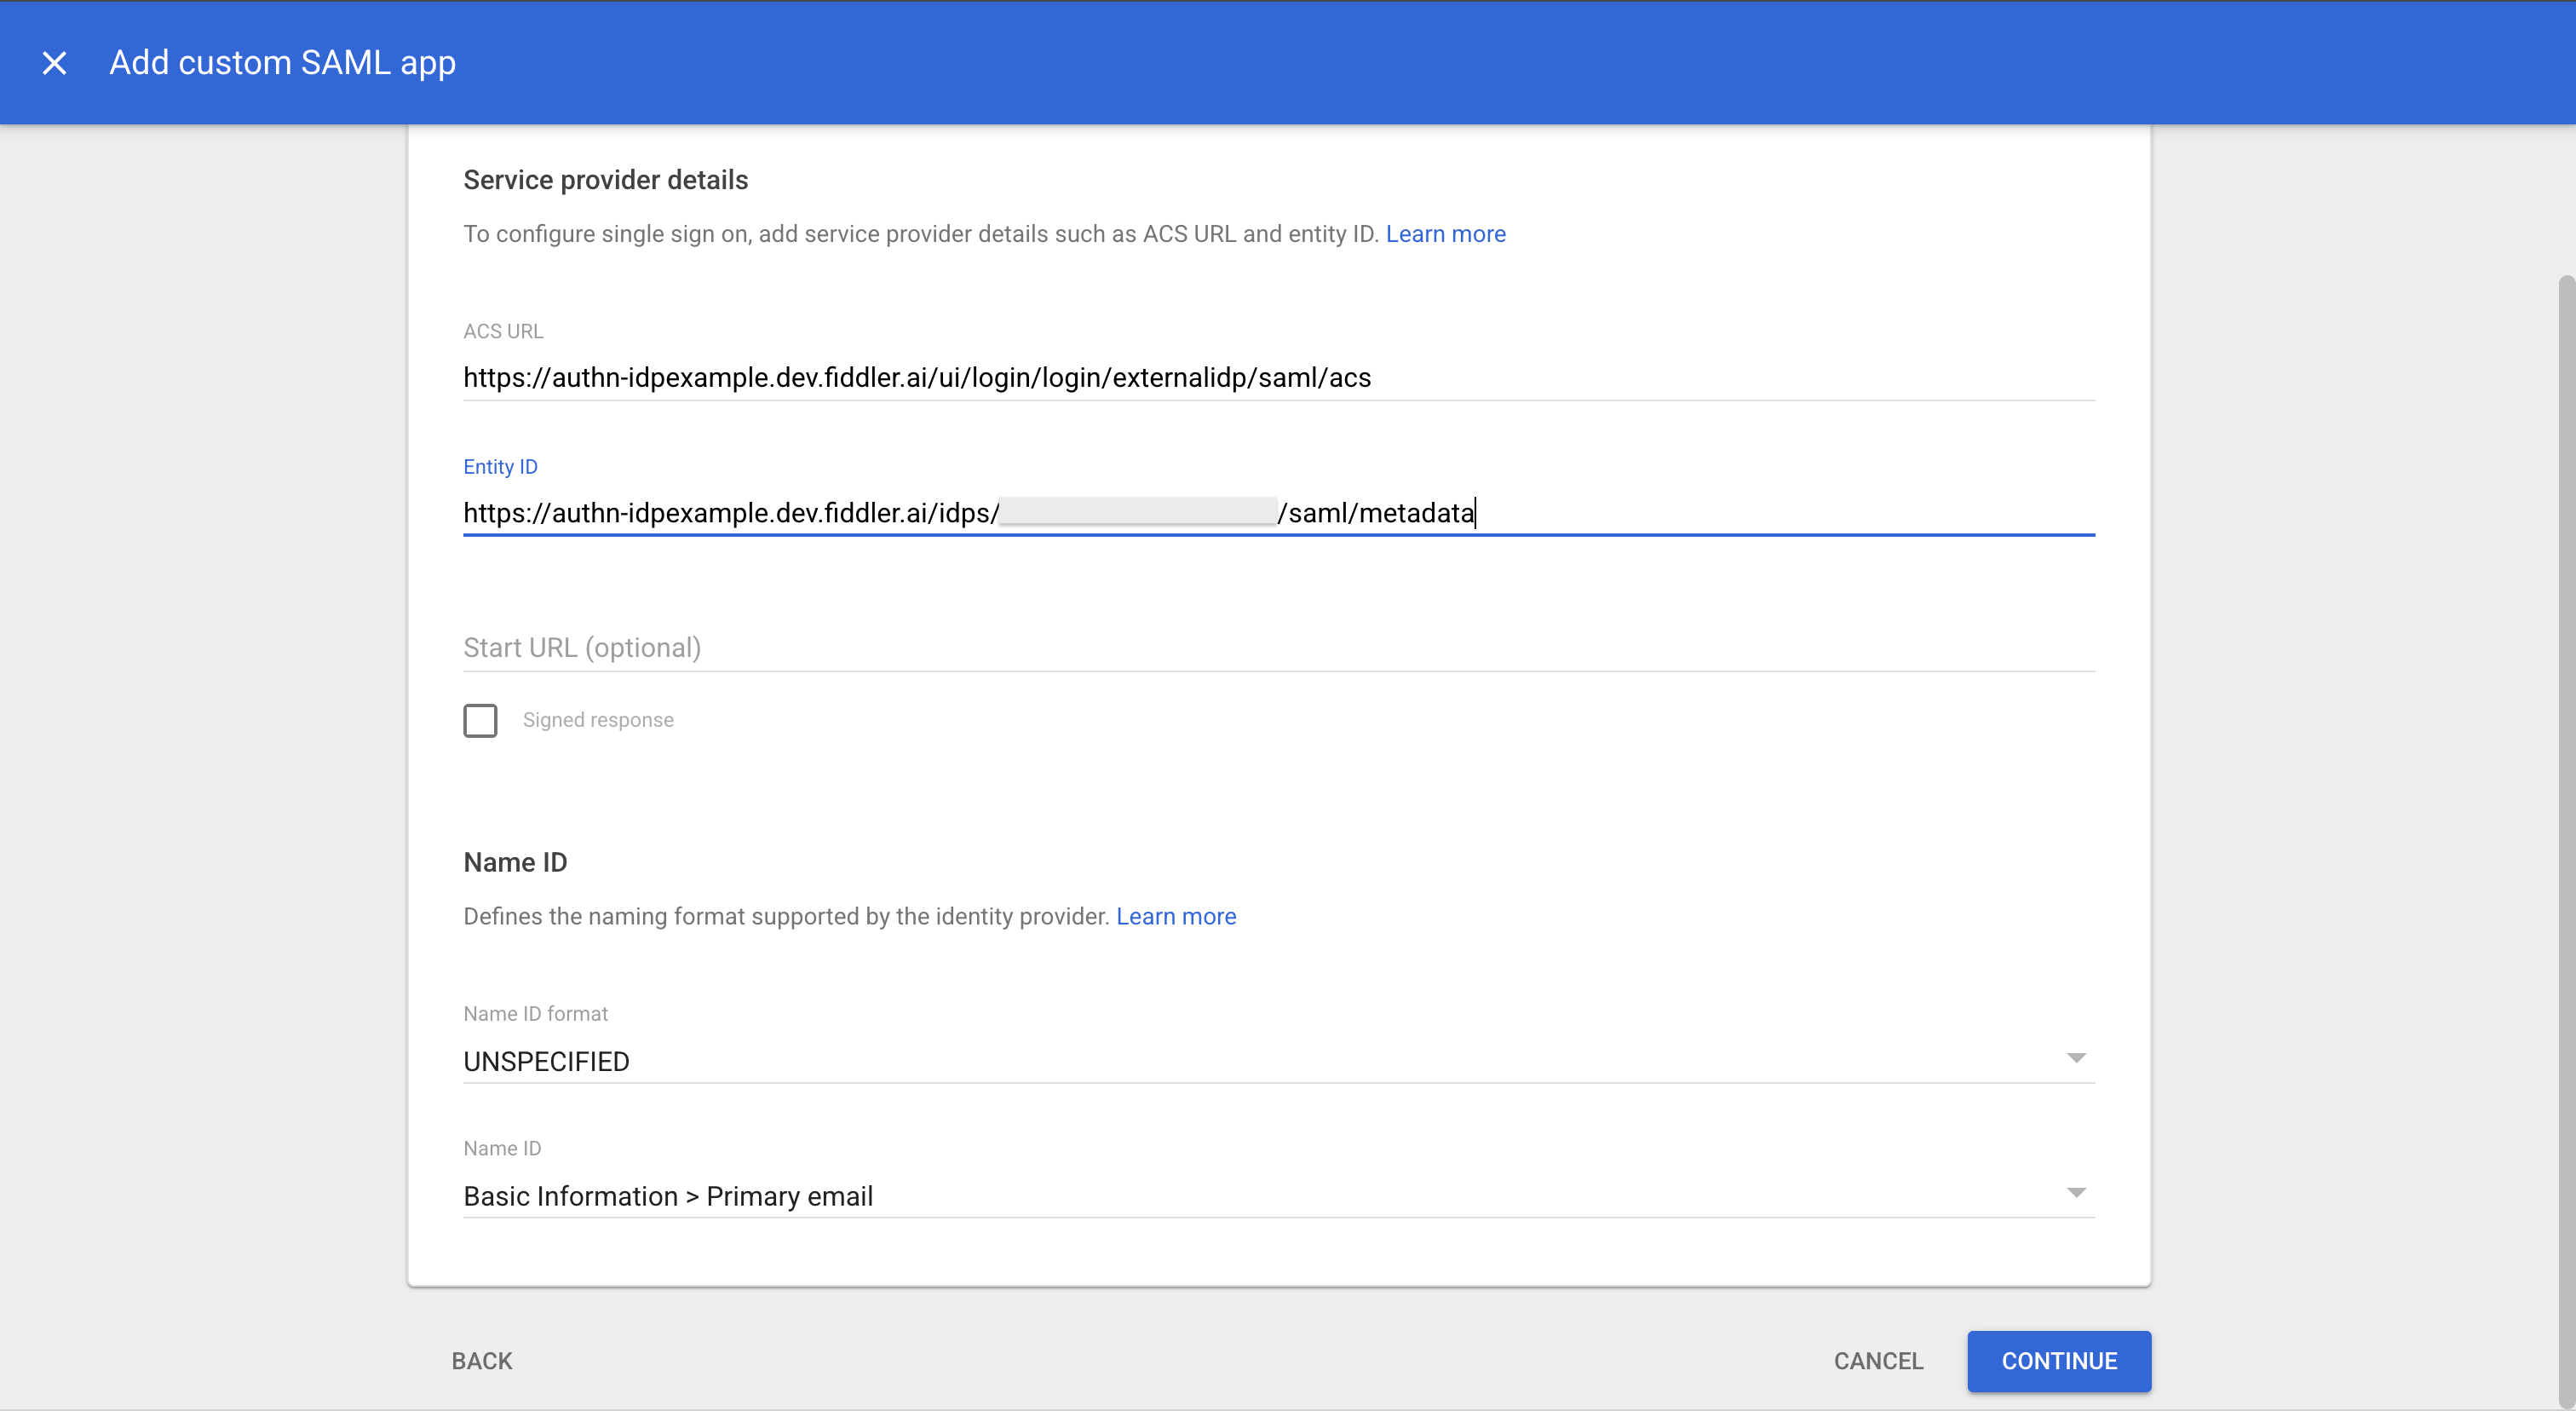 5. Select *Continue*.
Map Google directory fields to the attribute names Fiddler expects.
1. On the *Attributes* page, select *Add mapping* for each of the following:
1. *Basic Information → Primary email* → `email`
2. *Basic Information → First name* → `firstName`
3. *Basic Information → Last name* → `lastName`
5. Select *Continue*.
Map Google directory fields to the attribute names Fiddler expects.
1. On the *Attributes* page, select *Add mapping* for each of the following:
1. *Basic Information → Primary email* → `email`
2. *Basic Information → First name* → `firstName`
3. *Basic Information → Last name* → `lastName`
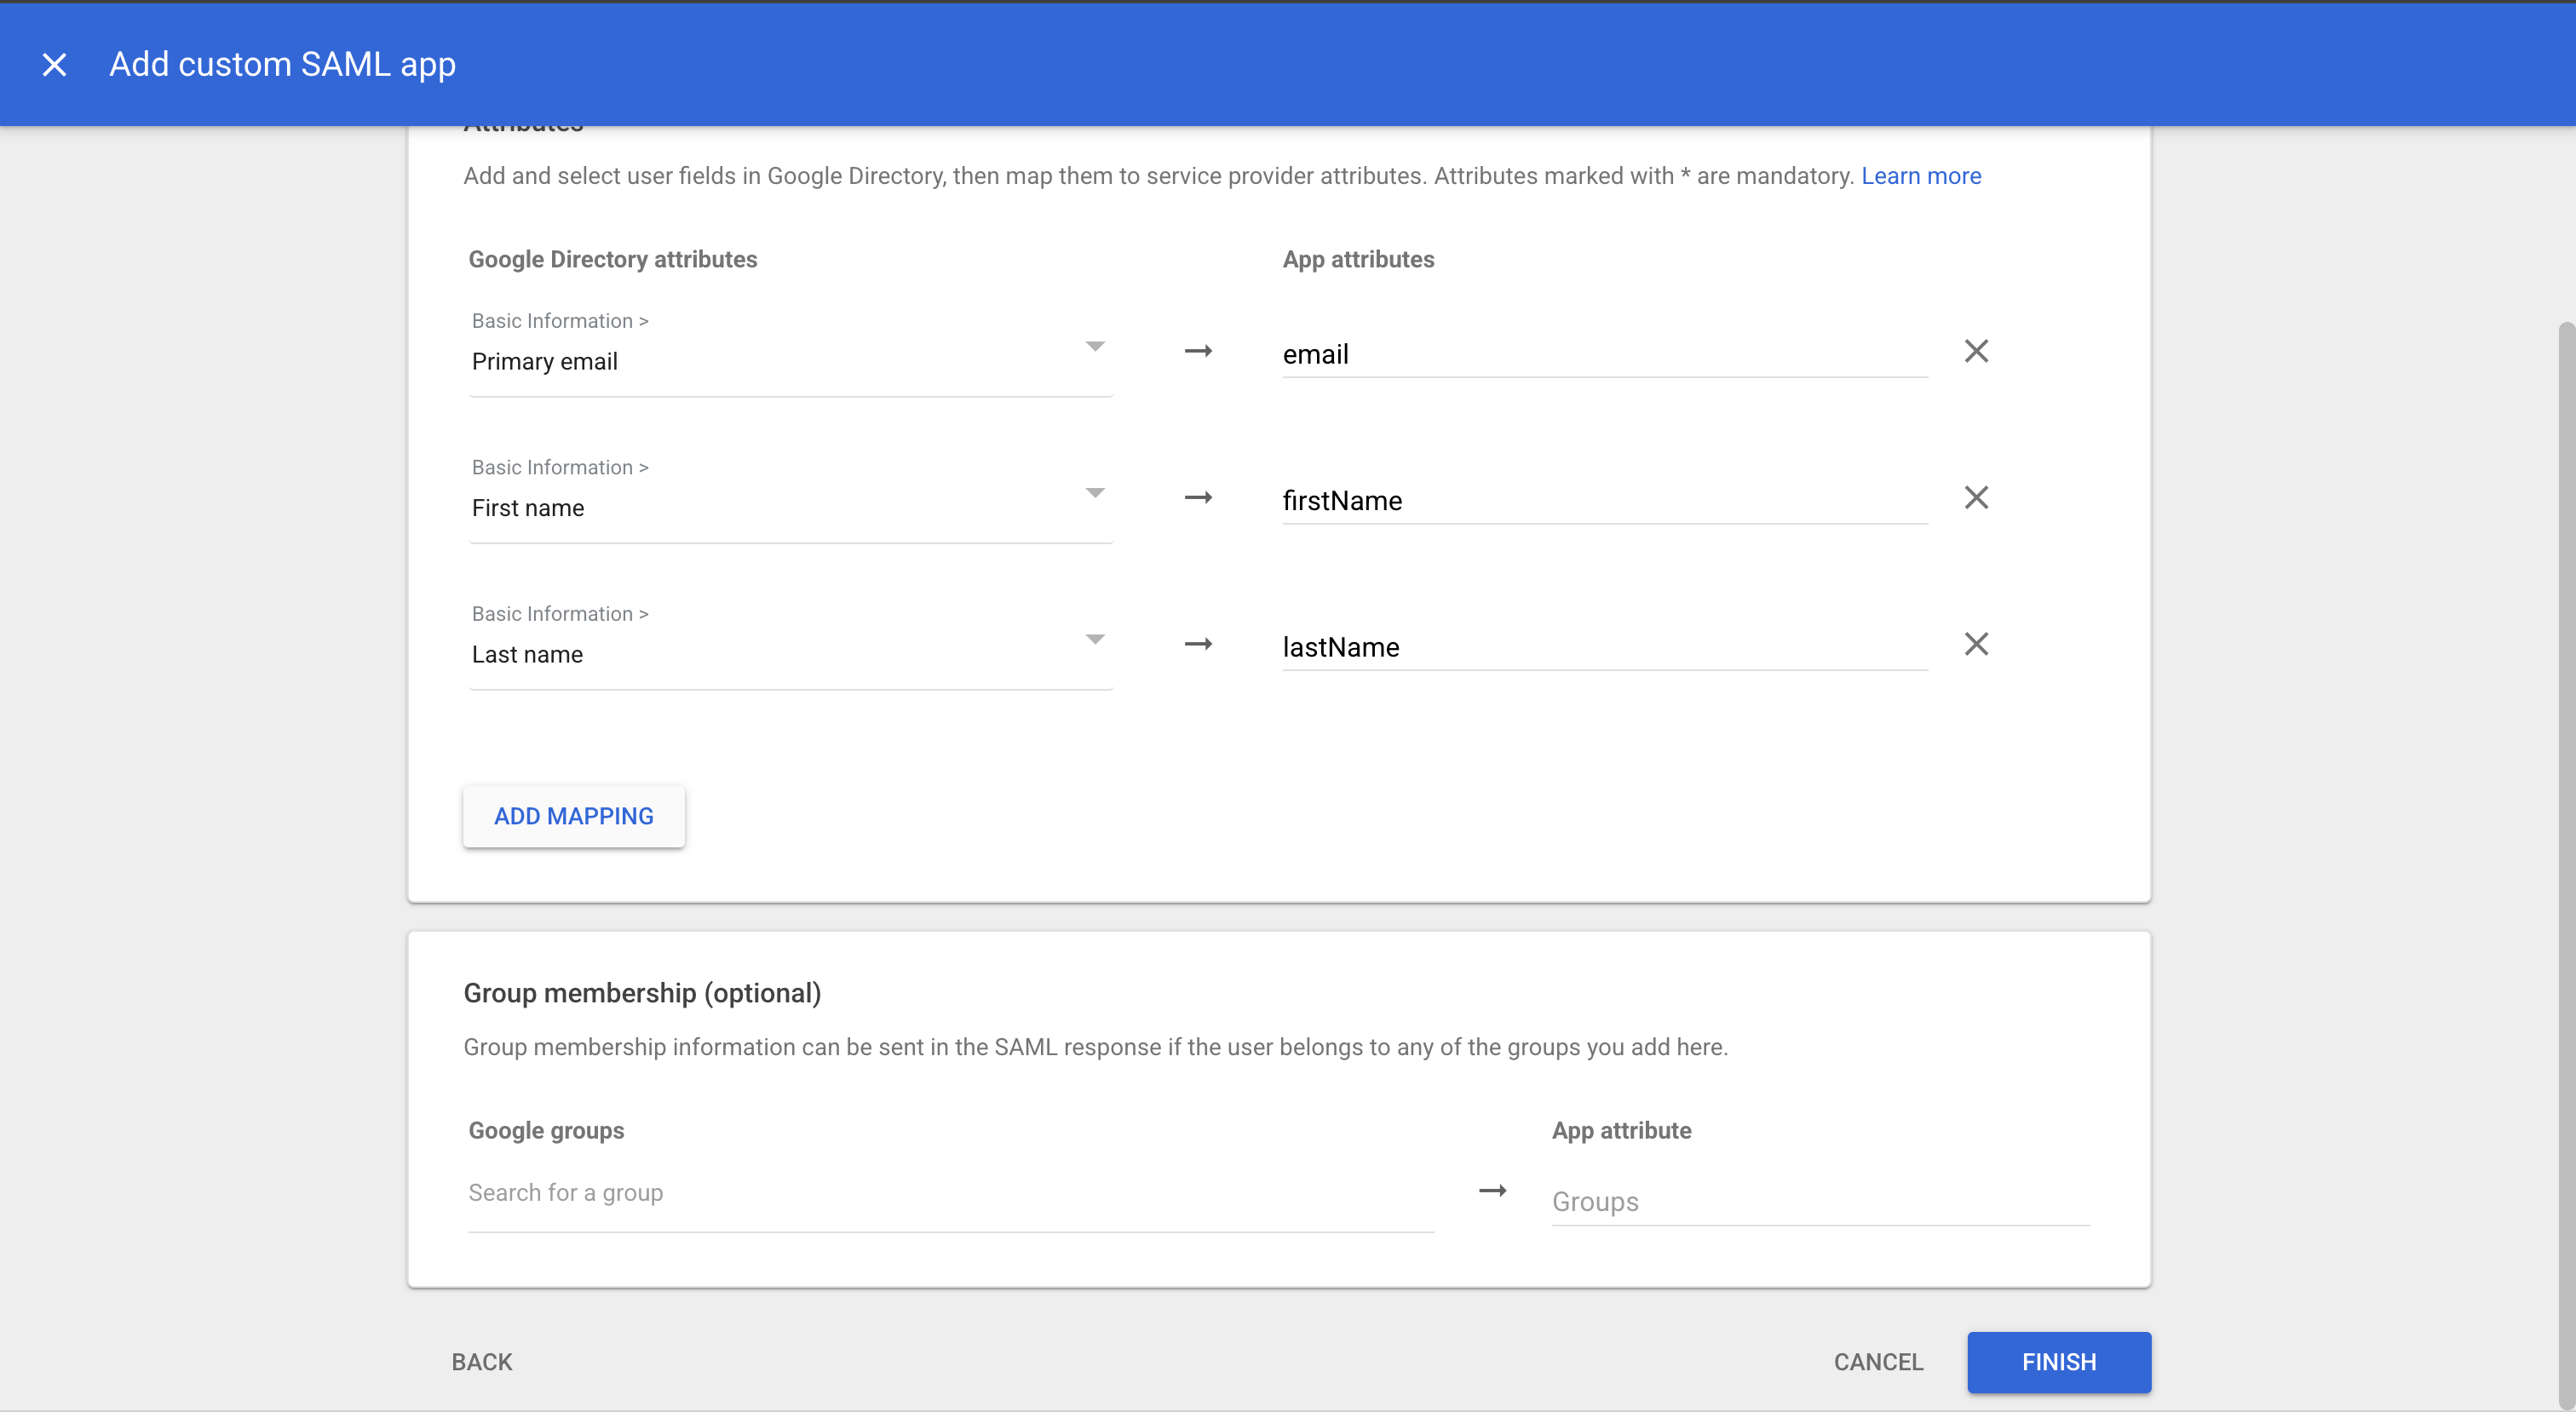 2. Select *Finish*.
Group membership is mapped separately, after the integration is working — see [Enable Group Sync](#enable-group-sync).
1. On the app page, select *User access*.
2. Select *Finish*.
Group membership is mapped separately, after the integration is working — see [Enable Group Sync](#enable-group-sync).
1. On the app page, select *User access*.
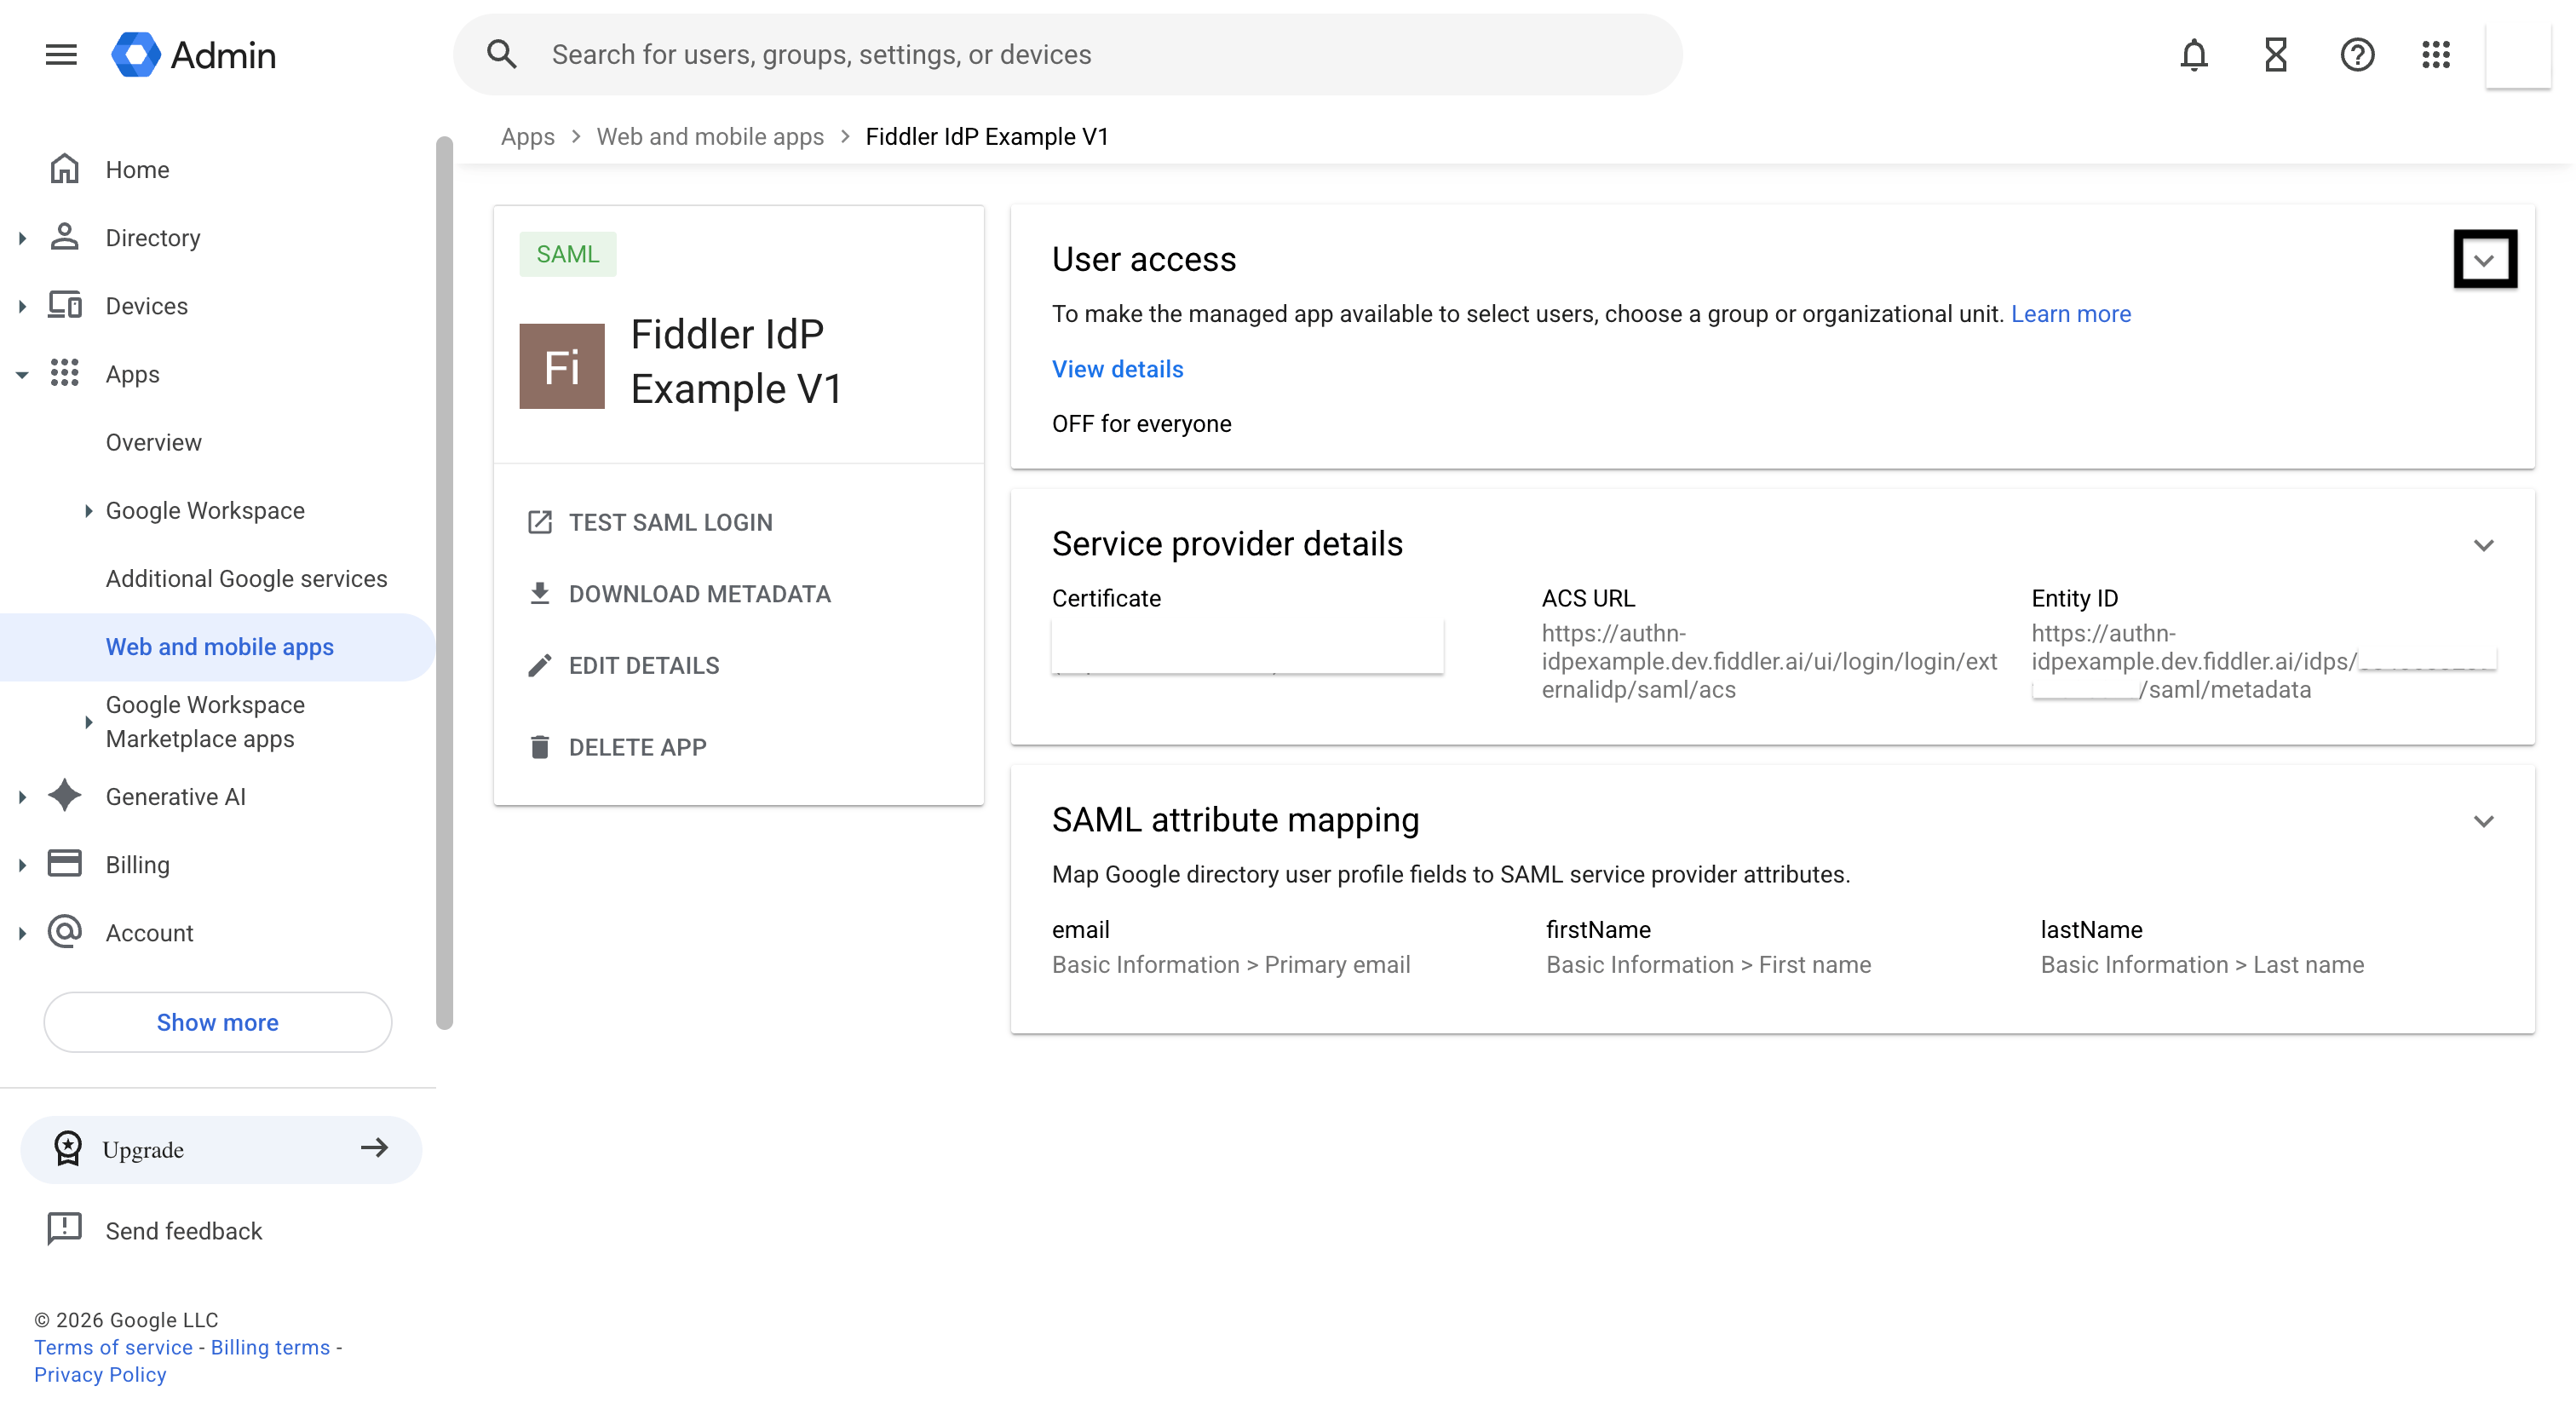 2. Select *On for everyone*, or turn the app on for the specific organizational units that should reach Fiddler, then select *Save*.
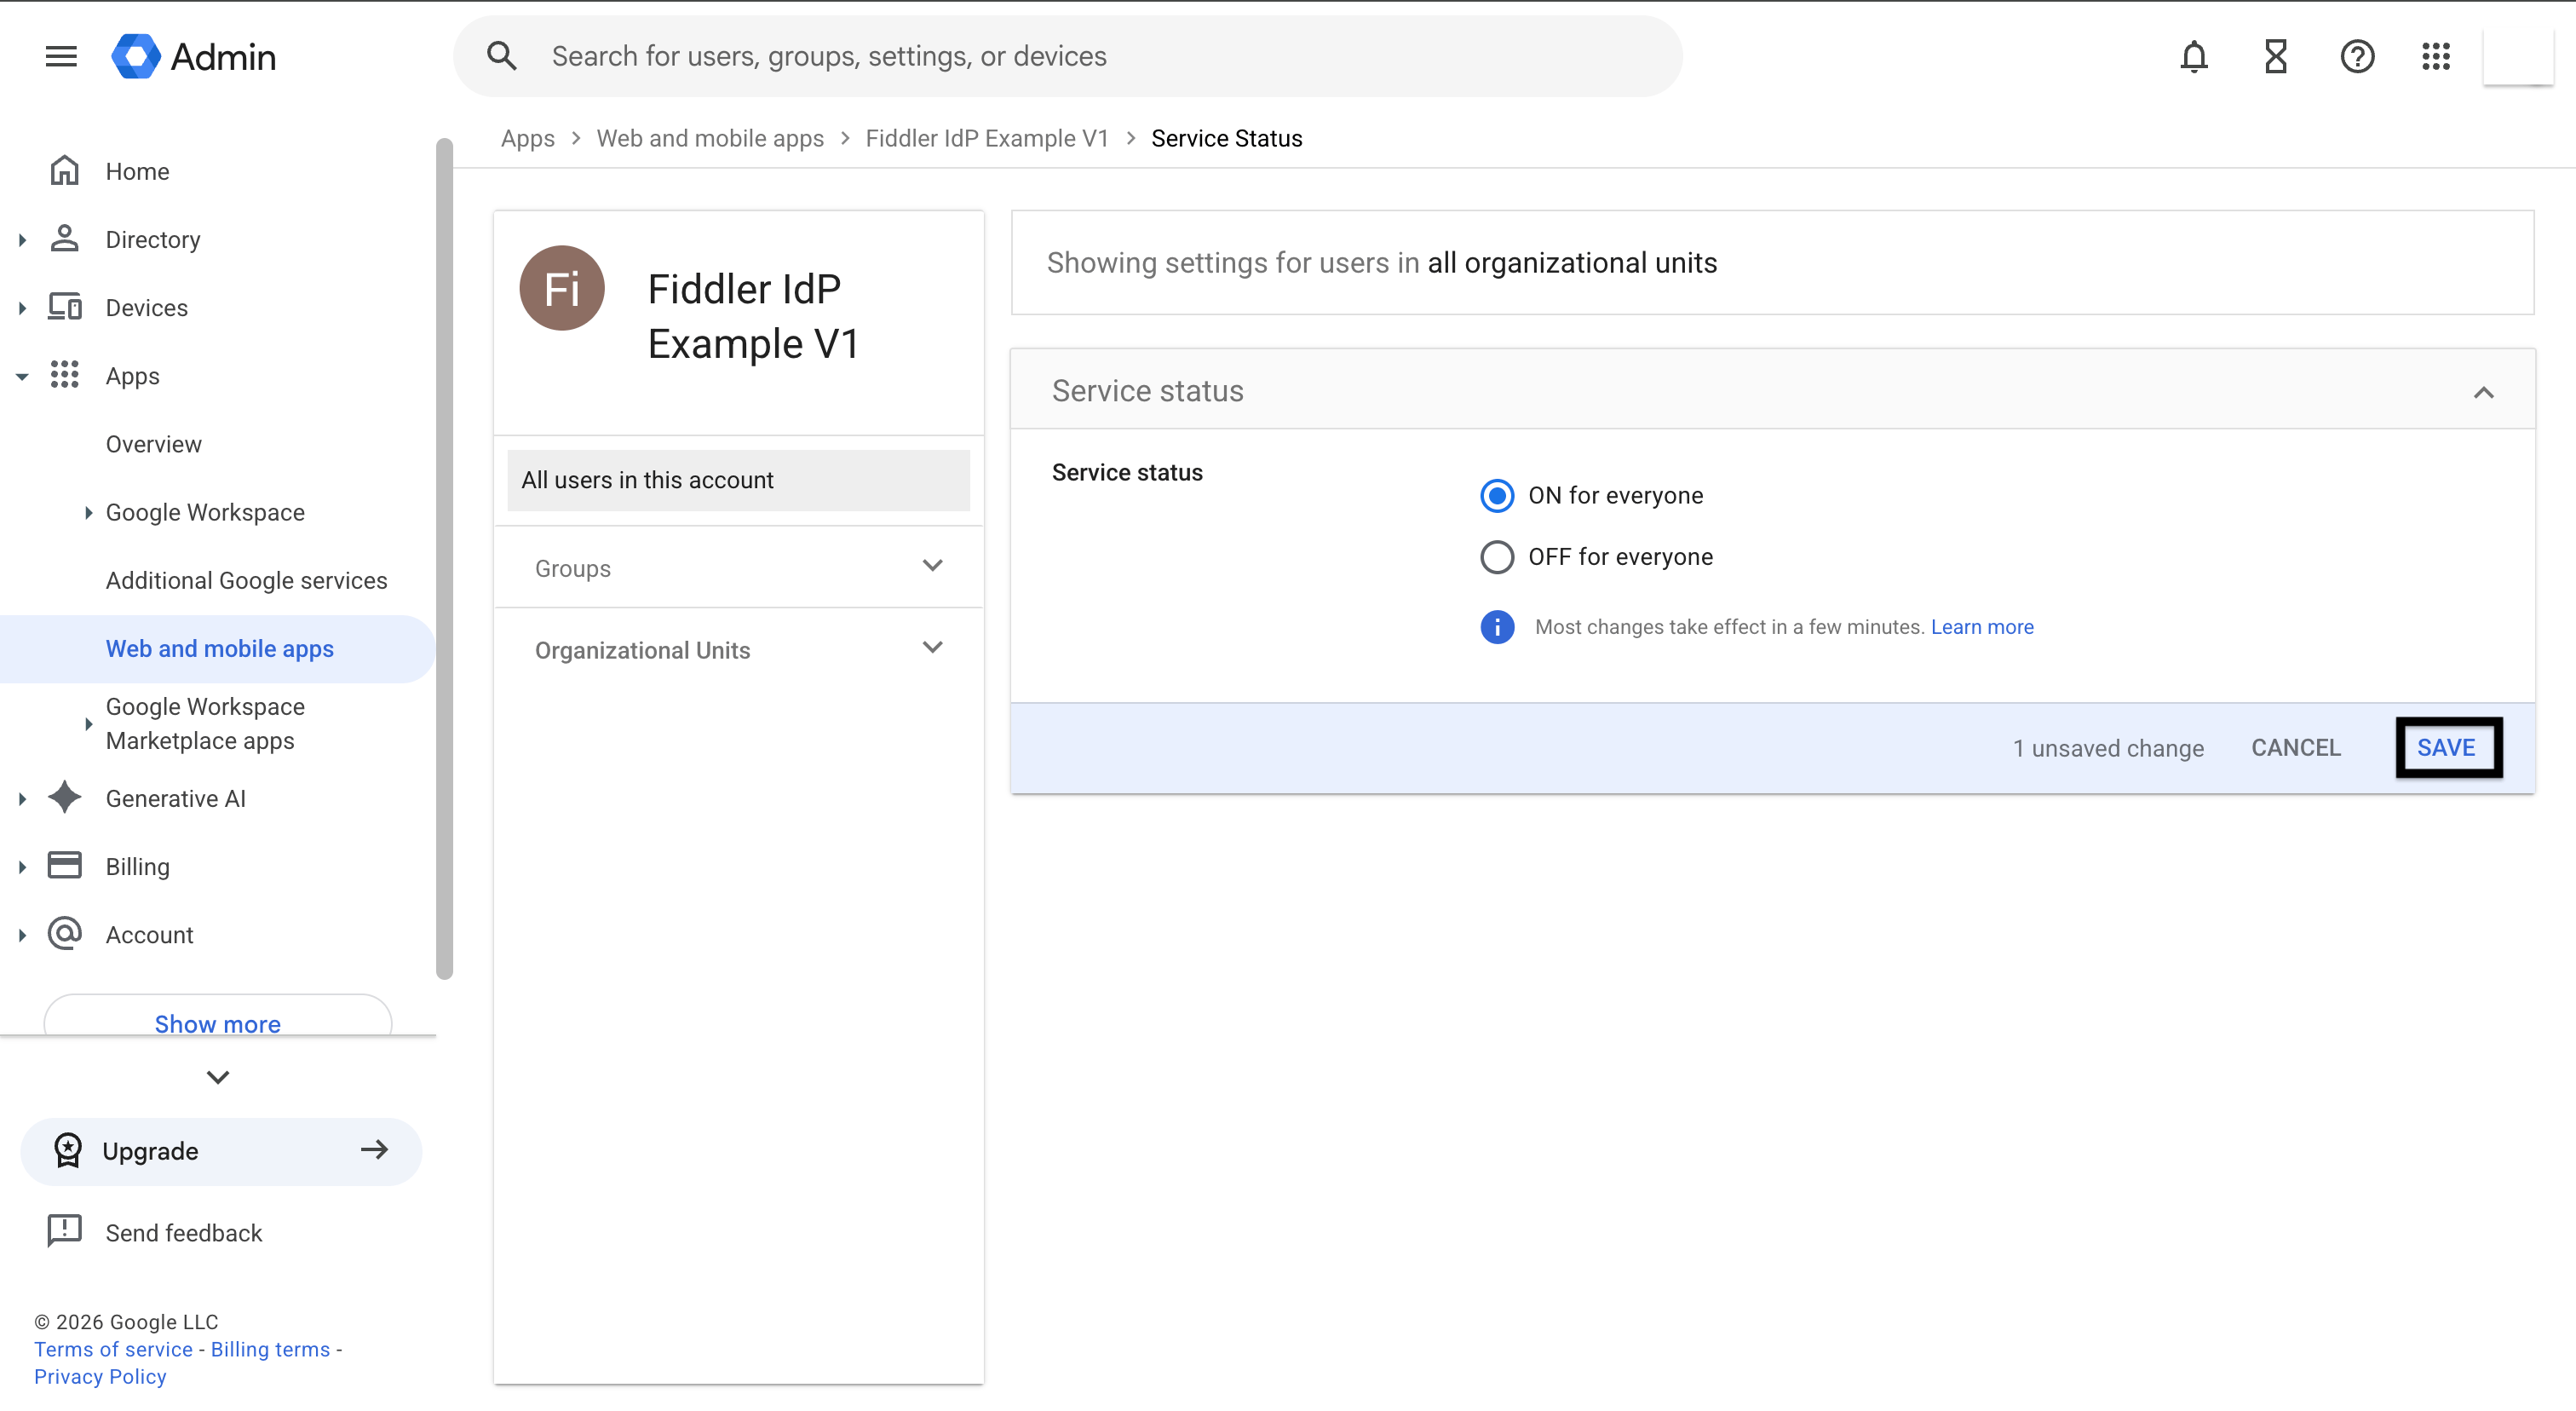 The *Metadata XML* field holds base64-encoded XML, so encode the file Google gave you before pasting it.
1. Base64-encode `GoogleIDPMetadata.xml` and copy the result to your clipboard:
```bash macOS theme={null}
base64 -i GoogleIDPMetadata.xml | tr -d '\n' | pbcopy
```
```bash Linux theme={null}
base64 -w 0 GoogleIDPMetadata.xml | tr -d '\n' | xclip -selection clipboard
```
```powershell Windows theme={null}
[Convert]::ToBase64String([IO.File]::ReadAllBytes("GoogleIDPMetadata.xml")) | Set-Clipboard
```
2. Return to the identity provider in the Fiddler AuthN console.
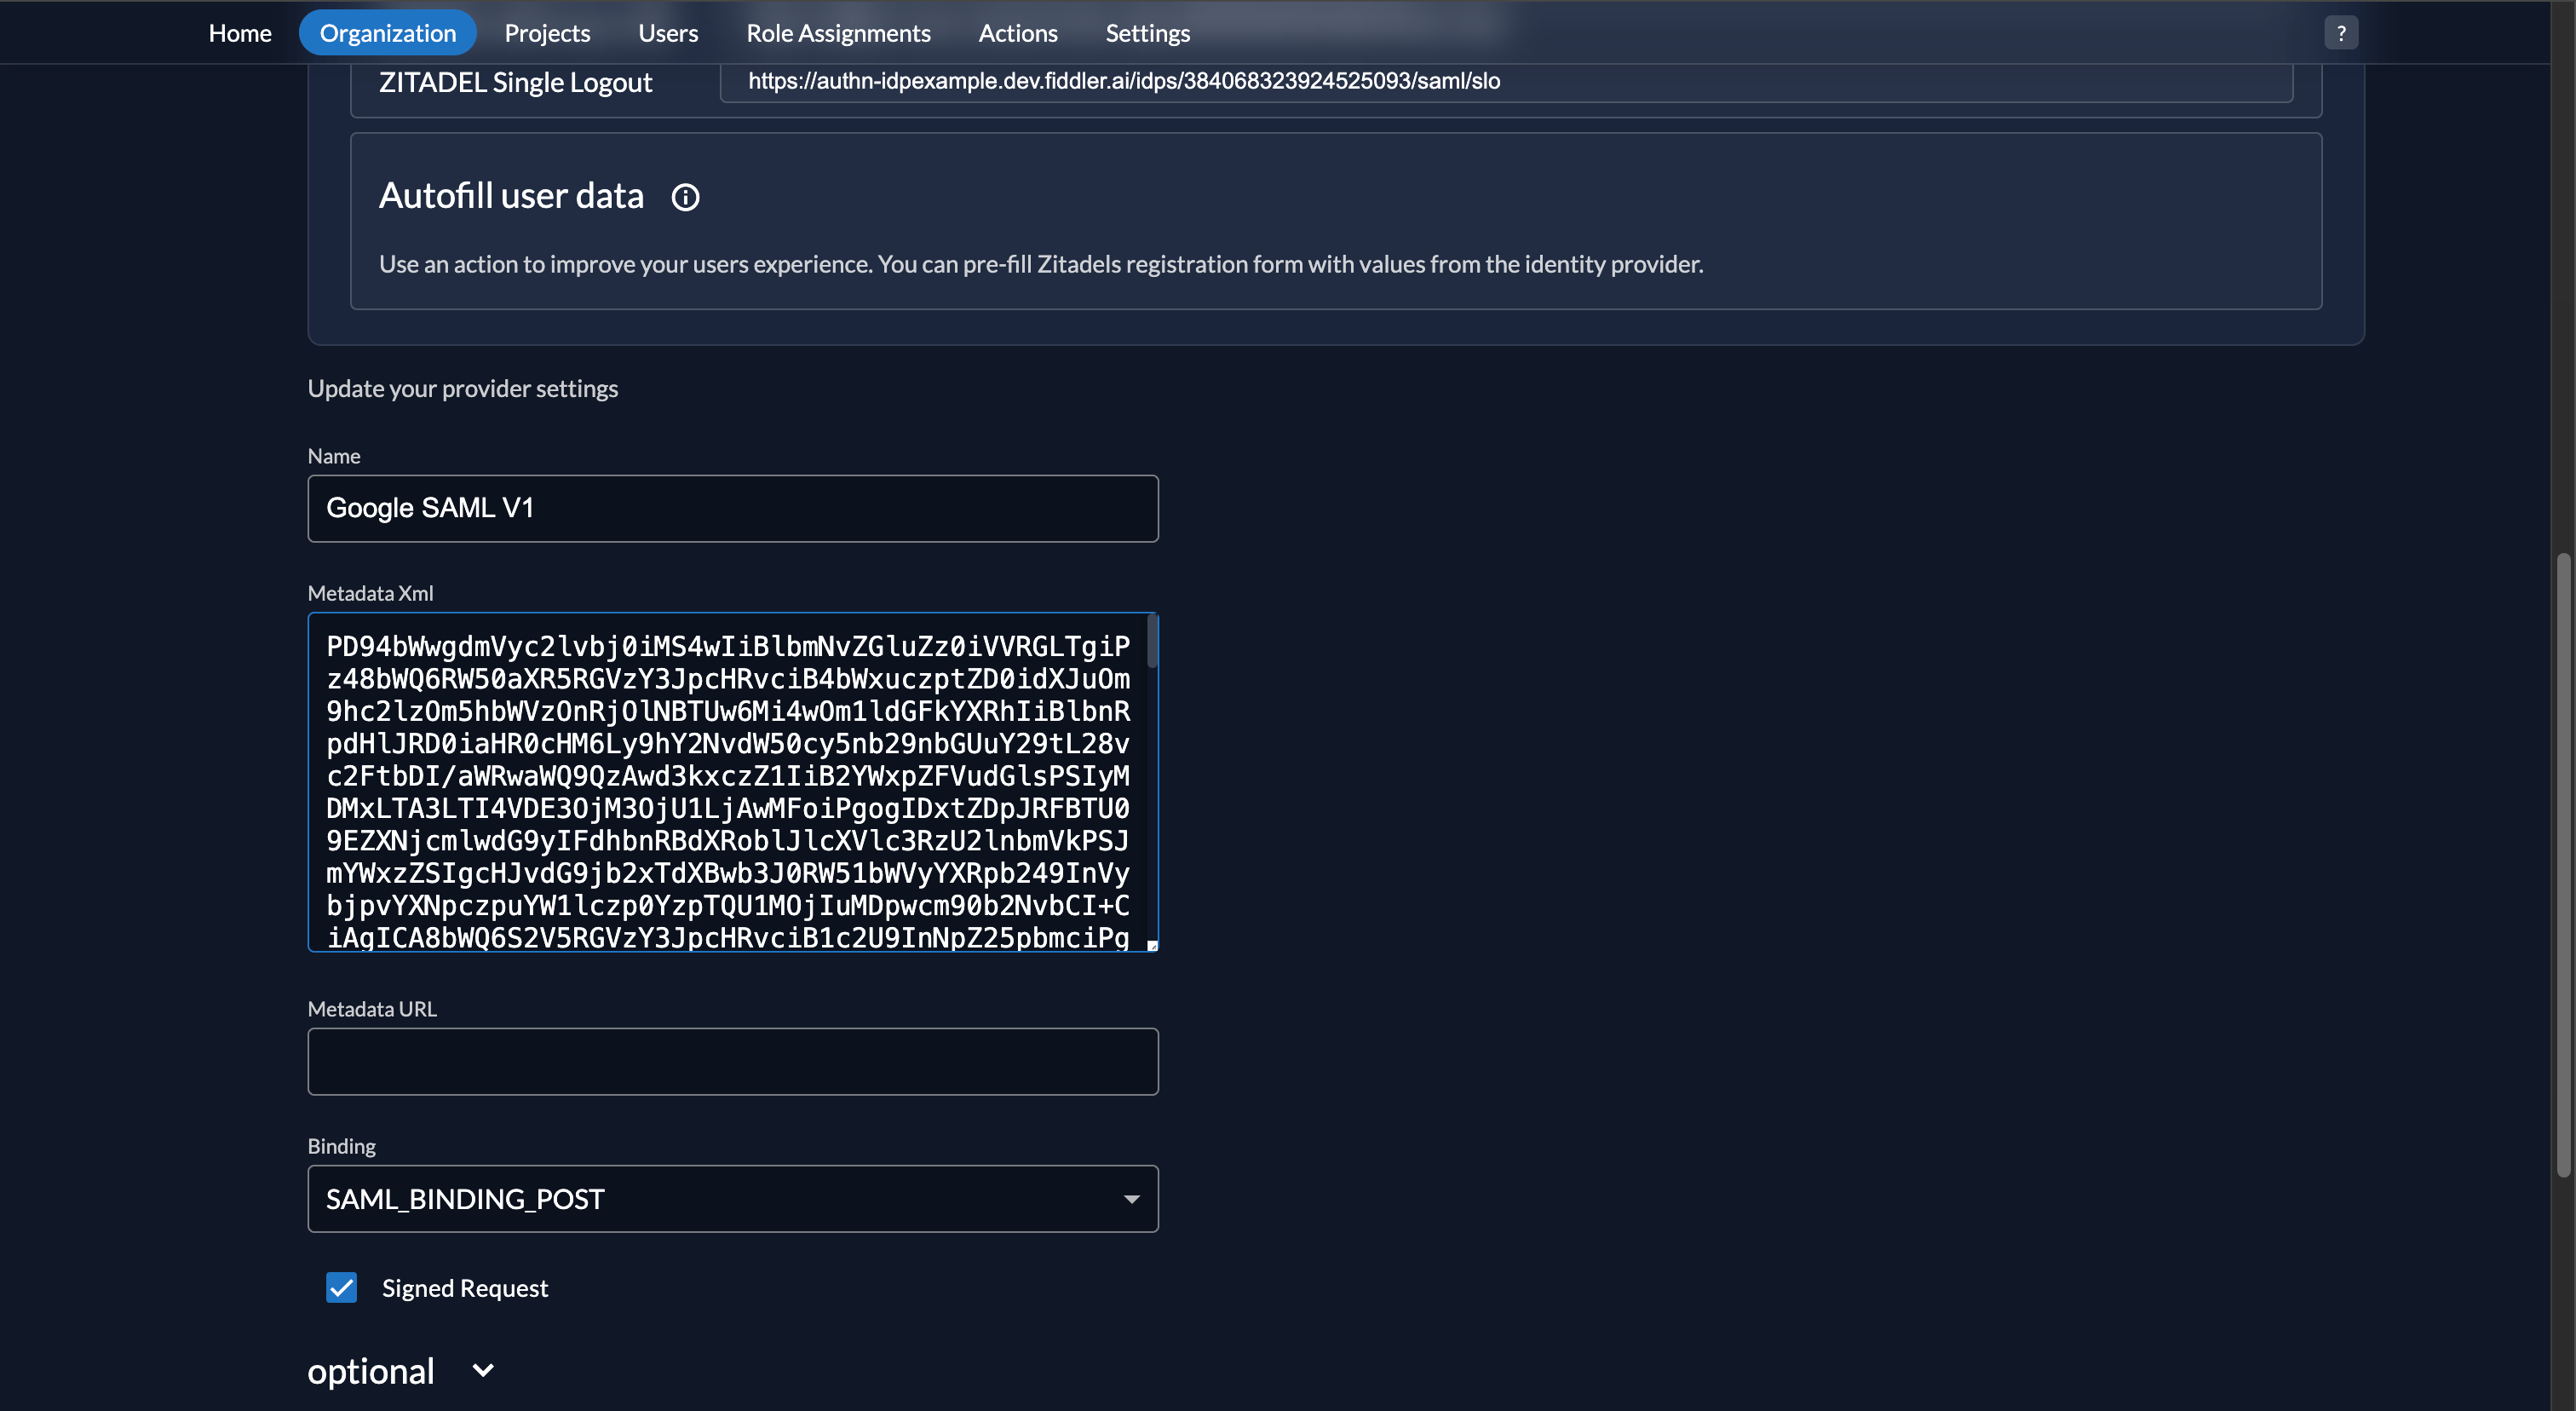
3. Clear the *Metadata XML* text area and paste the encoded value in its place. Leave the *Metadata URL* text box empty.
The *Metadata XML* field holds base64-encoded XML, so encode the file Google gave you before pasting it.
1. Base64-encode `GoogleIDPMetadata.xml` and copy the result to your clipboard:
```bash macOS theme={null}
base64 -i GoogleIDPMetadata.xml | tr -d '\n' | pbcopy
```
```bash Linux theme={null}
base64 -w 0 GoogleIDPMetadata.xml | tr -d '\n' | xclip -selection clipboard
```
```powershell Windows theme={null}
[Convert]::ToBase64String([IO.File]::ReadAllBytes("GoogleIDPMetadata.xml")) | Set-Clipboard
```
2. Return to the identity provider in the Fiddler AuthN console.
3. Clear the *Metadata XML* text area and paste the encoded value in its place. Leave the *Metadata URL* text box empty.
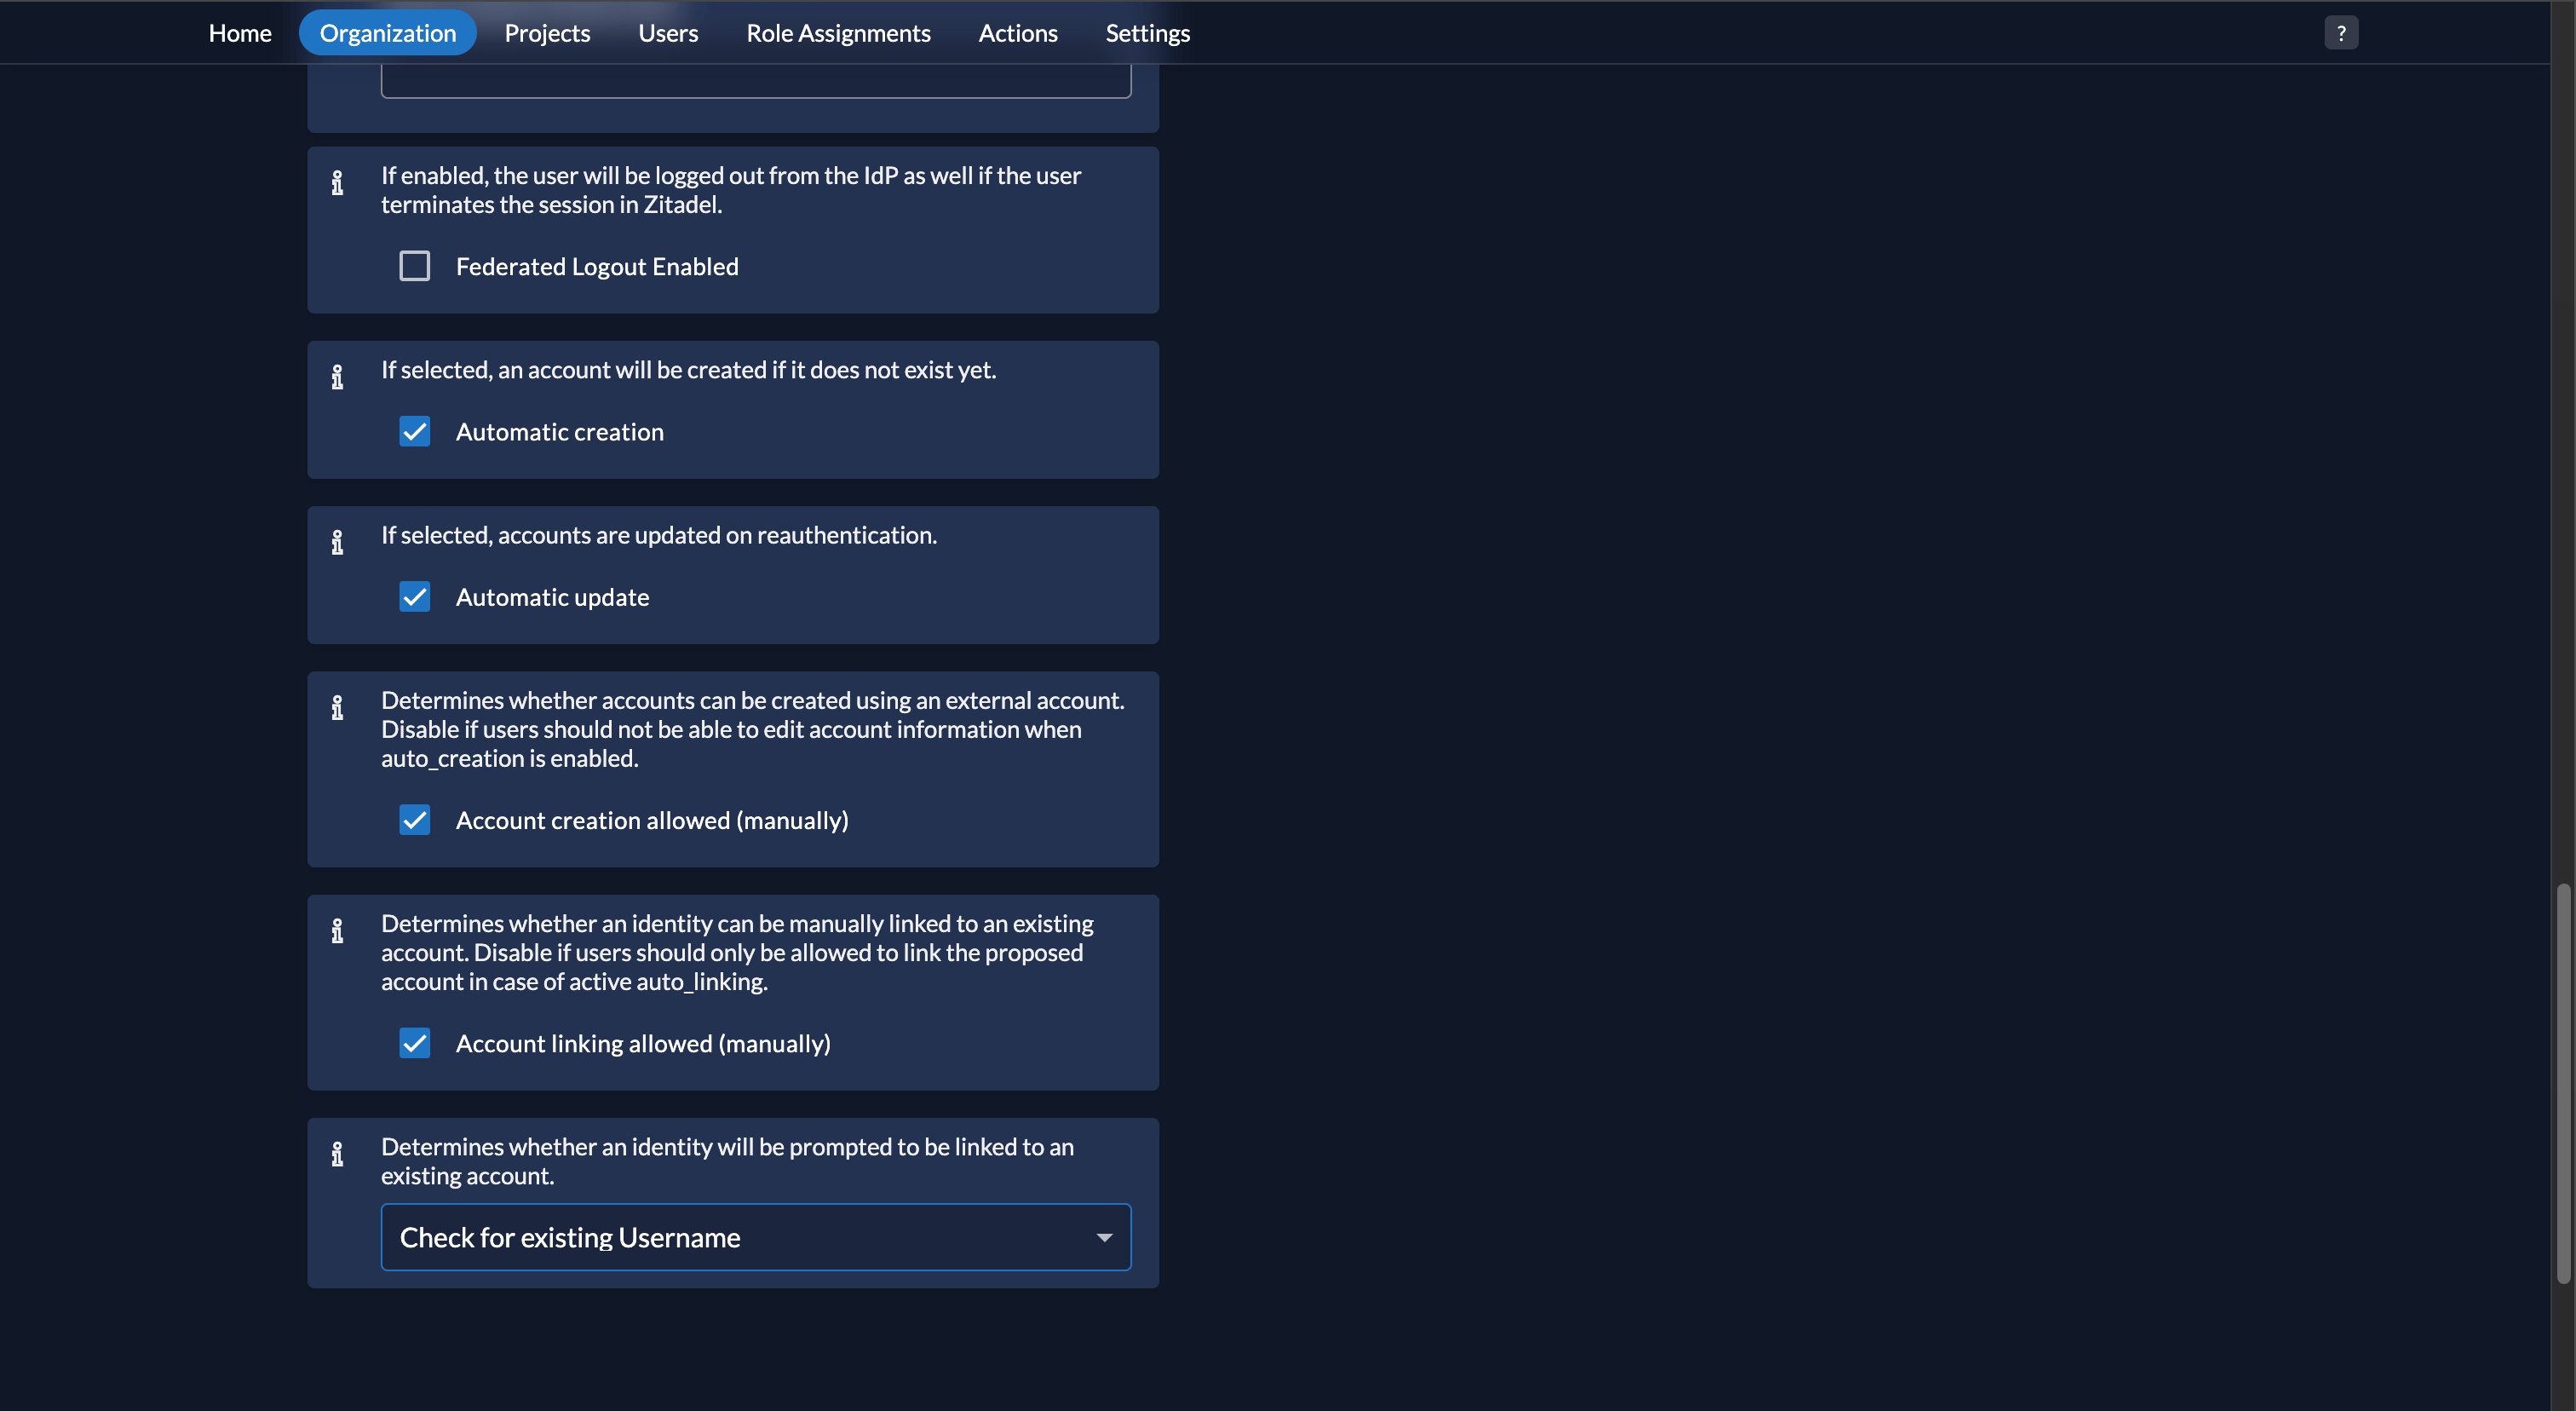
 1. Expand the *optional* section.
2. Ensure the *Automatic create* and *Automatic update* checkboxes are selected.
3. Set the *Determines whether an identity will be prompted to be linked to an existing account* dropdown to *Check for existing Username*.
1. Expand the *optional* section.
2. Ensure the *Automatic create* and *Automatic update* checkboxes are selected.
3. Set the *Determines whether an identity will be prompted to be linked to an existing account* dropdown to *Check for existing Username*.
 Select the *Save* button. You will be returned to the Organization Settings page.
1. Select your IdP from the list and select the *Activate* button on the identity provider page.
Select the *Save* button. You will be returned to the Organization Settings page.
1. Select your IdP from the list and select the *Activate* button on the identity provider page.
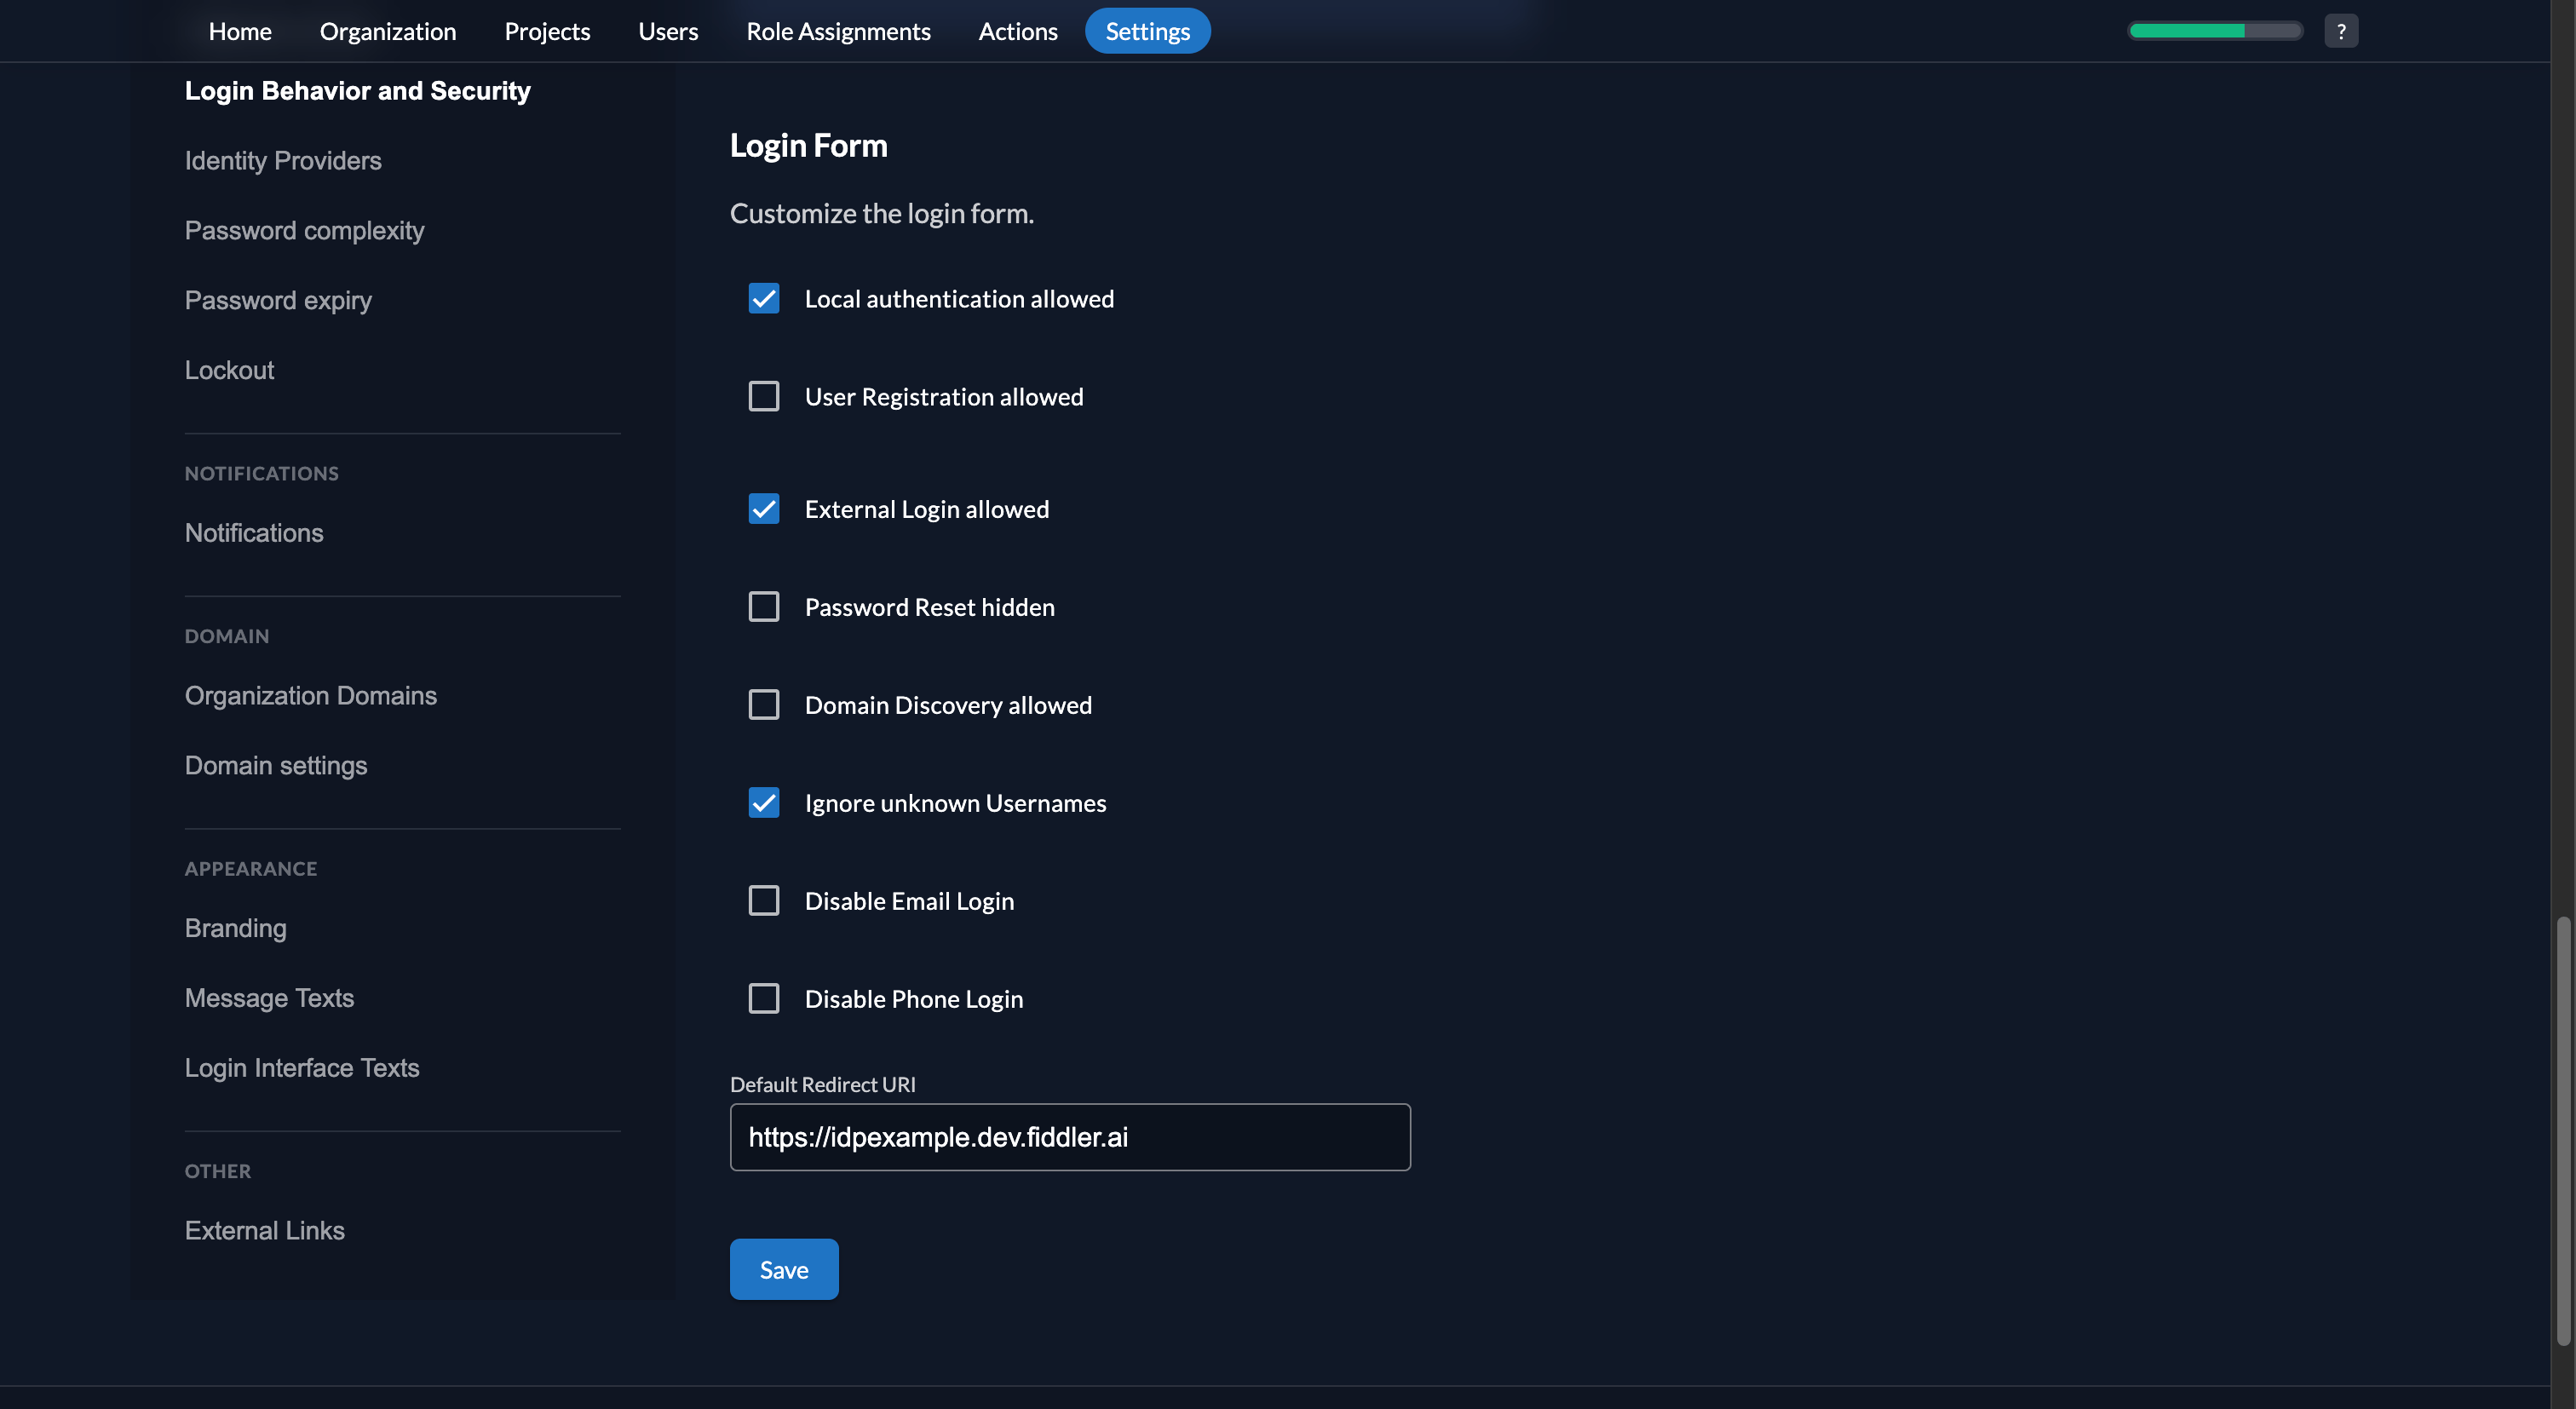
 2. Close the settings and then select *Login Behavior and Security* from the left nav menu and ensure the *External login allowed* checkbox is selected.
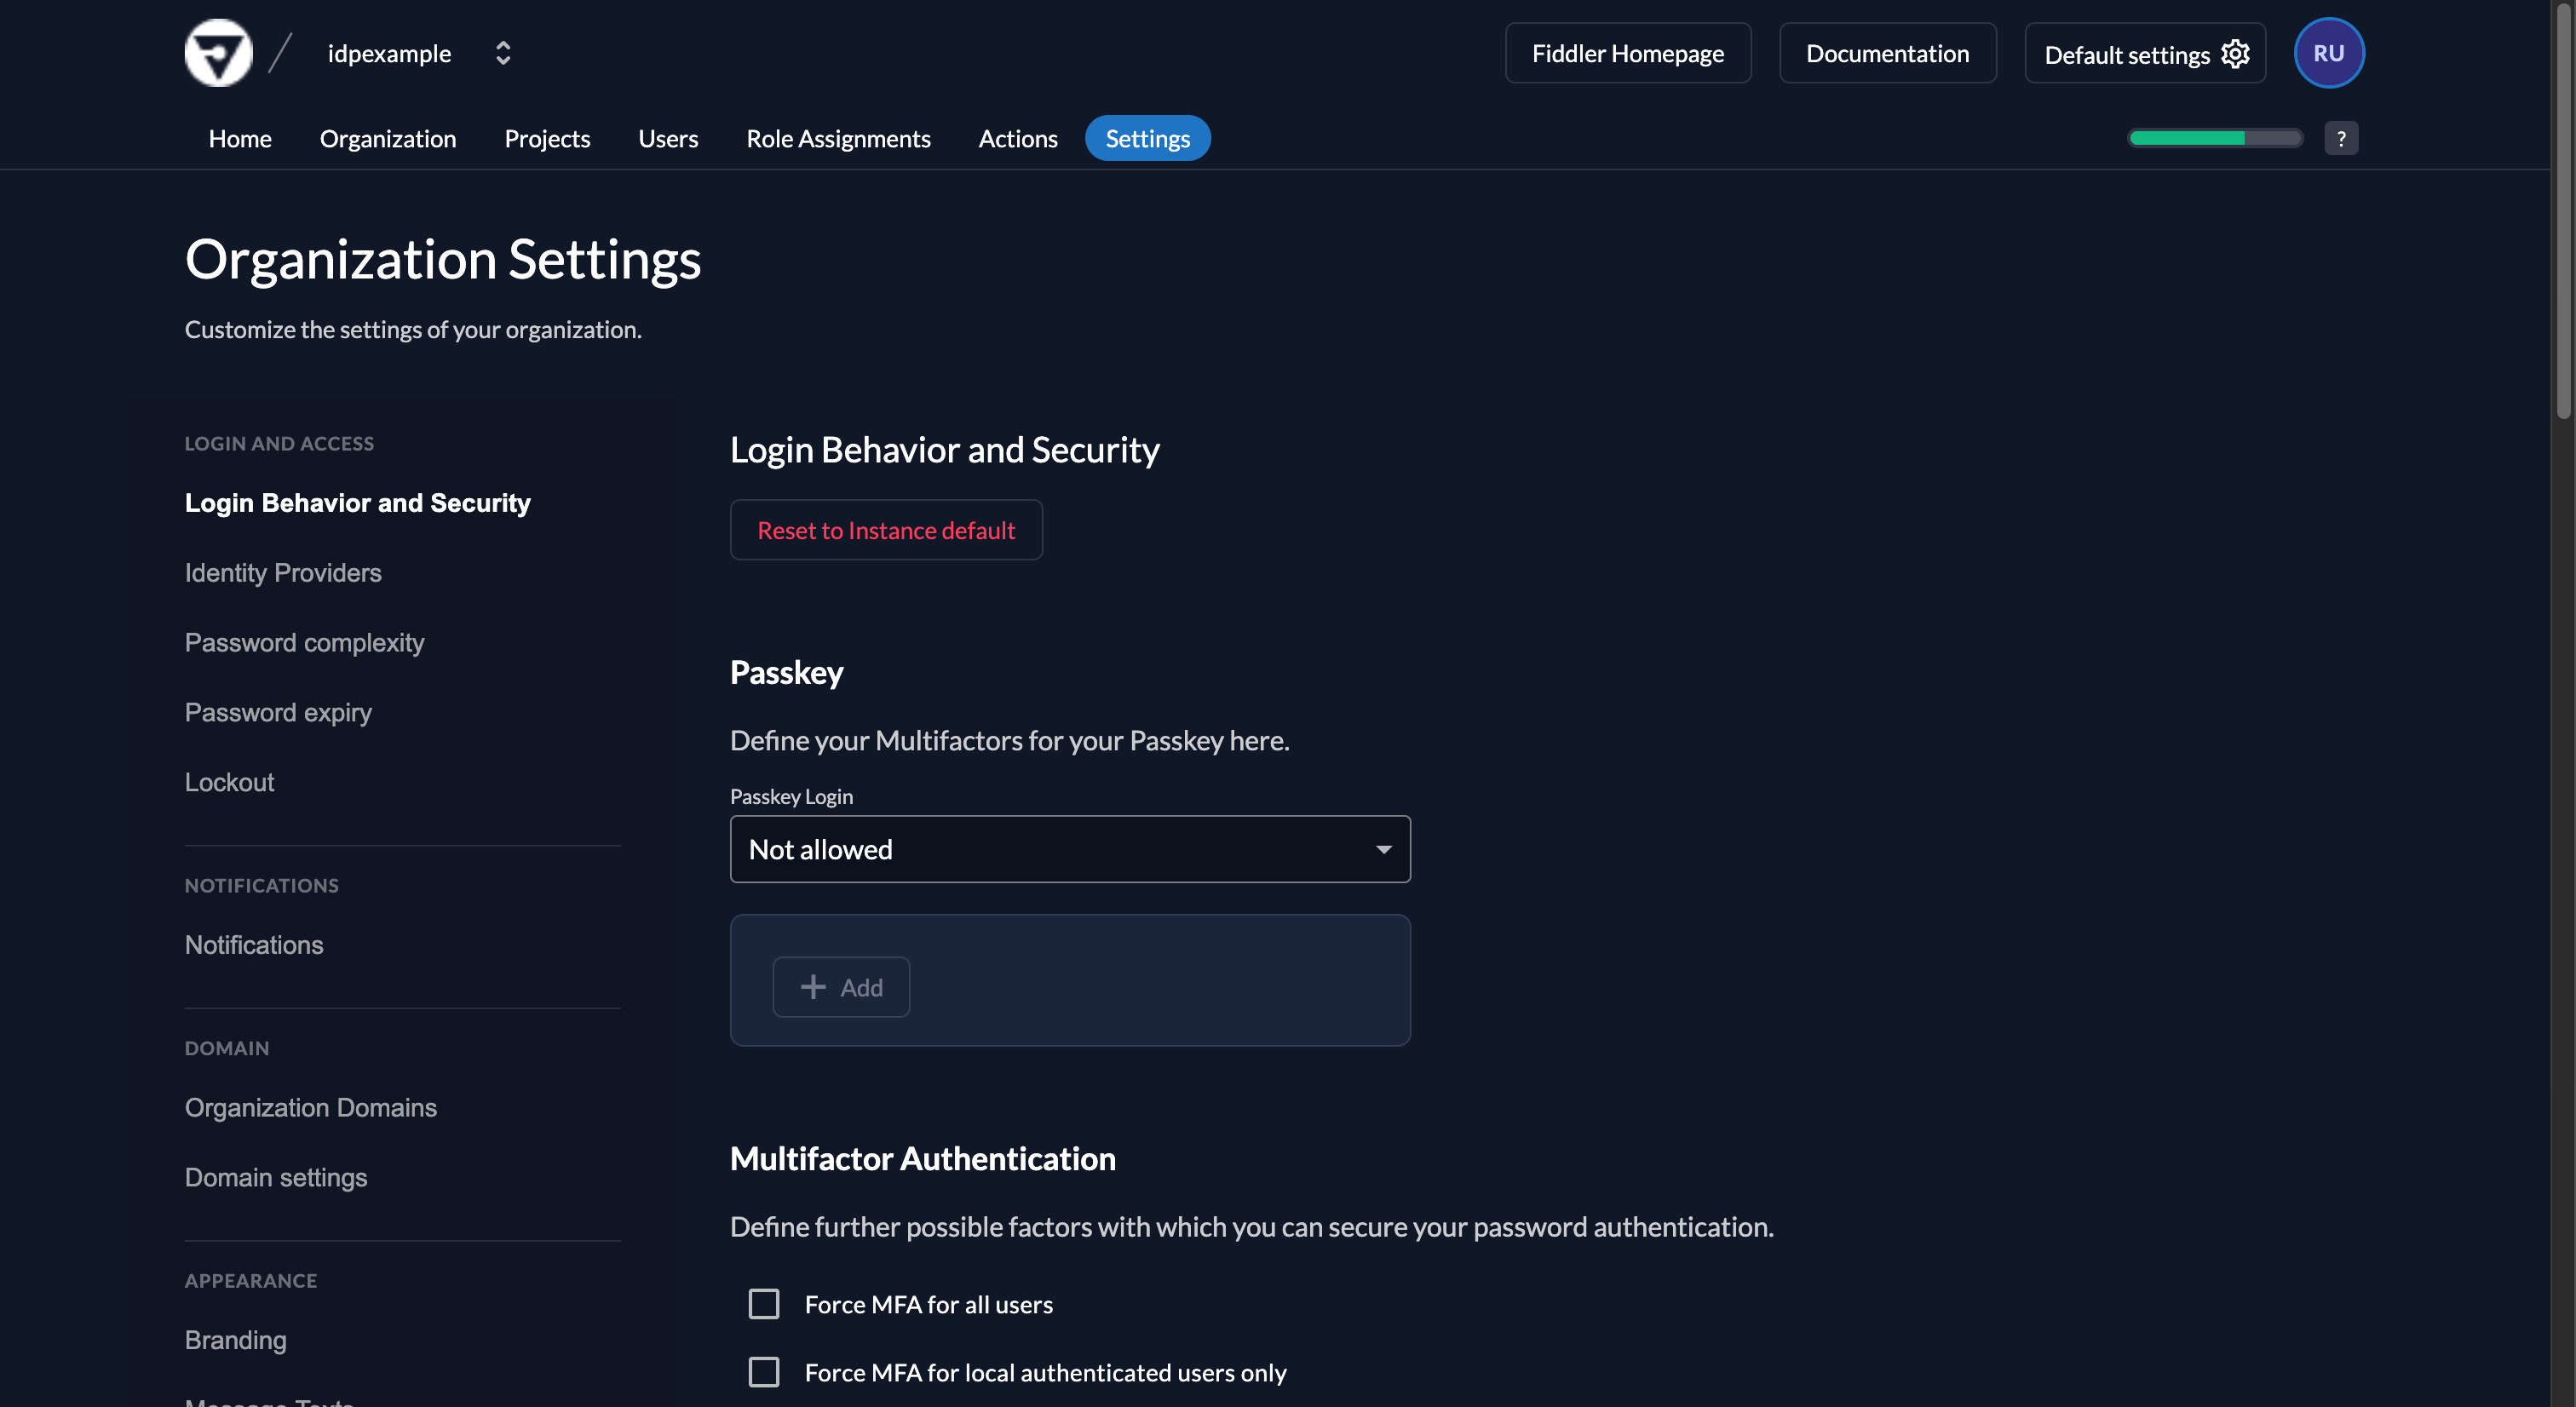 3. Select the *Save* button.
 Select the *Actions* tab from the top menu.
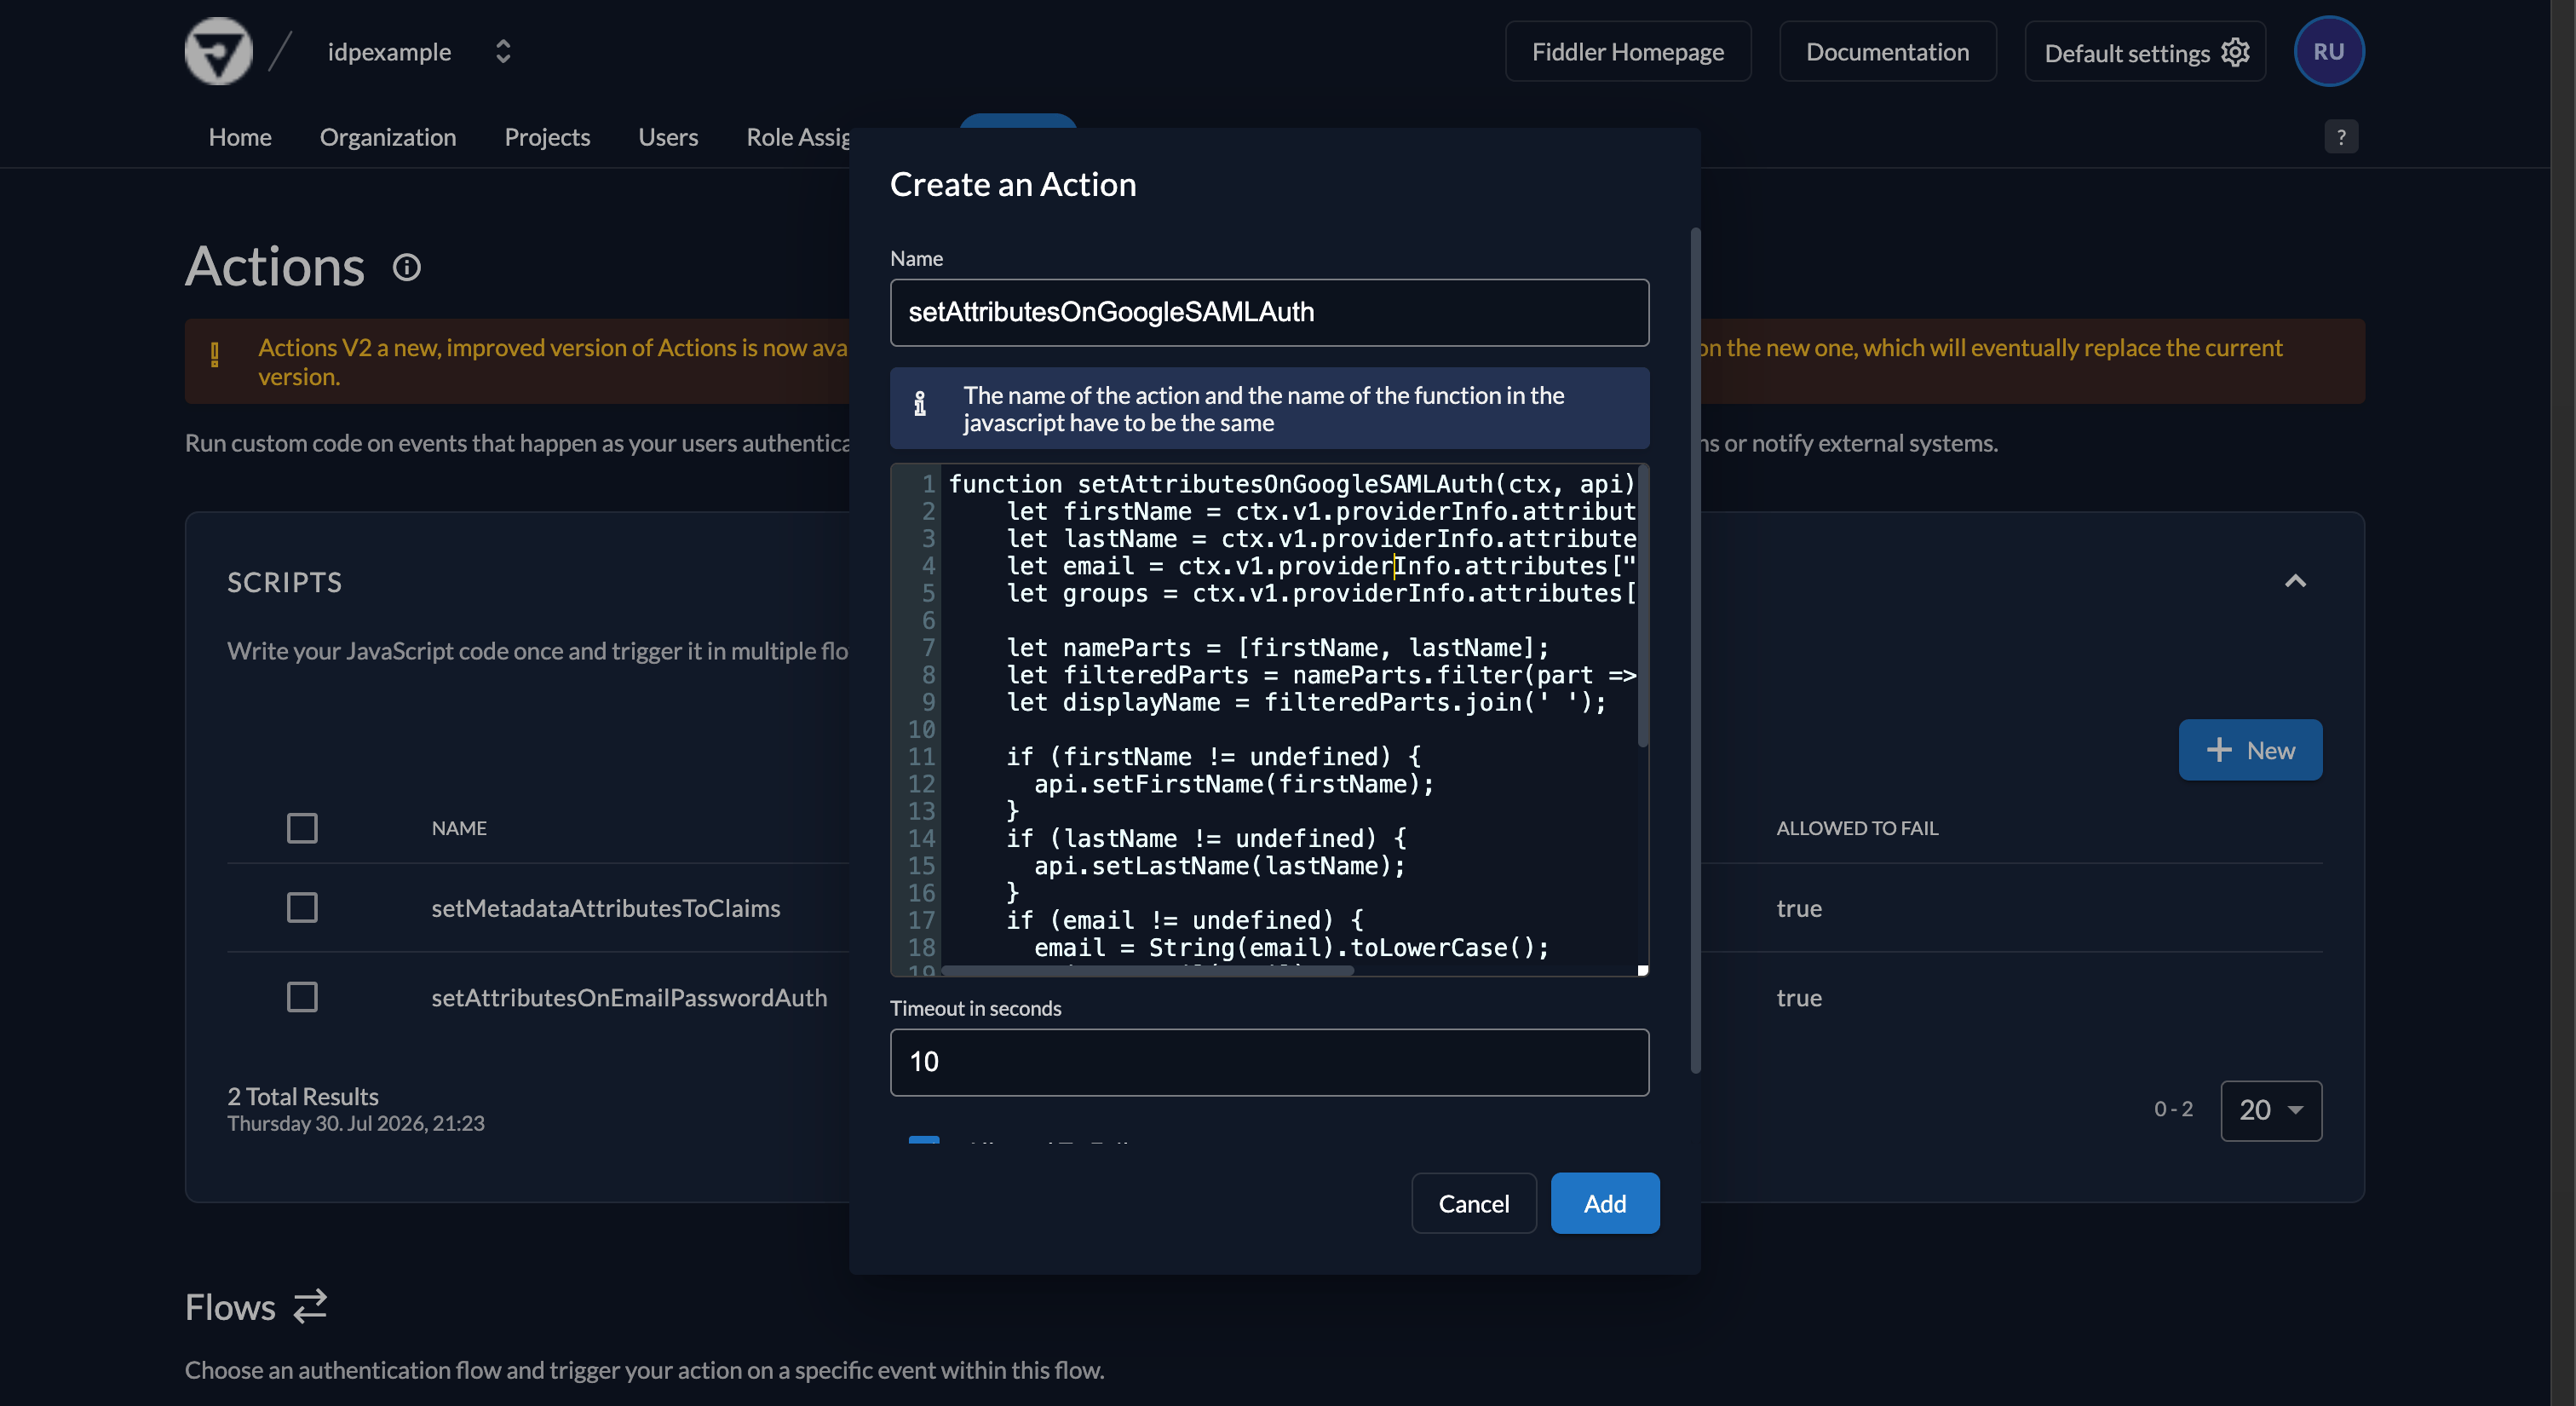 1. Select the *New* button in the *Scripts* section to create a new action script.
2. Copy the *Google SAML Action Script* below and paste it into the script text area.
3. Enter `setAttributesOnGoogleSAMLAuth` in the *Name* text box.
4. Select the *Add* button.
**File:** `Google SAML Action Script`
```javascript theme={null}
function setAttributesOnGoogleSAMLAuth(ctx, api) {
let firstName = ctx.v1.providerInfo.attributes["firstName"];
let lastName = ctx.v1.providerInfo.attributes["lastName"];
let email = ctx.v1.providerInfo.attributes["email"];
let groups = ctx.v1.providerInfo.attributes["groups"];
let nameParts = [firstName, lastName];
let filteredParts = nameParts.filter(part => part);
let displayName = filteredParts.join(' ');
if (firstName != undefined) {
api.setFirstName(firstName);
}
if (lastName != undefined) {
api.setLastName(lastName);
}
if (email != undefined) {
email = String(email).toLowerCase();
api.setEmail(email);
api.setEmailVerified(true);
api.setPreferredUsername(email);
}
if (displayName) {
api.setDisplayName(displayName);
}
api.v1.user.appendMetadata('fiddler_authentication_type', 'SSO:GOOGLE:SAML');
if (groups === null || groups === undefined) {
groups = []
}
api.v1.user.appendMetadata('fiddler_groups', groups);
}
```
Scroll down to the *Flows* section.
1. Select the *New* button in the *Scripts* section to create a new action script.
2. Copy the *Google SAML Action Script* below and paste it into the script text area.
3. Enter `setAttributesOnGoogleSAMLAuth` in the *Name* text box.
4. Select the *Add* button.
**File:** `Google SAML Action Script`
```javascript theme={null}
function setAttributesOnGoogleSAMLAuth(ctx, api) {
let firstName = ctx.v1.providerInfo.attributes["firstName"];
let lastName = ctx.v1.providerInfo.attributes["lastName"];
let email = ctx.v1.providerInfo.attributes["email"];
let groups = ctx.v1.providerInfo.attributes["groups"];
let nameParts = [firstName, lastName];
let filteredParts = nameParts.filter(part => part);
let displayName = filteredParts.join(' ');
if (firstName != undefined) {
api.setFirstName(firstName);
}
if (lastName != undefined) {
api.setLastName(lastName);
}
if (email != undefined) {
email = String(email).toLowerCase();
api.setEmail(email);
api.setEmailVerified(true);
api.setPreferredUsername(email);
}
if (displayName) {
api.setDisplayName(displayName);
}
api.v1.user.appendMetadata('fiddler_authentication_type', 'SSO:GOOGLE:SAML');
if (groups === null || groups === undefined) {
groups = []
}
api.v1.user.appendMetadata('fiddler_groups', groups);
}
```
Scroll down to the *Flows* section.
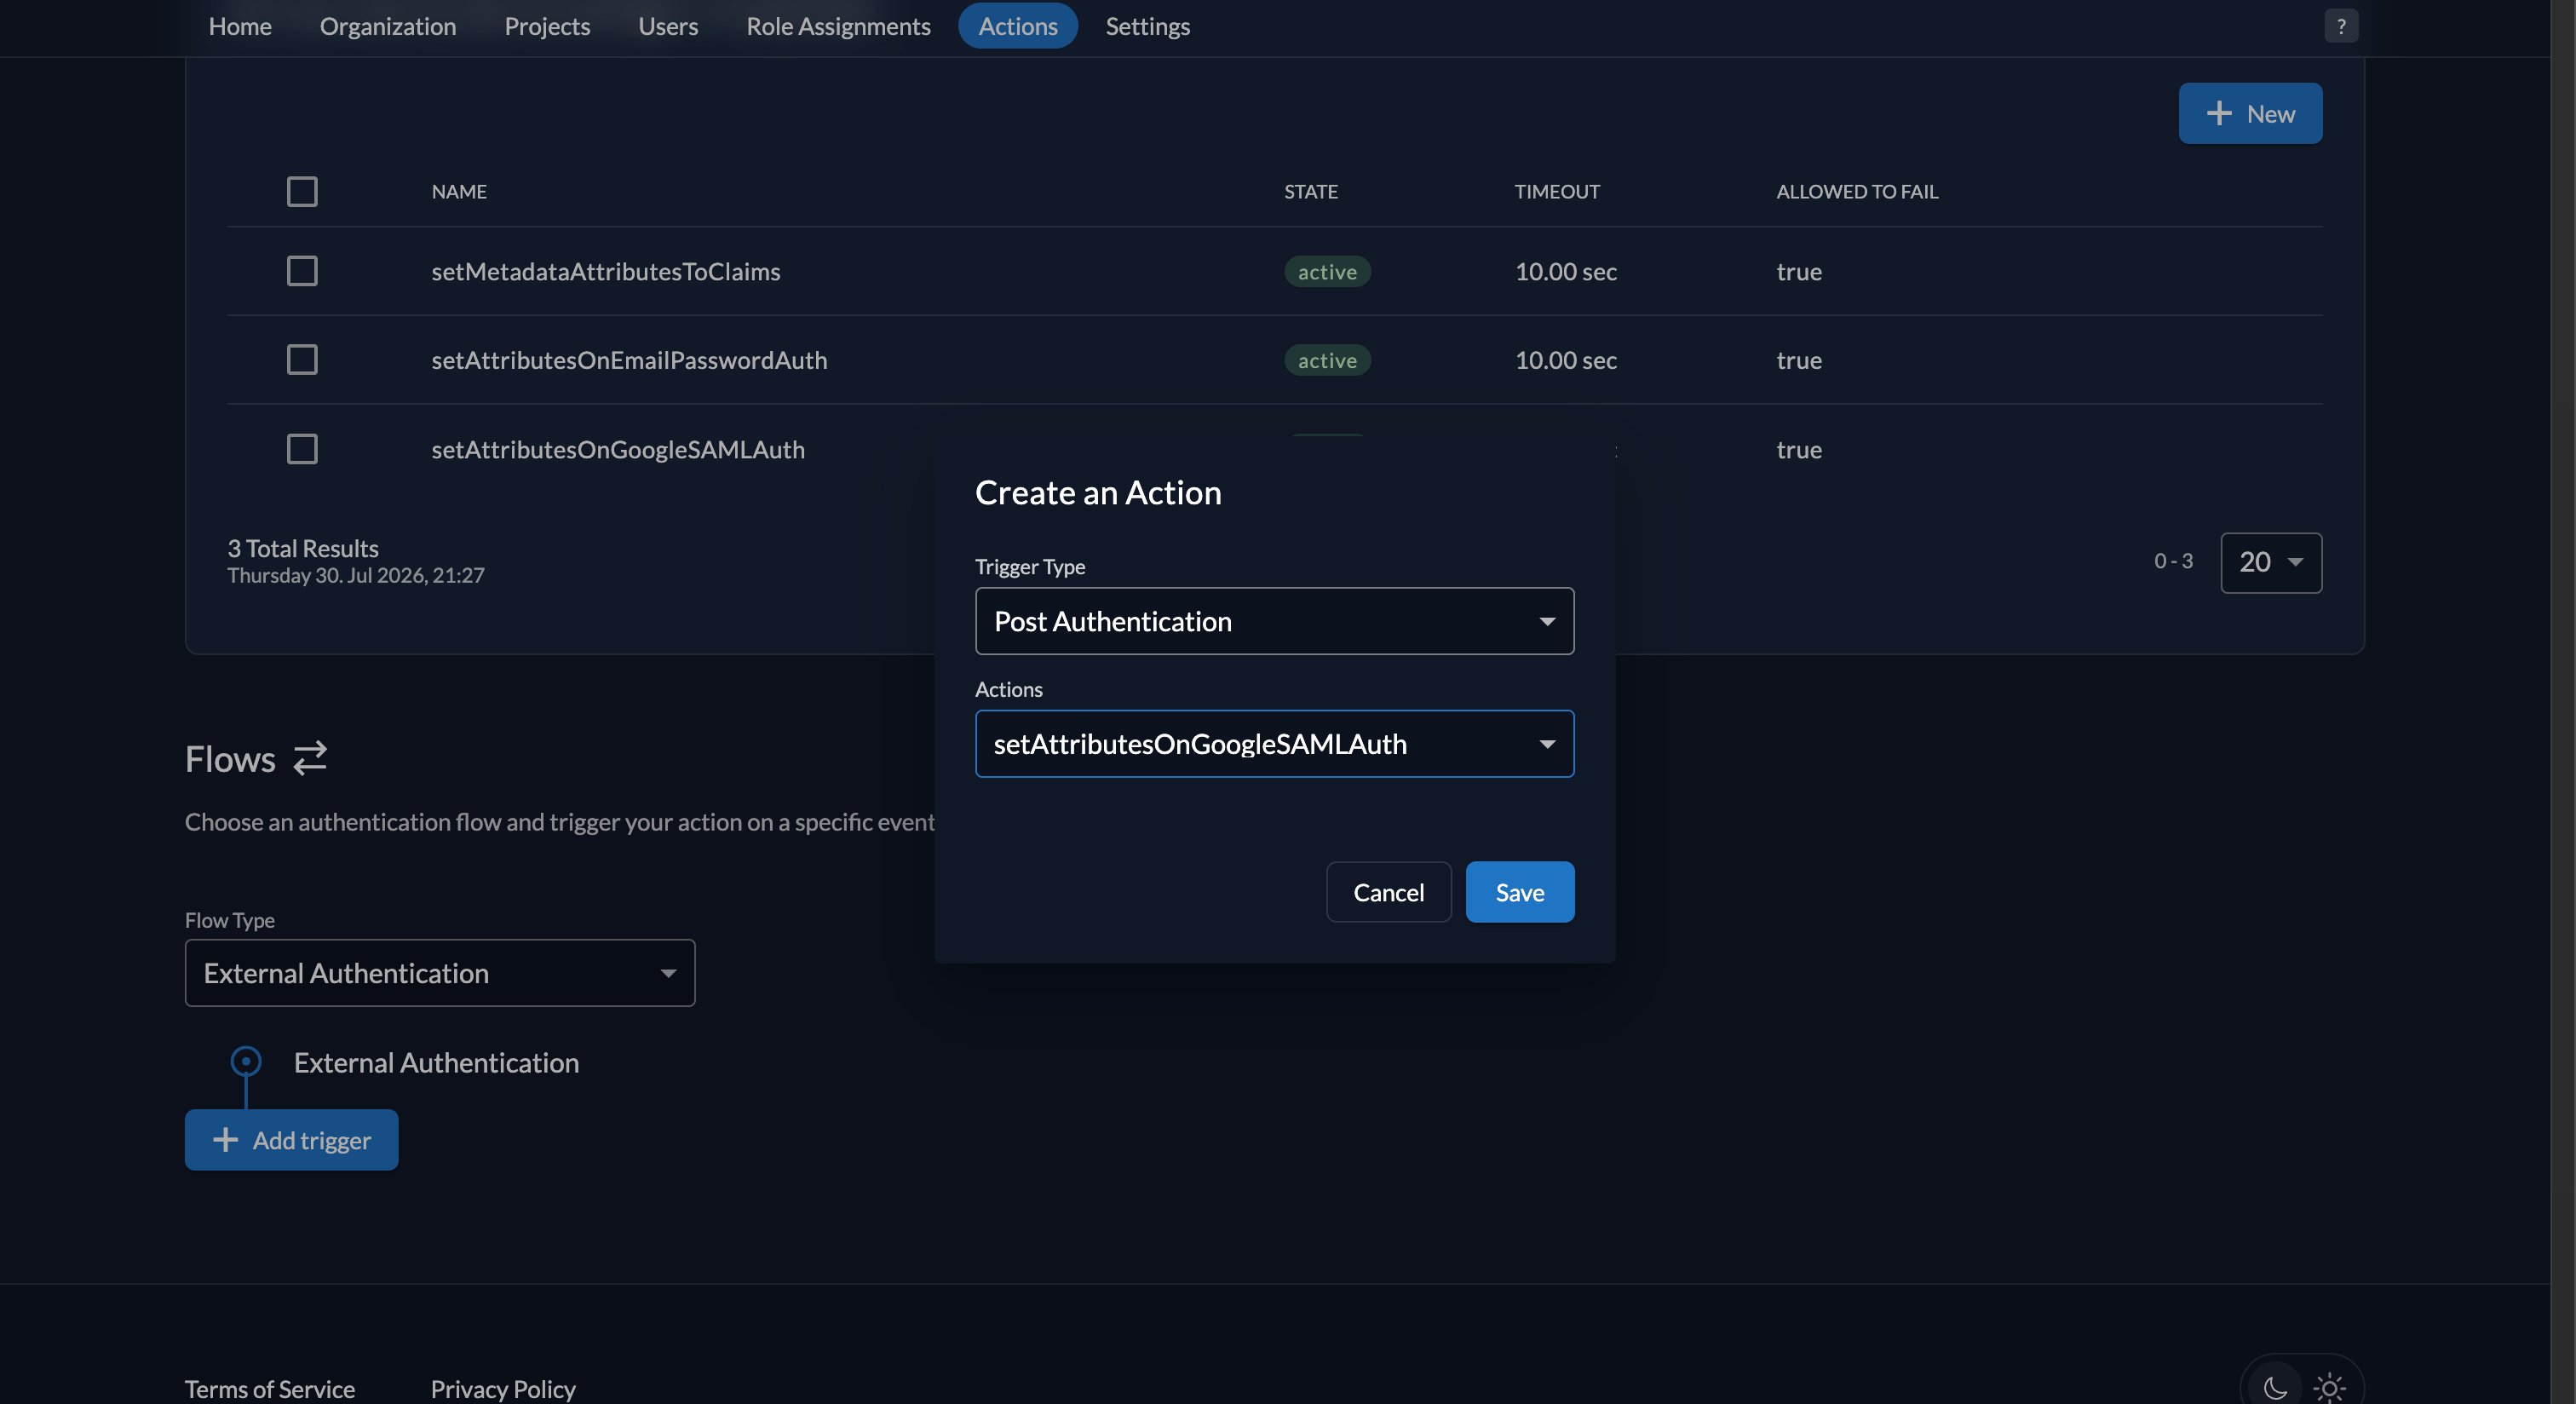 1. Select the *External Authentication* option for the *Flow Type* dropdown.
2. Select the *+ Add trigger* button.
3. Select the *Post Authentication* option for the *Trigger Type* dropdown.
4. Select the *setAttributesOnGoogleSAMLAuth* option for the *Actions* dropdown.
5. Select the *Save* button.
Add an organization metadata key so Fiddler can correctly identify and process this SSO connection. Set this once during setup.
1. Go to the *Metadata* section and select *Edit*.
1. Select the *External Authentication* option for the *Flow Type* dropdown.
2. Select the *+ Add trigger* button.
3. Select the *Post Authentication* option for the *Trigger Type* dropdown.
4. Select the *setAttributesOnGoogleSAMLAuth* option for the *Actions* dropdown.
5. Select the *Save* button.
Add an organization metadata key so Fiddler can correctly identify and process this SSO connection. Set this once during setup.
1. Go to the *Metadata* section and select *Edit*.
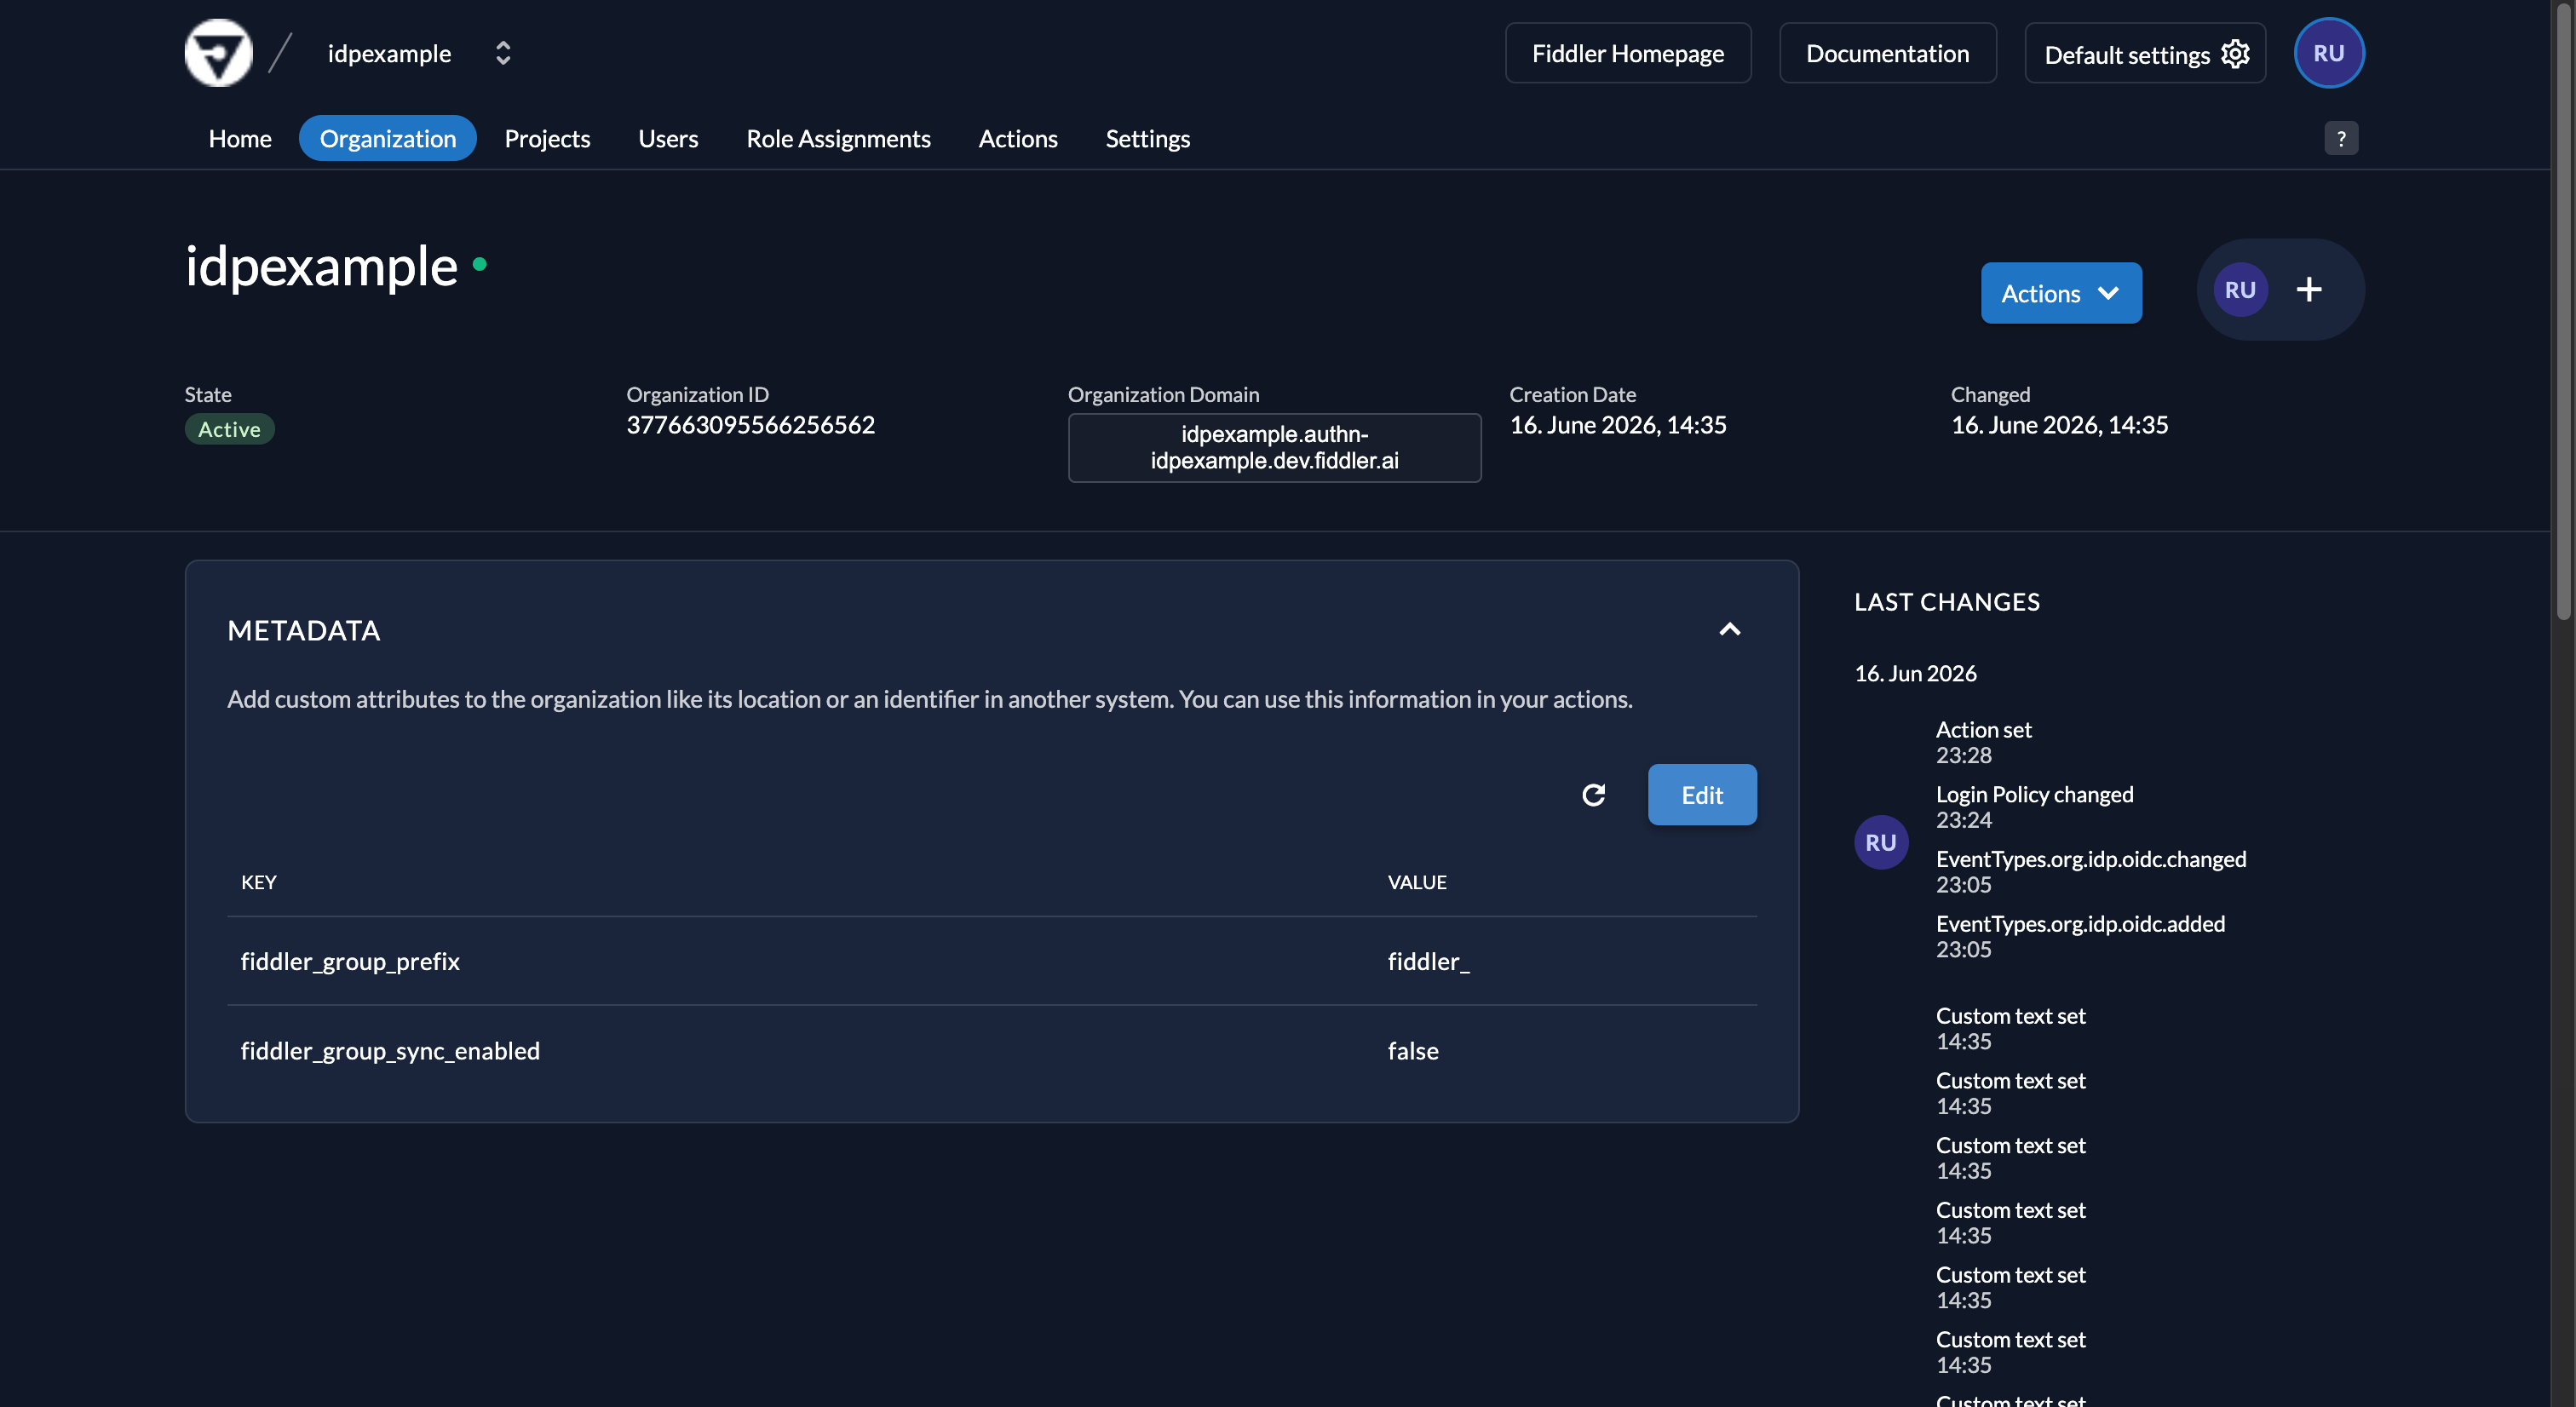 2. Select the *Add* button, then enter the key `fiddler_sso_authentication_type` with the value `SSO:GOOGLE:SAML`.
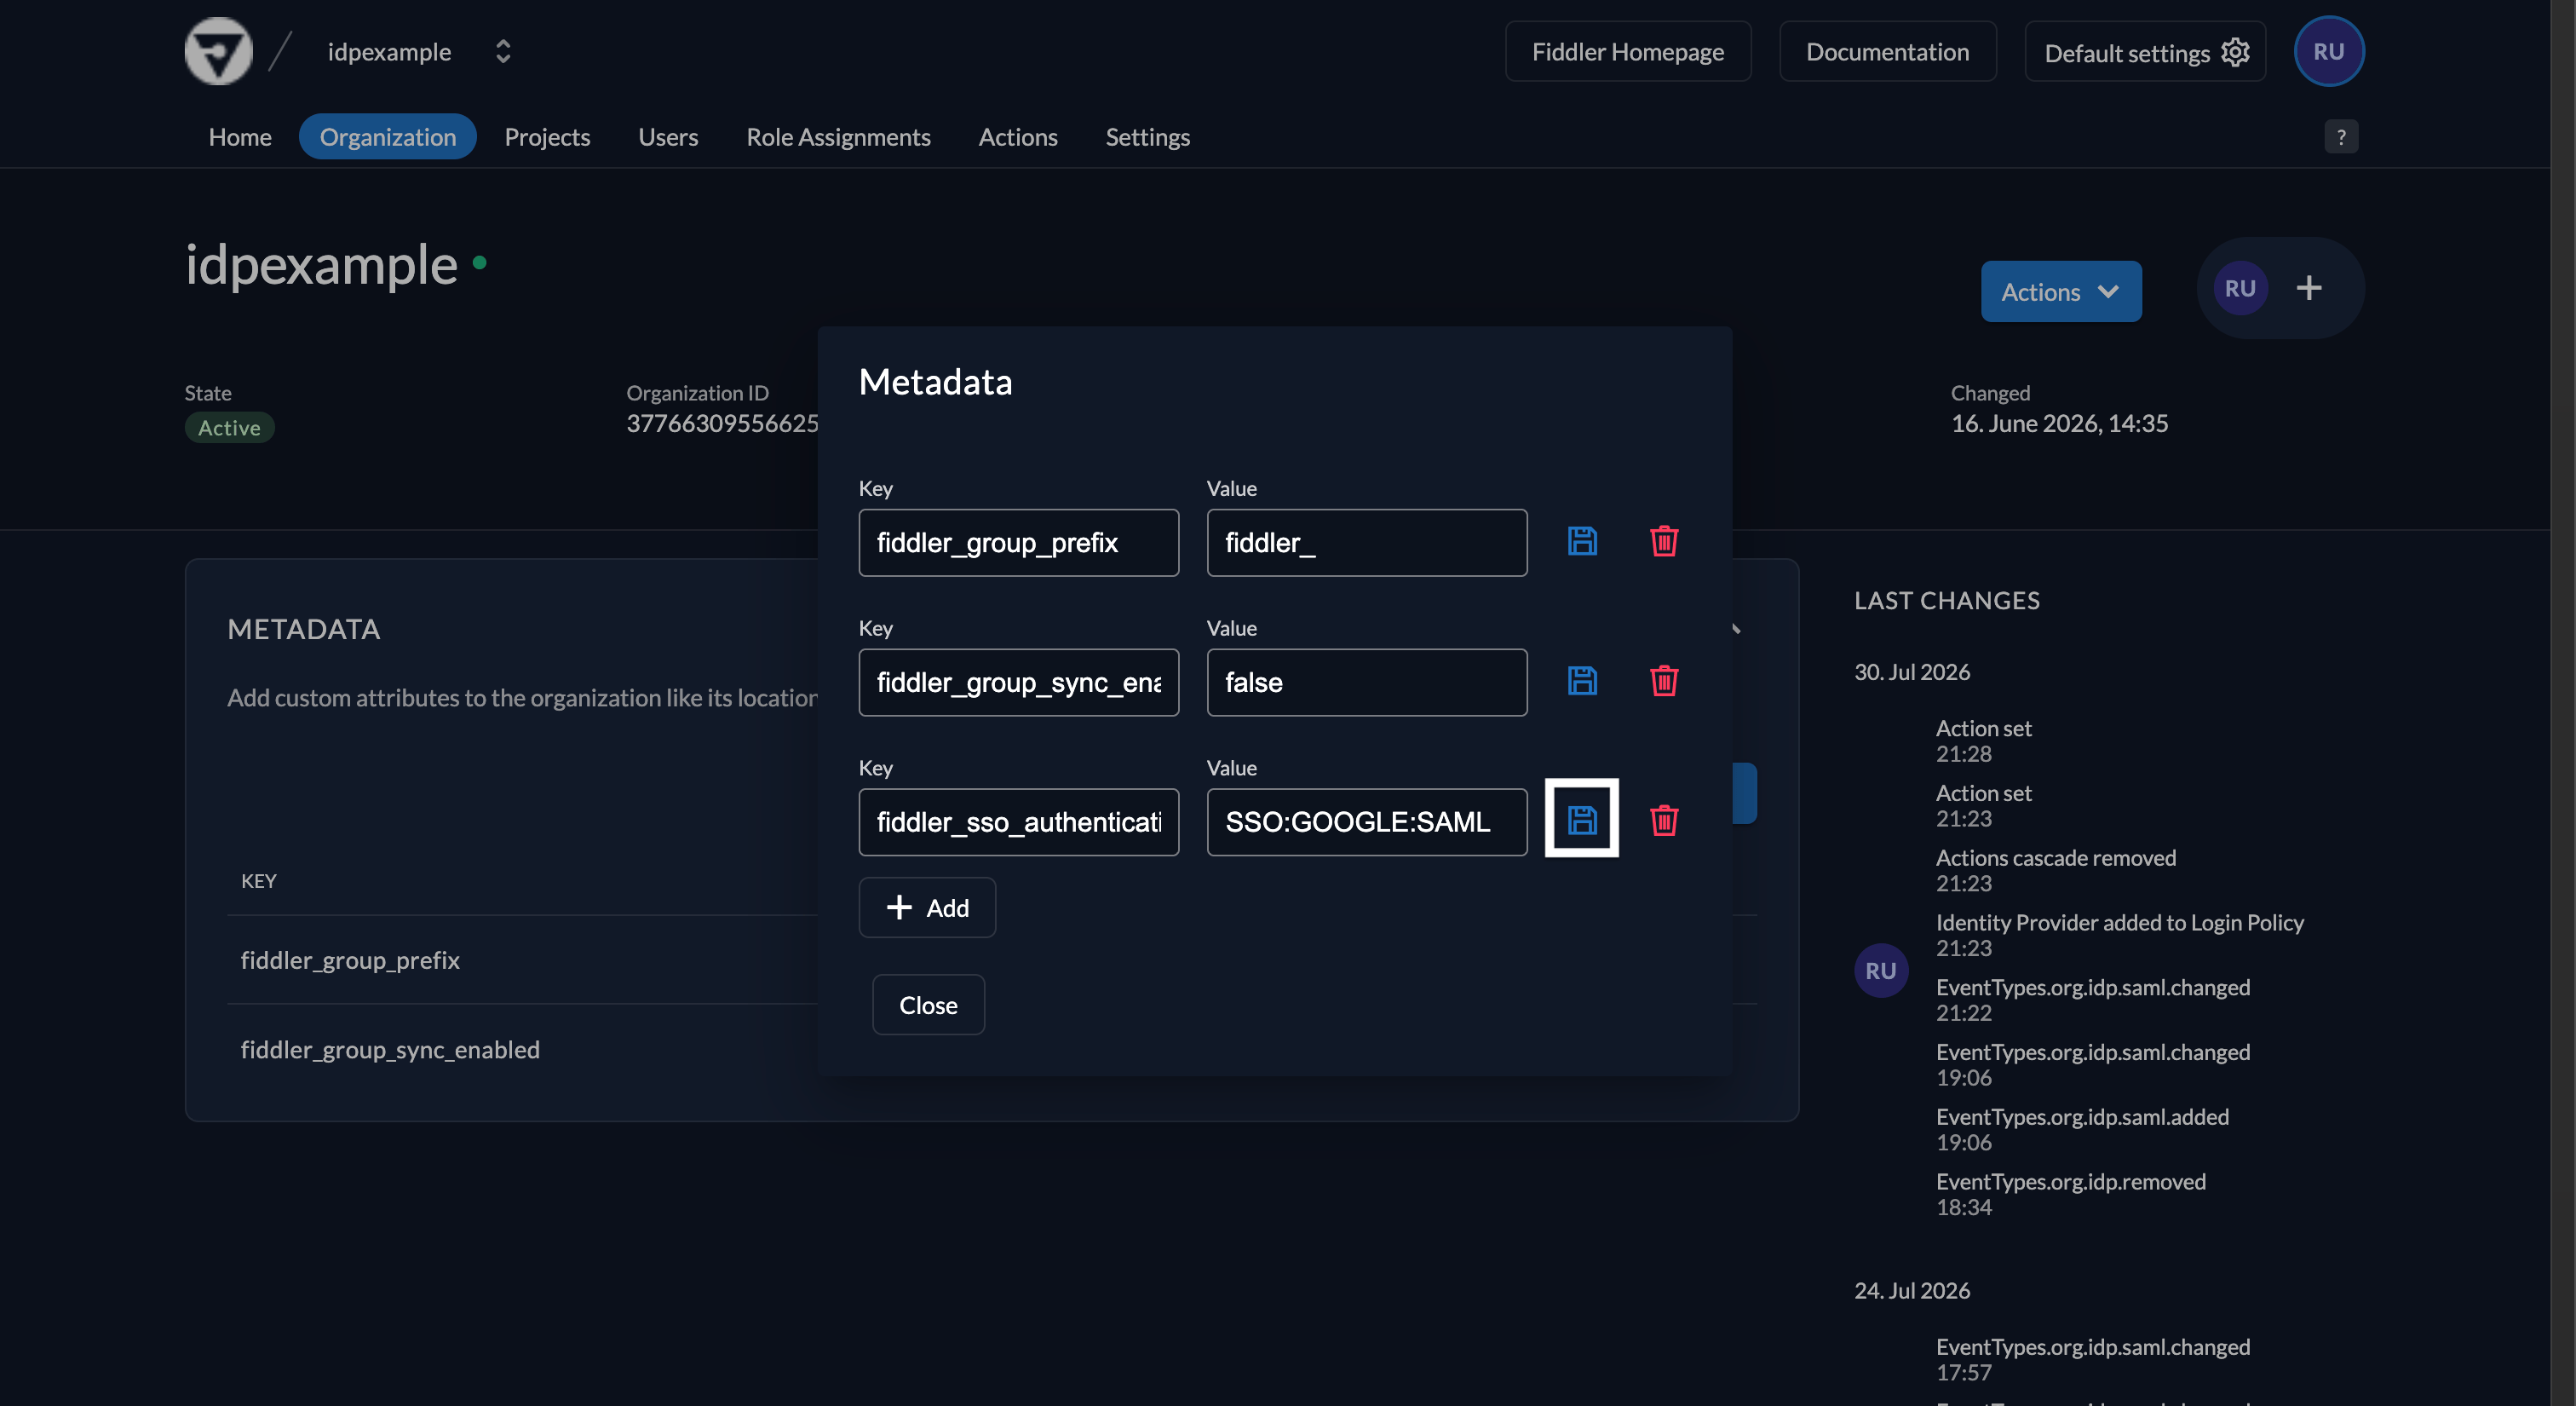 3. Select the *Save* button next to the new entry.
Before validating, ensure the app's *User access* is on for your Google Workspace account.
1. Open your Fiddler URL (e.g. `https://idpexample.dev.fiddler.ai`).
2. Ensure you see the Fiddler sign-in page and that it displays an SSO login button labeled with the name you configured (e.g. *Google SAML V1*).
3. Select the *Save* button next to the new entry.
Before validating, ensure the app's *User access* is on for your Google Workspace account.
1. Open your Fiddler URL (e.g. `https://idpexample.dev.fiddler.ai`).
2. Ensure you see the Fiddler sign-in page and that it displays an SSO login button labeled with the name you configured (e.g. *Google SAML V1*).
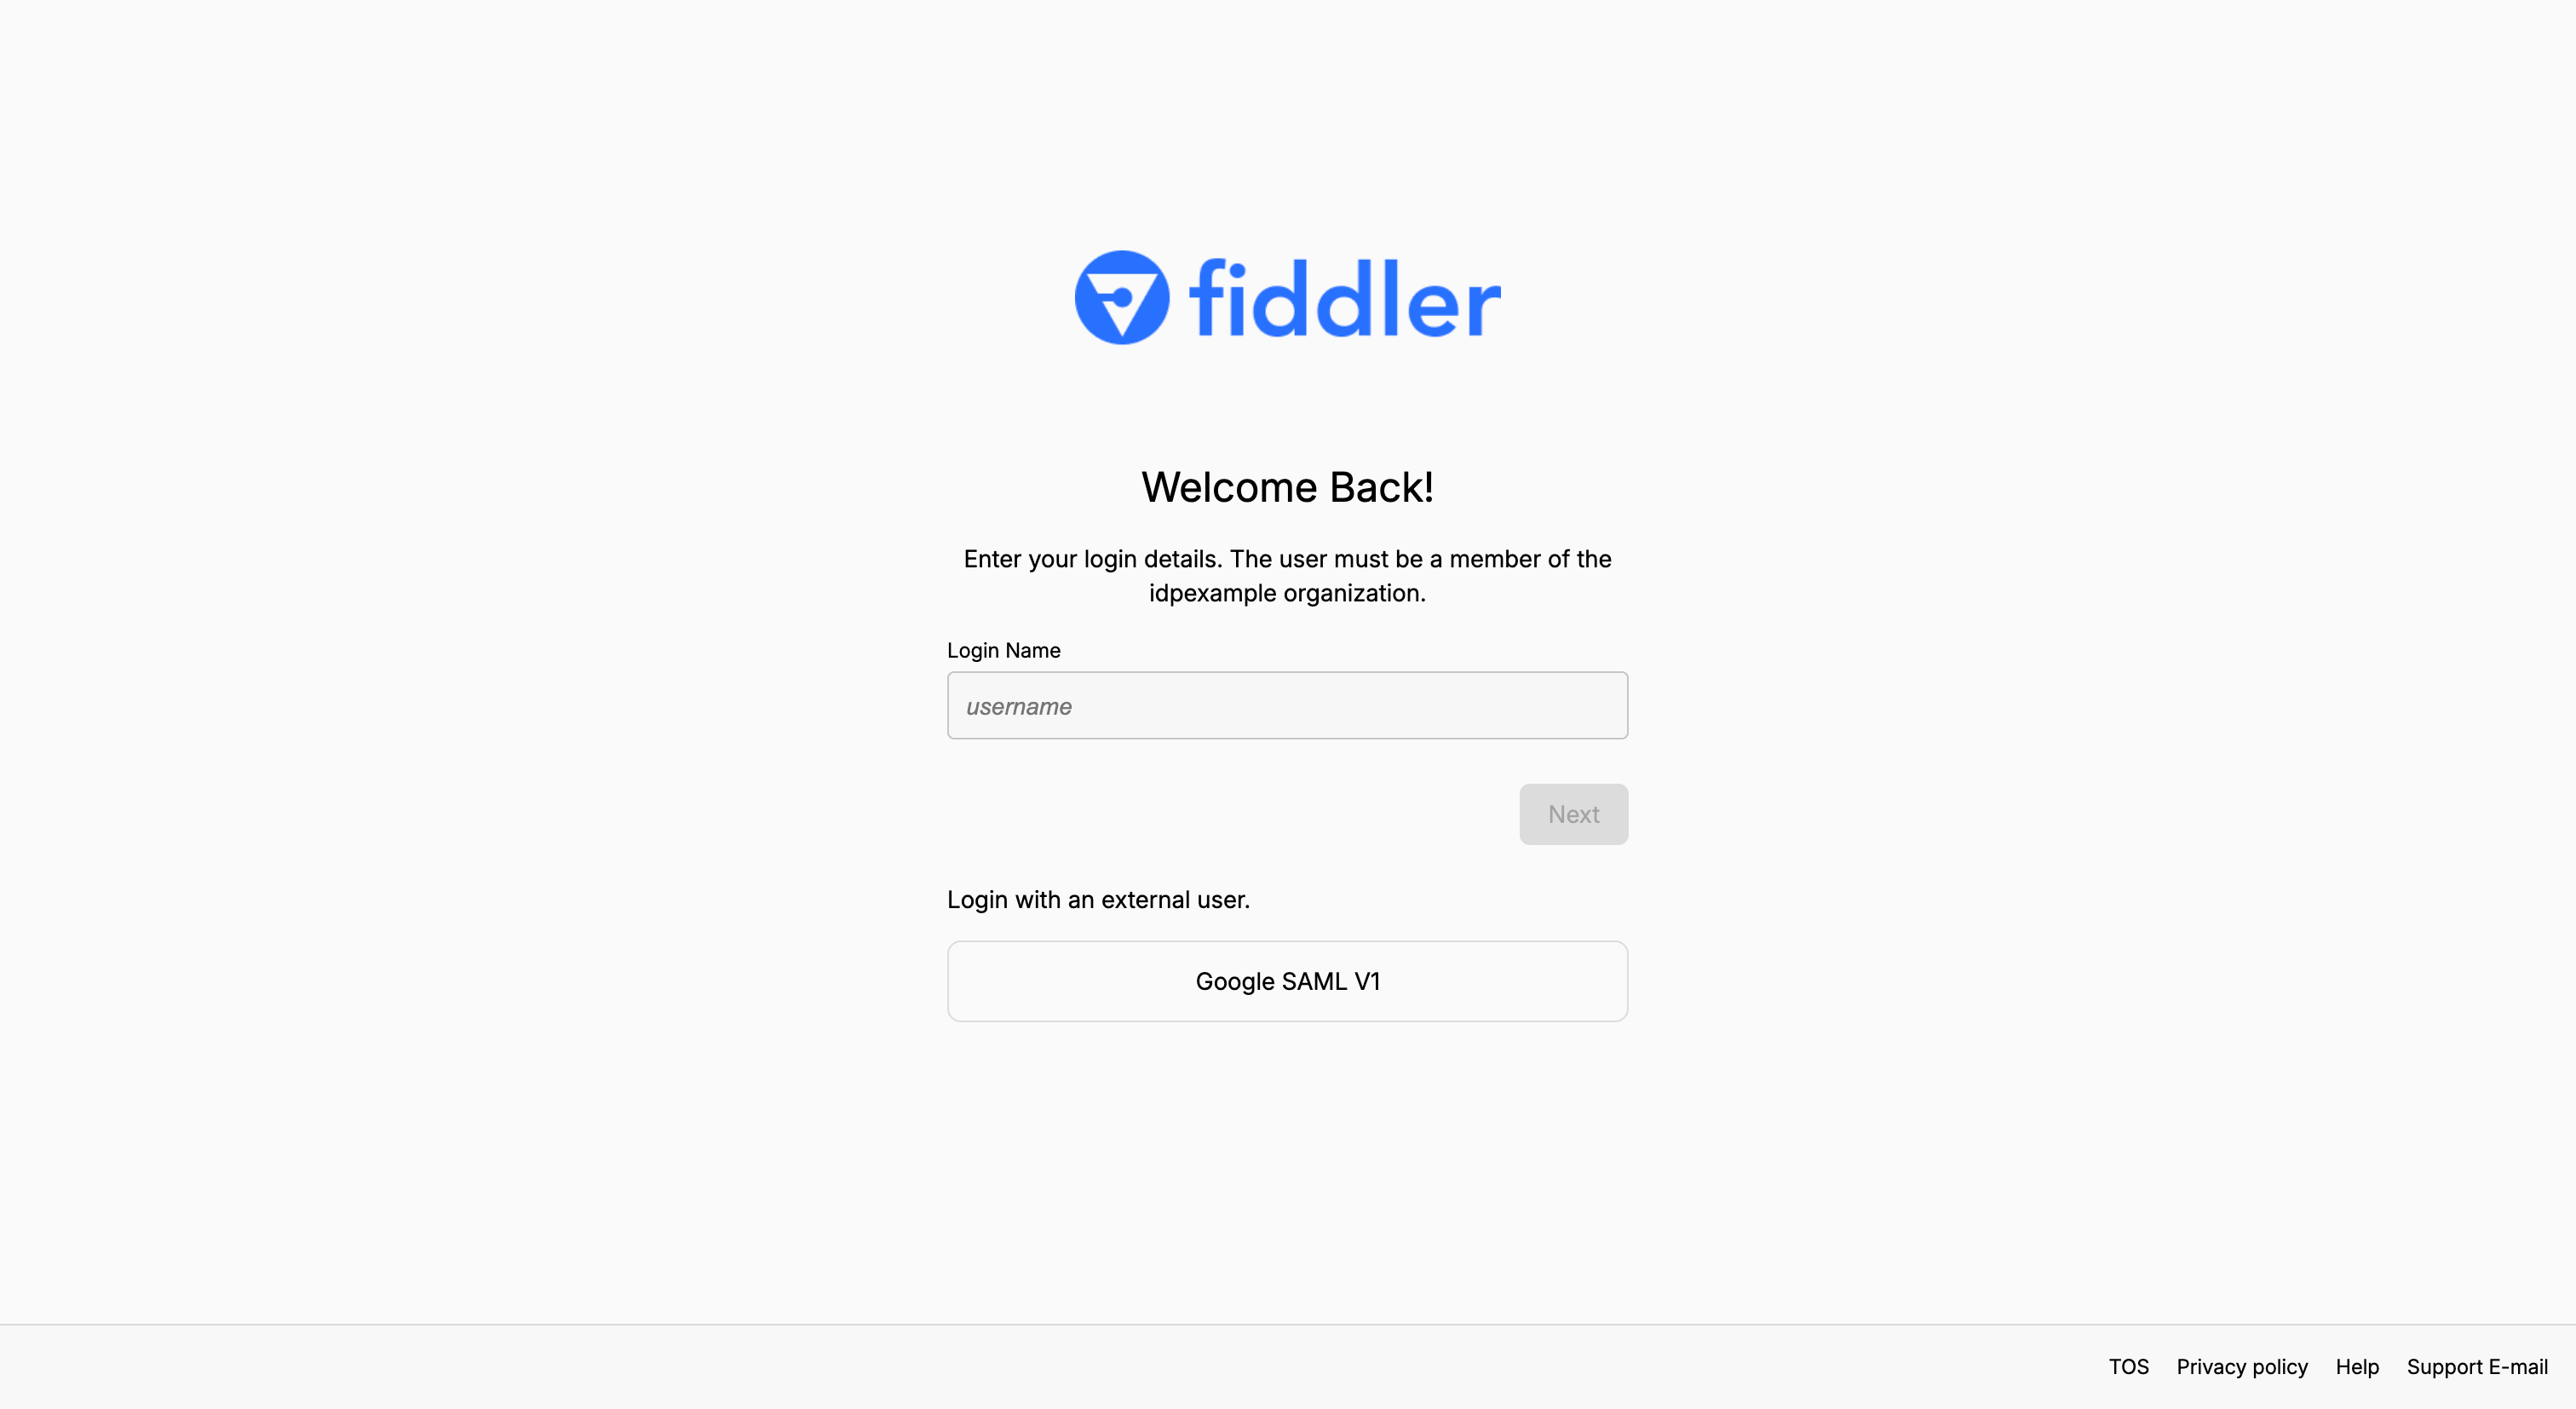 3. Select the button and confirm that the Fiddler application loads.
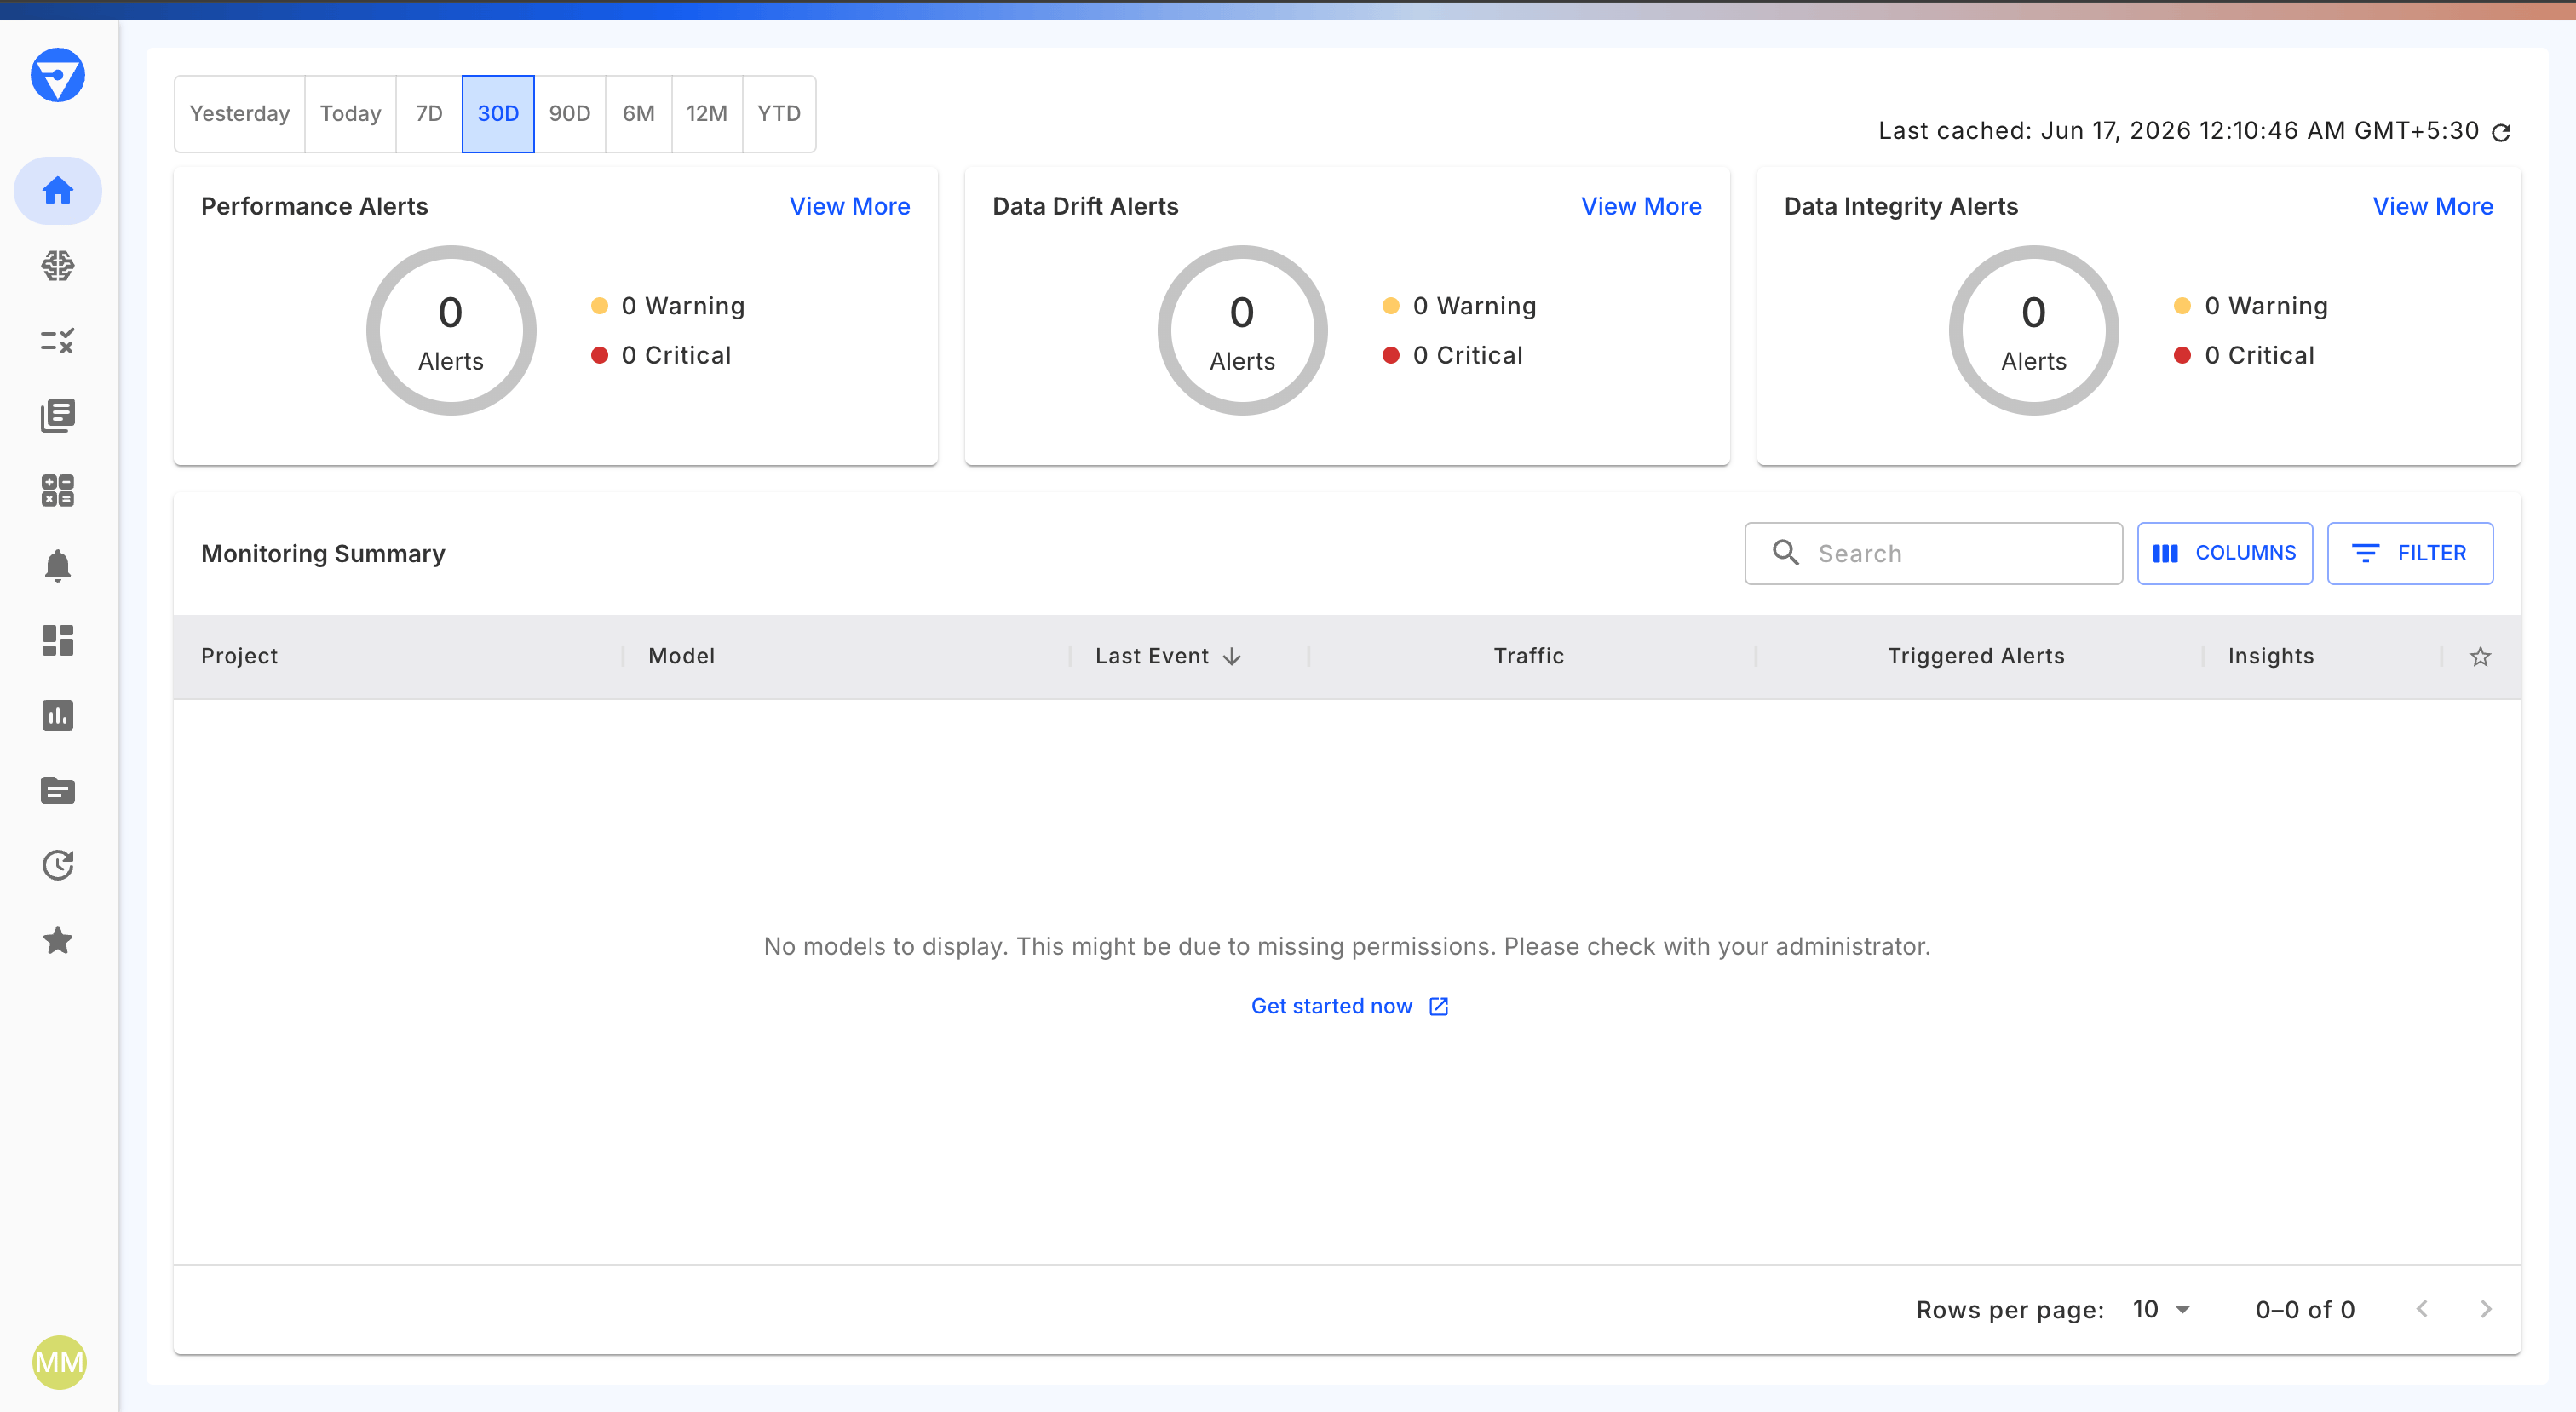 The first user to sign in to the Fiddler application is automatically assigned the Fiddler Org Admin role; subsequent members are Org Members by default.
## Add a Second Integration for Login V2
The Google app and identity provider configured above serve Login V1. Fiddler is moving to Login V2, which uses a different ACS URL, so set up a second Google app with its own identity provider now. The second pair stays inactive until your deployment switches over.
In the AuthN console, add a second SAML identity provider using the same placeholder *Metadata XML* value and the same optional settings as the first. Give it a name that distinguishes it from the first, e.g. `Google SAML V2`, so the two are easy to tell apart in the Identity Providers list.
Do not activate this identity provider. An active second provider adds a second SSO button to the Fiddler sign-in page.
Save the provider, open it, and copy its *ZITADEL Metadata URL* and *ZITADEL ACS Intent API URL*. Both differ from the first provider's because they carry a different identity provider ID, which is what gives the second Google app its own Entity ID — two Google apps cannot share one.
Create another custom SAML app with a name that distinguishes it, e.g. `Fiddler IdP Example - Login V2`, and download its metadata. On the *Service provider details* page, set *ACS URL* to the second provider's *ZITADEL ACS Intent API URL* and *Entity ID* to its *ZITADEL Metadata URL*.
Apply the same attribute mappings and group membership configuration as the first app, then turn *User access* on for the same users and organizational units.
Base64-encode the second app's metadata file with the same command used earlier, then return to the second identity provider, clear the *Metadata XML* text area, paste the encoded value, and save. Leave the provider deactivated.
Nothing else changes. The action script, its trigger, and the organization metadata are set at the organization level and apply to both providers.
When your deployment moves to Login V2, deactivate the Login V1 identity provider and activate the Login V2 one. The provider name is the SSO login button label, so rename the activated provider to match the label you want your users to see. Your Fiddler representative coordinates the timing.
## Enable Group Sync
Fiddler maps identity provider group **names** to Fiddler teams and roles — see [Mapping AD Groups to Fiddler Teams](/reference/access-control/mapping-ad-groups-to-fiddler-teams) for the naming convention. Google Workspace emits group names, so no additional translation is needed — but group membership is not included in the assertion unless you explicitly configure it.
1. On the app's *Attributes* page, find the *Group membership (optional)* section.
2. Search for each group that should be sent to Fiddler and add it. Only the groups you list here are emitted, and only for users who belong to them.
3. Set the app attribute name to `groups`.
4. Select *Save*.
Each group must be added individually — there is no option to send all of a user's groups. If a group is renamed in Google Workspace, you must re-enter it in the *Group membership* field, or the new name is not sent in the SAML response.
Google limits a SAML response to 75 group names. Listing only the groups Fiddler needs keeps you well under this limit.
## Getting Help
If sign-in fails, review the Google SAML log events (*Reporting → Audit and investigation → SAML log events*) for the failed attempt and its reason. Google documents the causes of each error in [SAML app error messages](https://knowledge.workspace.google.com/admin/apps/saml-app-error-messages).
If users sign in but land in no team, confirm the group membership mapping is configured and that group names carry the prefix Fiddler expects — see [Enable Group Sync](#enable-group-sync).
For Fiddler-side issues, see the [SSO Authentication Guide](/reference/access-control/sso-authentication-guide). If the issue persists, contact your Fiddler representative with the specific error message.
## Important Notes
* **Data Storage**: Fiddler stores the following profile attributes from Google Workspace: first name, last name, display name, email address, and group memberships (used to map users to Fiddler teams).
* **API Access**: For programmatic API access, users create an API key from the *Credentials* tab in Fiddler's *Settings* page.
* **Single Authentication Method**: Users can only authenticate via either SSO or email authentication, not both.
* **Certificate Expiration**: The Google SAML signing certificate expires after five years. Because Google publishes no metadata URL, rotating it also requires pasting the new metadata into the identity provider — Fiddler cannot refresh it automatically.
## Next Steps
After successful integration:
* **Train Users**: Provide guidance on accessing Fiddler through Google Workspace SSO.
* **Configure Teams**: Map your Google groups to Fiddler teams — see [Mapping AD Groups to Fiddler Teams](/reference/access-control/mapping-ad-groups-to-fiddler-teams).
* **Test Group Sync**: Verify automatic group synchronization is working as expected.
* **Monitor Usage**: Review authentication logs and set a reminder for signing certificate expiration.
The first user to sign in to the Fiddler application is automatically assigned the Fiddler Org Admin role; subsequent members are Org Members by default.
## Add a Second Integration for Login V2
The Google app and identity provider configured above serve Login V1. Fiddler is moving to Login V2, which uses a different ACS URL, so set up a second Google app with its own identity provider now. The second pair stays inactive until your deployment switches over.
In the AuthN console, add a second SAML identity provider using the same placeholder *Metadata XML* value and the same optional settings as the first. Give it a name that distinguishes it from the first, e.g. `Google SAML V2`, so the two are easy to tell apart in the Identity Providers list.
Do not activate this identity provider. An active second provider adds a second SSO button to the Fiddler sign-in page.
Save the provider, open it, and copy its *ZITADEL Metadata URL* and *ZITADEL ACS Intent API URL*. Both differ from the first provider's because they carry a different identity provider ID, which is what gives the second Google app its own Entity ID — two Google apps cannot share one.
Create another custom SAML app with a name that distinguishes it, e.g. `Fiddler IdP Example - Login V2`, and download its metadata. On the *Service provider details* page, set *ACS URL* to the second provider's *ZITADEL ACS Intent API URL* and *Entity ID* to its *ZITADEL Metadata URL*.
Apply the same attribute mappings and group membership configuration as the first app, then turn *User access* on for the same users and organizational units.
Base64-encode the second app's metadata file with the same command used earlier, then return to the second identity provider, clear the *Metadata XML* text area, paste the encoded value, and save. Leave the provider deactivated.
Nothing else changes. The action script, its trigger, and the organization metadata are set at the organization level and apply to both providers.
When your deployment moves to Login V2, deactivate the Login V1 identity provider and activate the Login V2 one. The provider name is the SSO login button label, so rename the activated provider to match the label you want your users to see. Your Fiddler representative coordinates the timing.
## Enable Group Sync
Fiddler maps identity provider group **names** to Fiddler teams and roles — see [Mapping AD Groups to Fiddler Teams](/reference/access-control/mapping-ad-groups-to-fiddler-teams) for the naming convention. Google Workspace emits group names, so no additional translation is needed — but group membership is not included in the assertion unless you explicitly configure it.
1. On the app's *Attributes* page, find the *Group membership (optional)* section.
2. Search for each group that should be sent to Fiddler and add it. Only the groups you list here are emitted, and only for users who belong to them.
3. Set the app attribute name to `groups`.
4. Select *Save*.
Each group must be added individually — there is no option to send all of a user's groups. If a group is renamed in Google Workspace, you must re-enter it in the *Group membership* field, or the new name is not sent in the SAML response.
Google limits a SAML response to 75 group names. Listing only the groups Fiddler needs keeps you well under this limit.
## Getting Help
If sign-in fails, review the Google SAML log events (*Reporting → Audit and investigation → SAML log events*) for the failed attempt and its reason. Google documents the causes of each error in [SAML app error messages](https://knowledge.workspace.google.com/admin/apps/saml-app-error-messages).
If users sign in but land in no team, confirm the group membership mapping is configured and that group names carry the prefix Fiddler expects — see [Enable Group Sync](#enable-group-sync).
For Fiddler-side issues, see the [SSO Authentication Guide](/reference/access-control/sso-authentication-guide). If the issue persists, contact your Fiddler representative with the specific error message.
## Important Notes
* **Data Storage**: Fiddler stores the following profile attributes from Google Workspace: first name, last name, display name, email address, and group memberships (used to map users to Fiddler teams).
* **API Access**: For programmatic API access, users create an API key from the *Credentials* tab in Fiddler's *Settings* page.
* **Single Authentication Method**: Users can only authenticate via either SSO or email authentication, not both.
* **Certificate Expiration**: The Google SAML signing certificate expires after five years. Because Google publishes no metadata URL, rotating it also requires pasting the new metadata into the identity provider — Fiddler cannot refresh it automatically.
## Next Steps
After successful integration:
* **Train Users**: Provide guidance on accessing Fiddler through Google Workspace SSO.
* **Configure Teams**: Map your Google groups to Fiddler teams — see [Mapping AD Groups to Fiddler Teams](/reference/access-control/mapping-ad-groups-to-fiddler-teams).
* **Test Group Sync**: Verify automatic group synchronization is working as expected.
* **Monitor Usage**: Review authentication logs and set a reminder for signing certificate expiration.